

It’s been a while since I’ve shared a crochet project…
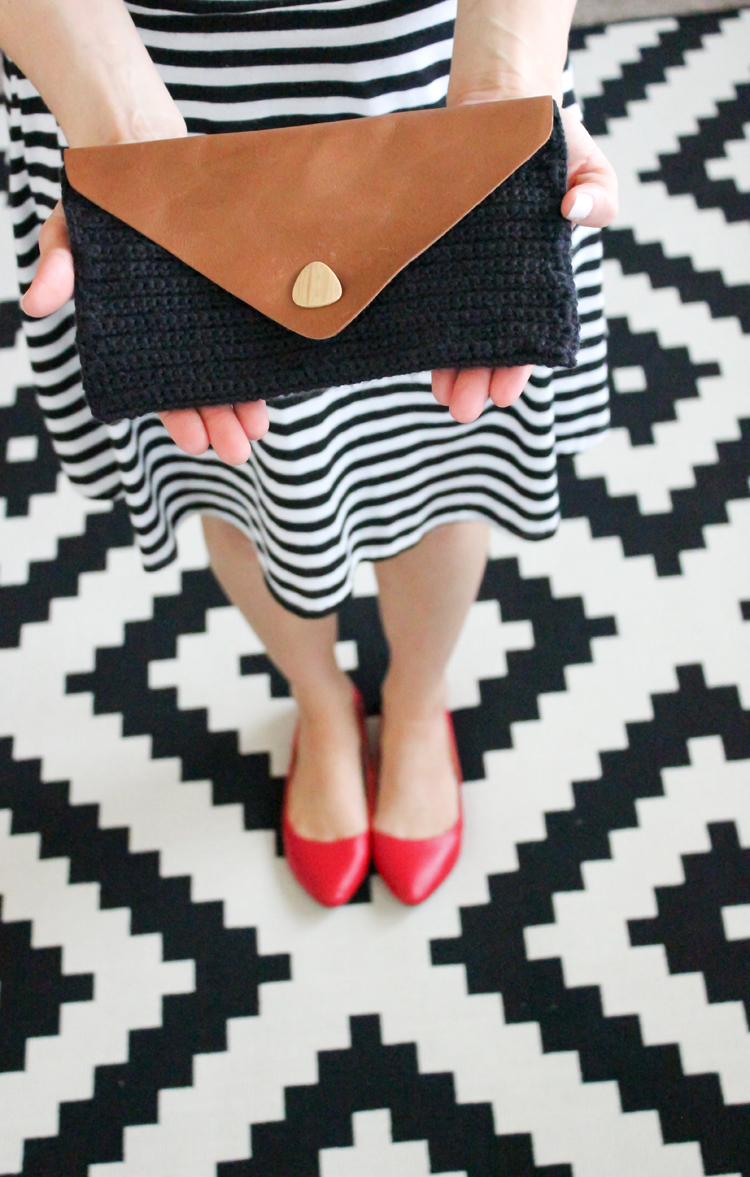
It combines two things I love: crochet texture and leather.

Yummy. 🙂
If you are a regular reader, than you know I have an ongoing crochet series called Hip Hooks. If you are new to crochet, I started in the Fall with some very beginner projects and patterns and have worked up to more difficult ones like this one. It is still a beginner project, but takes just a little bit more time and patience.
You need to know how to:
slip knot, chain, single crochet, weave in ends
We will also cover how to do a sc bl stitch, which means you will be single crocheting in the back loops only at certain points in the tutorial.
Materials:
Scrap piece of leather or vinyl about 8×10 inches* leather punch or Dritz eyelet punch tool medium worsted weight yarn F hook (3.75 mm) sharp scissors 1 inch button hand sewing needle and thread* You can use an old purse or jacket, buy vinyl by the yard at JoAnn. The source for the leather in this tutorial is the Leather Hide Store (see THIS post for more information and other projects)
Gauge: 22 sc x 25 rows = 4×4 inch square
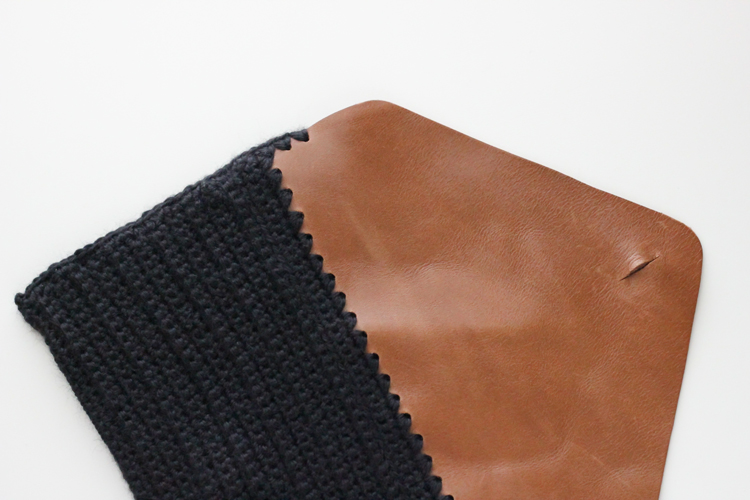
PREP THE LEATHER FLAP
Download my FREE pattern HERE for the leather flap.
Cut out the paper pattern, trace it onto your leather and cut that out.
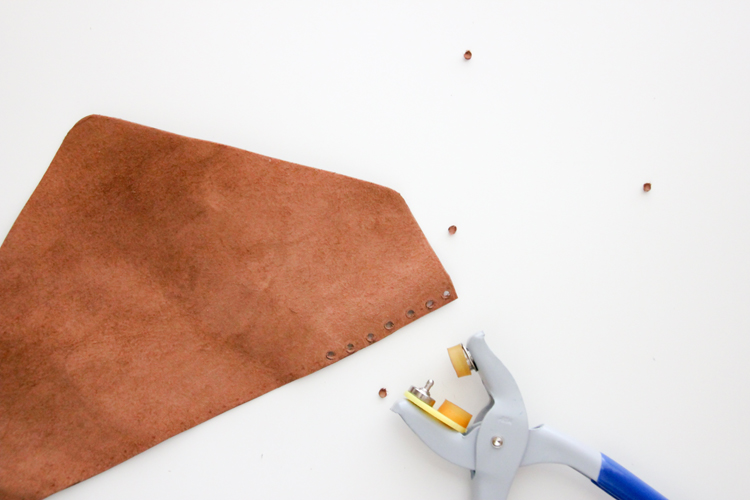 Punch 25 holes evenly across the straight edge of the flap and two holes up the sides of the flap, on each side.
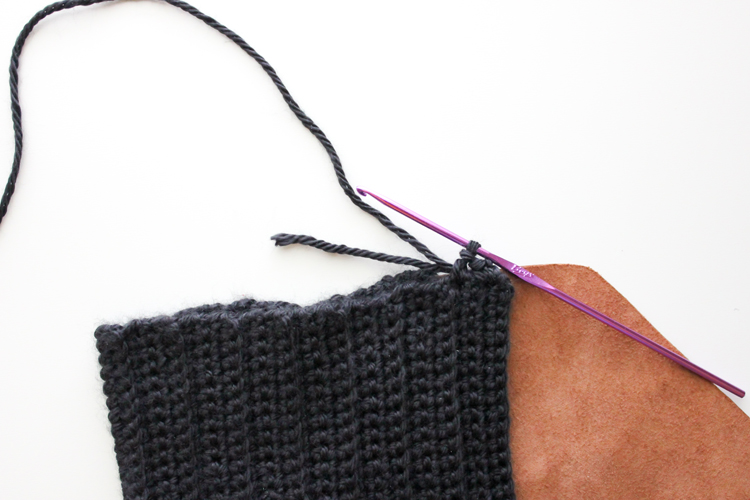
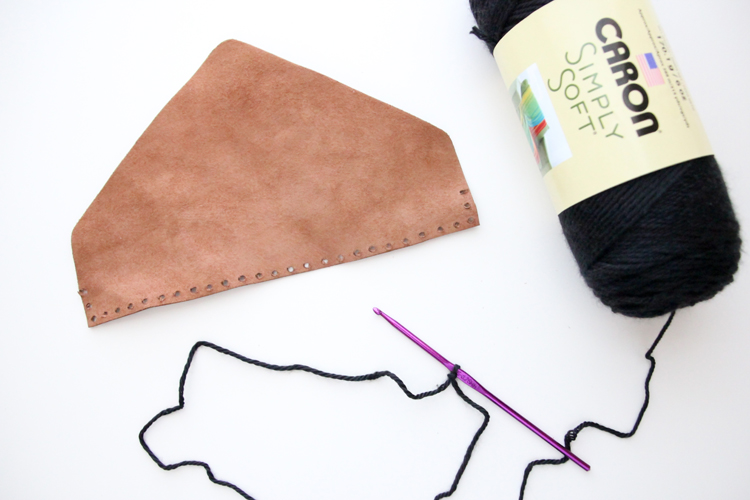 Prepare your hook. Now, you will begin by single crocheting (sc) into the leather holes along the straight edge.
CROCHET THE CLUTCH
Start at one corner…
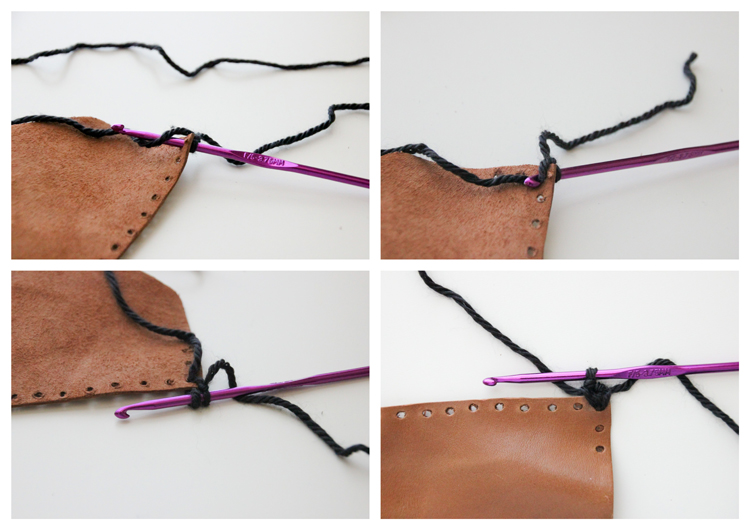 …and crochet into each hole twice until you reach the other side. This is your foundation row.
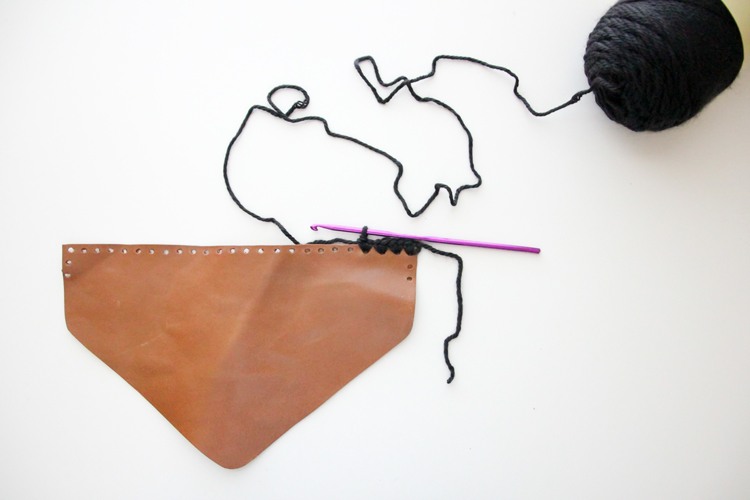
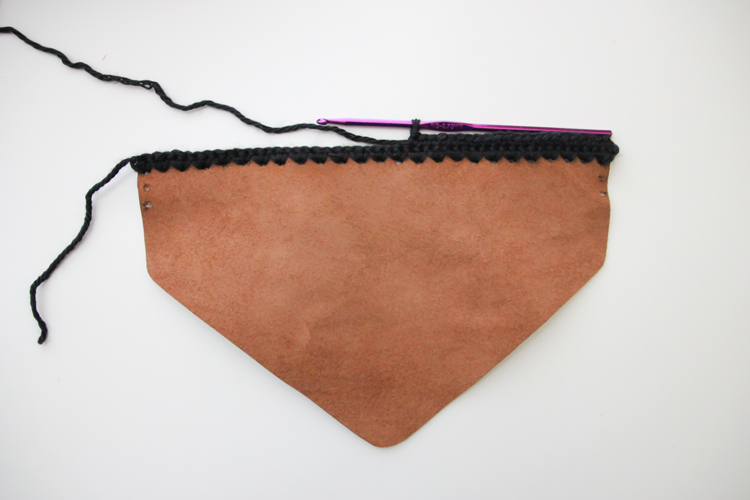 Chain one at the end, turn and sc crochet three more rows of 50 sc. (if you prefer a traditional pattern format, scroll to the end)
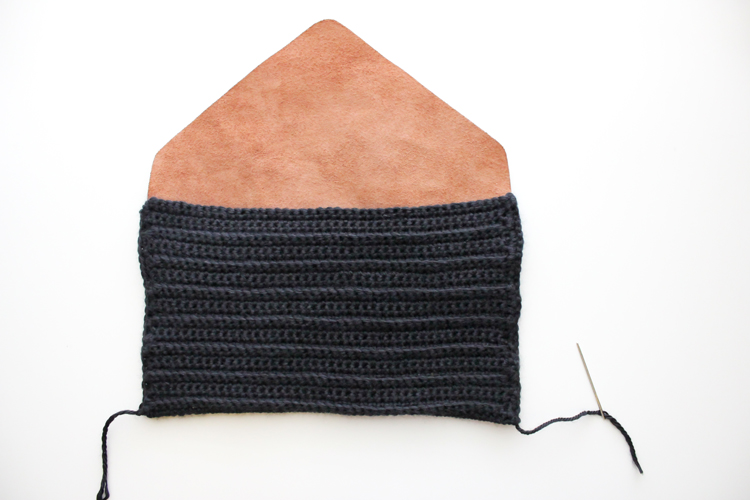
On the fourth row (not including the foundation row), you will crochet into the back loops only.
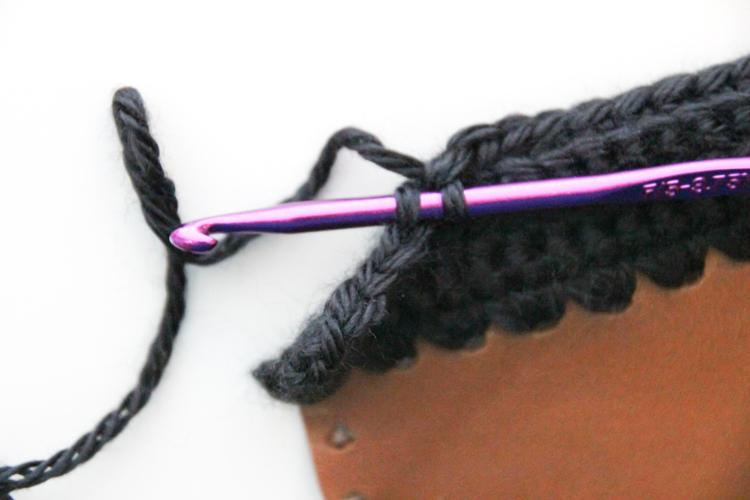
Typically you would slide your hook under two top loops, but this time, you will only pick up the back loop. This helps create a nice texture for the outside of the clutch. It can be a little tricky to get the hang of, but one you get going, it gets easier.
Do the sc bl stitch for the remainder of the row, ch 1 and then turn. Sc three rows of 50, then sc bl another row. You will continue this pattern of 3 rows of sc and 1 row of sc bl, 12 more times or a total of 14 times.
Do not tie of your yarn when you get to the end of the pattern. Instead, pull the loop out far enough, so your work doesn’t accidentally get pulled out.
BLOCKING
Now, this is optional, but I am going to show you how to block your work.
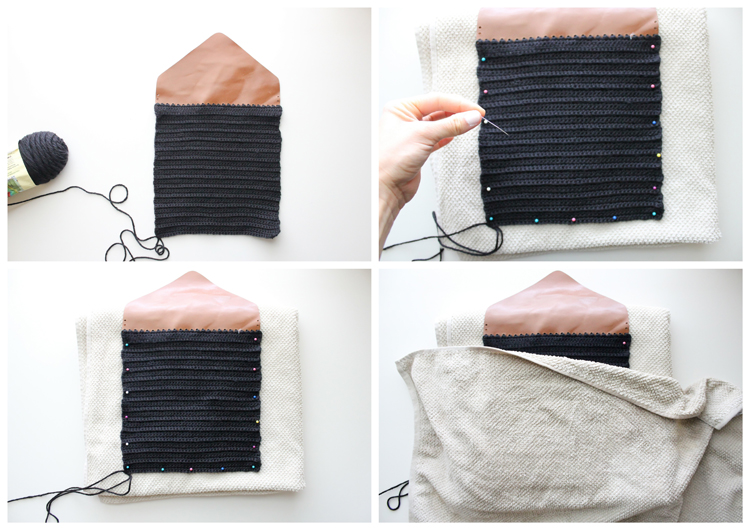
Blocking is essentially knitting and crochet’s version of ironing. There are several ways to block crochet and knitted items, but the idea is basically setting the shape of whatever you just made so it ‘s not warped and so it lays nice and even.
For this damp or cold method (which is great for a yarn that has acrylic in it), fold a large towel into eighths. Lay your clutch on top of the towel. Shape your clutch how you want it and then pin it into place. Add a damp towel over the top. Once the towel is dry, then your work should be set. You may also want to spray the project directly with a spray bottle of water. Once it’s dry, it’s blocked. (The result is less obvious in these pictures, but it definitely makes it easier to work with)
CROCHET THE CLUTCH TOGETHER
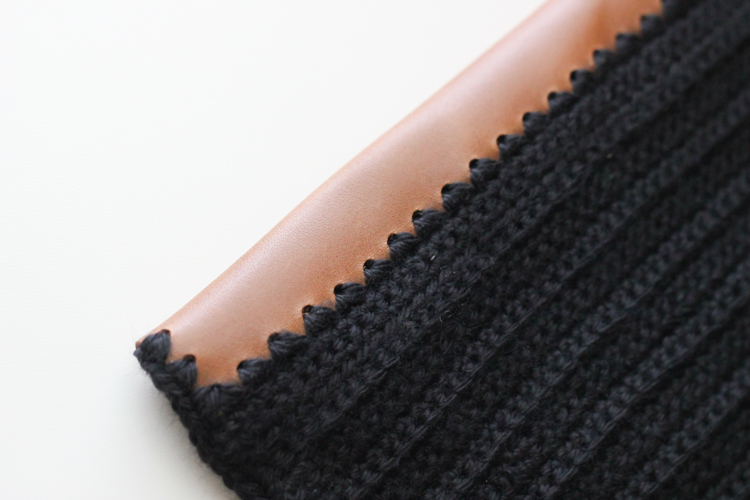
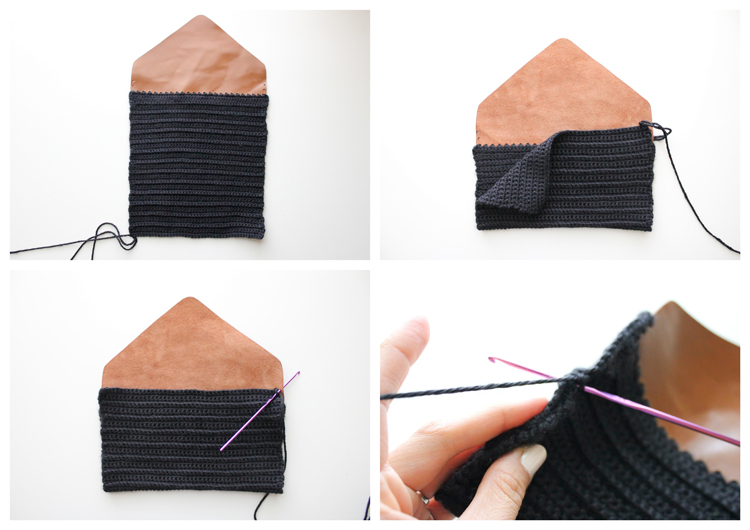 Now, let’s bring the clutch together. Fold the bottom up, so that the right side of the leather faces out. Make sure that the bottom overlaps the inside of the leather flap about one inch, and matches up to the two side holes you made earlier. Check to see that the back loop stripes match up on the sides as well.
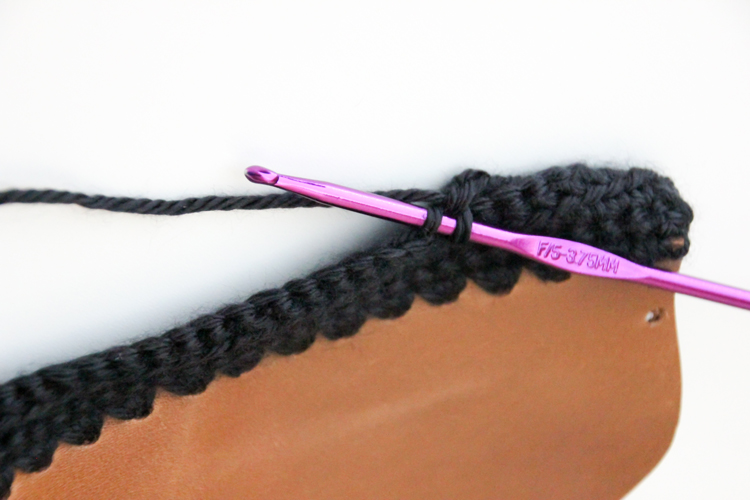
Single crochet twice into each of the side holes, and then sc into the matched up rows down to the bottom. Tie it off.
Sc along the other side, weaving the tail in as you go, tie it off.
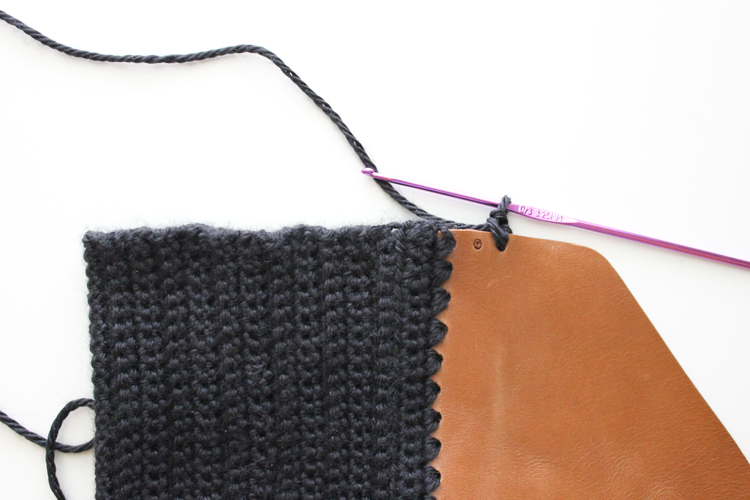
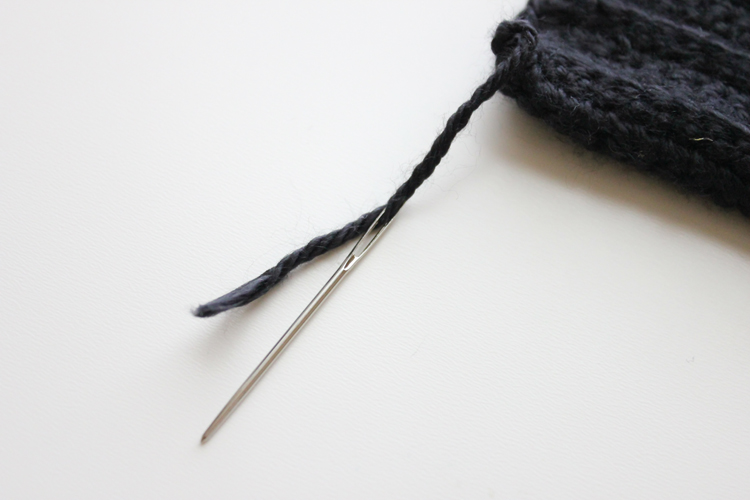 Using a yarn needle with a large eye, weave in the the ends.
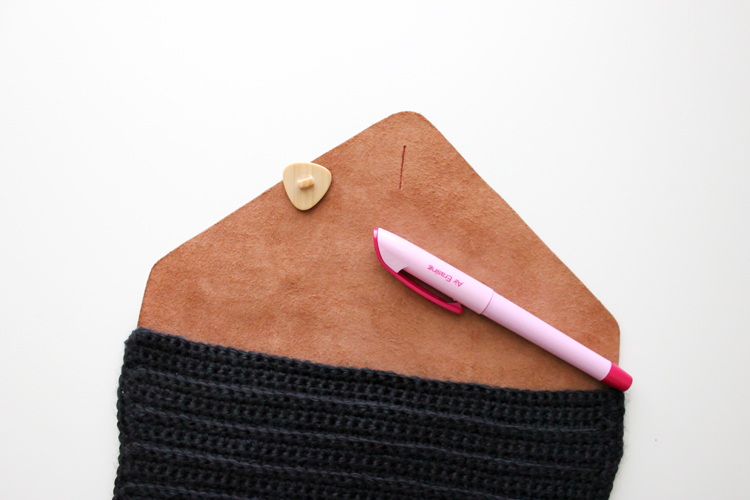
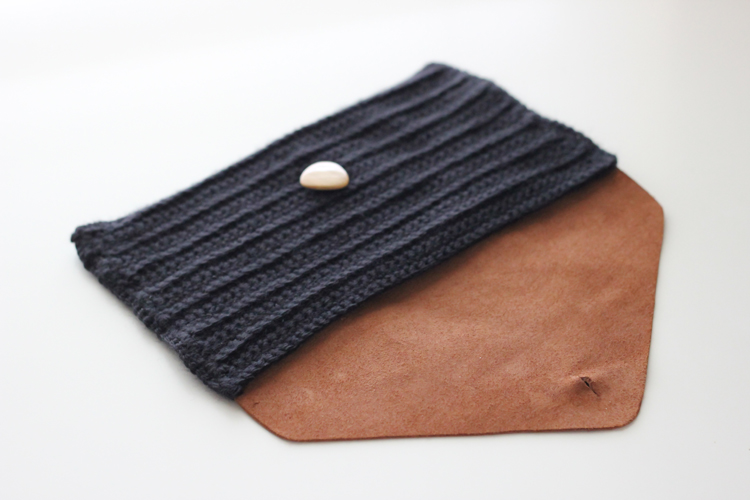
Take your button and draw a line exactly the height of the button onto the wrong side of the leather flap, with a fabric or air erasing marker (mine is from the Ribbon Retreat). You don’t want to or need to make it larger, because the leather stretches to accommodate the button.
Using sharp scissors, carefully cut the button hole line you just created.
Now, fold the flap over and mark the middle of the button hole with a pin. Open up the flap, letting the pin pass through the button hole. This is where you need to hand sew your button on.
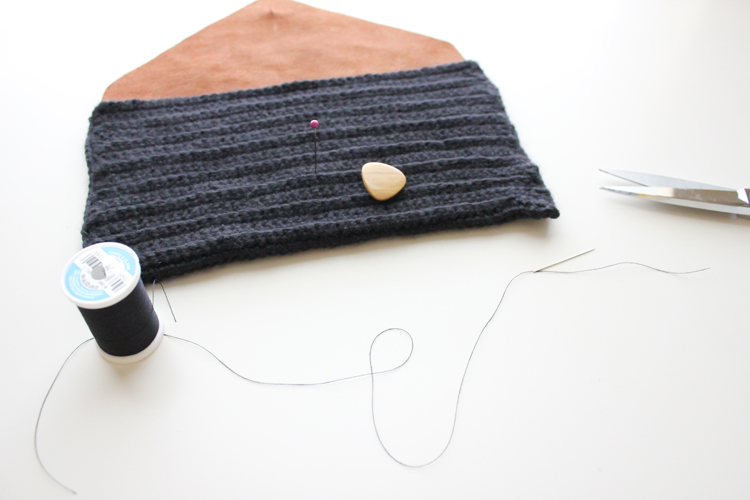
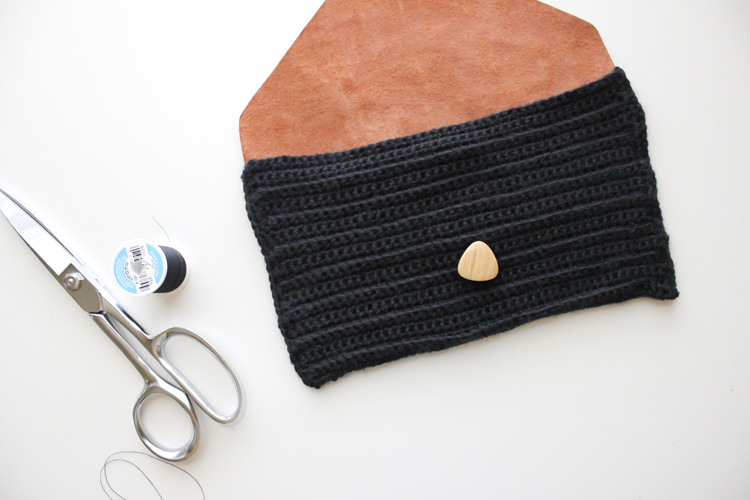
Be sure to only sew through the top layer, so the clutch remains functional.
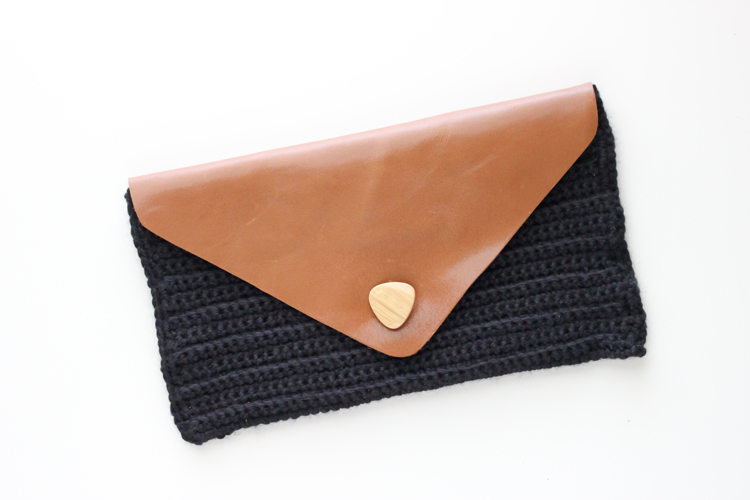
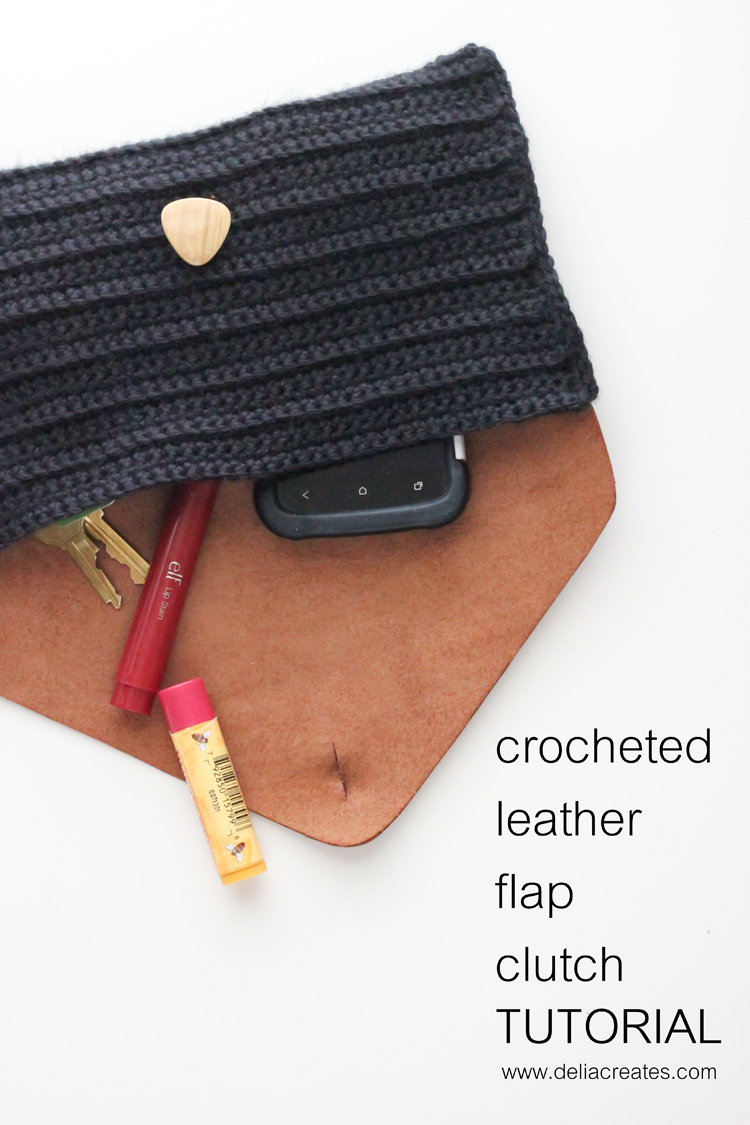
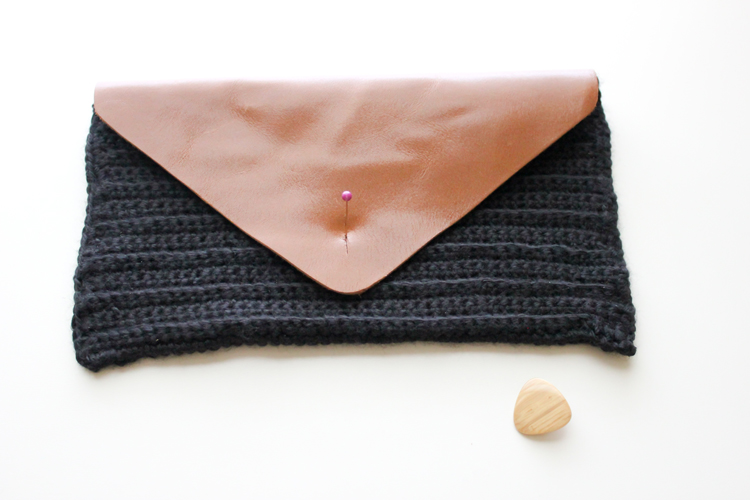
All done!
Here is how the back looks:
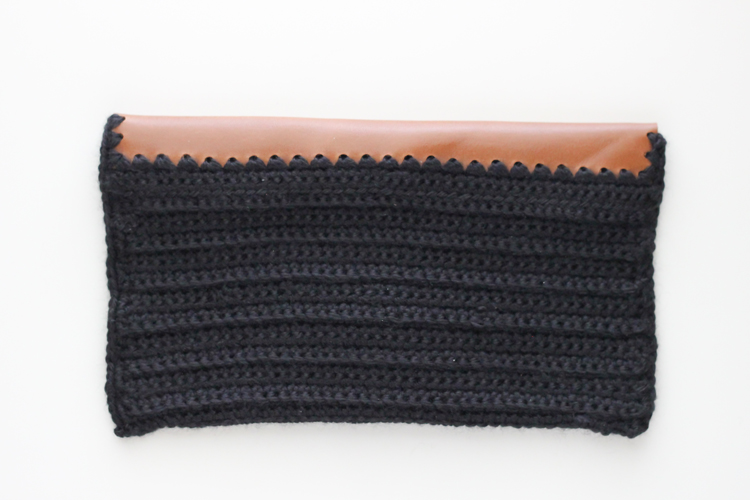
Kind of cool right?
 Here is the project in pattern format for your convenience:

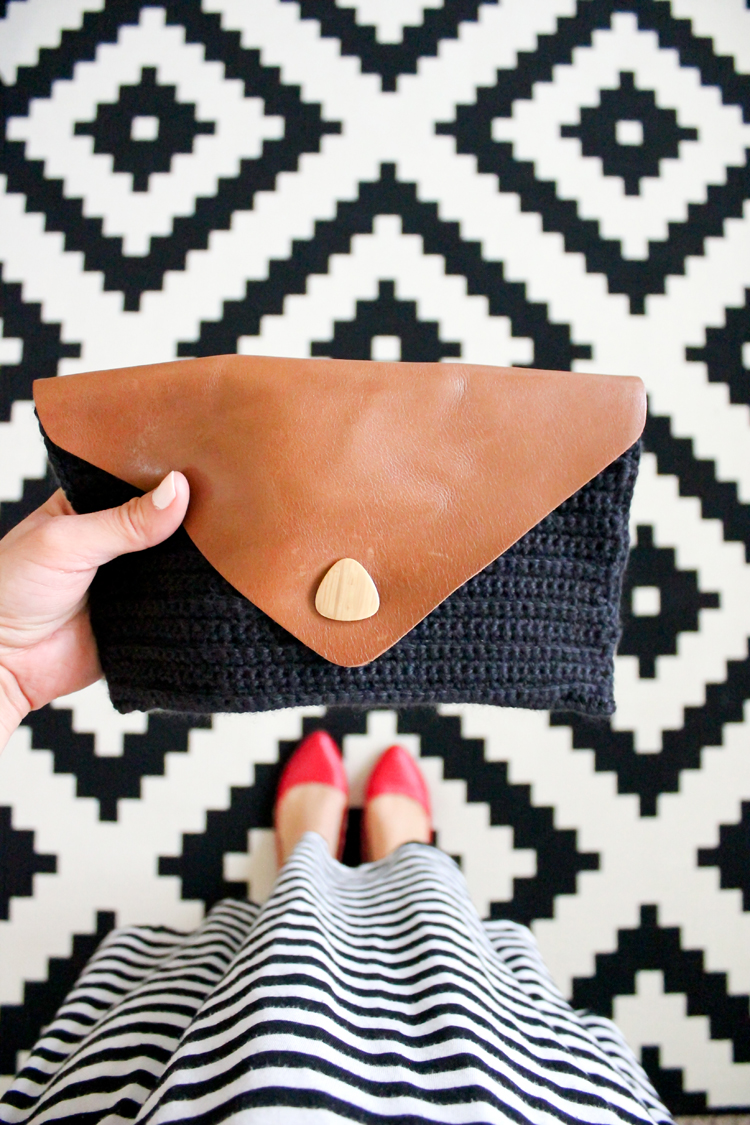
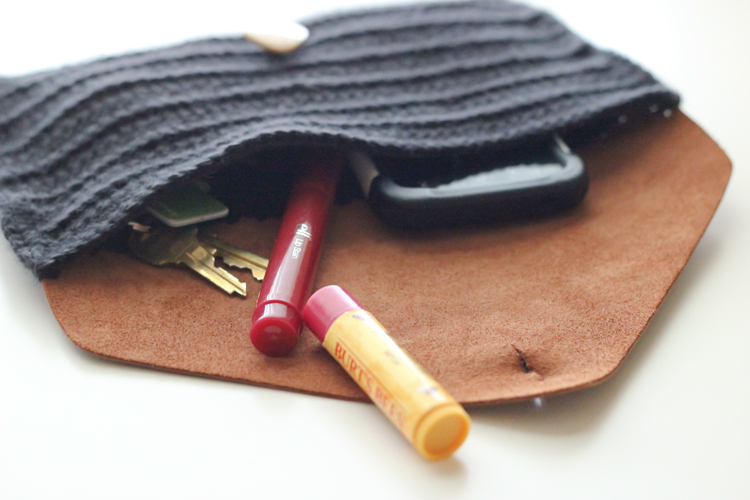
The finished clutch is about 9 x 5.25 inches.
Not a heavy hitting diaper bag 😉 but great for carrying around small essentials.
For more crochet projects, check out my crochet archives page HERE.
Have an awesome weekend! 🙂
this is so pretty delia! Makes me want to learn crochet. 🙂 And you must stay up all night getting these wonderful instructions done!
ha. yep. I did! 😉 Thanks Anna.
This is the cutest and coolest thing I have ever seen. You are amazing!!!
Thank you so much Ashley!
It turned out so lovely! I love the leather with the crochet……such a pretty combo. Your tutorial is great! Hope to get some leather and try it out soon
Thanks Leigh Anne!
Beautiful!
Thank you Janet!
amazing delia!
You are so kind. Thank you Charissa!
So cool!!
Thanks Mary. 🙂
I gasped when I saw this! Time to learn to crochet. I <3 you so much, Delia.
aw. thanks Adela! 🙂 Anneliese’s tutorials (links I share at the beginning) are super helpful in helping you to get started.
I love this! Such a genius idea! 🙂
Thank you Erin! 🙂
Another beautiful project! And your photography! So on – brand. Love it.
Very nice. Where did you get your leather? Can you get it at the regular old Joanns?
Thanks,
Kelley
Thanks Kelley!
I got it from the Leather Hide Store. You can use an old thrift-ed purse, vinyl from Joann, or even leather from Hobby Lobby. I don’t believe Joann carries leather. Let me know if you have any other questions! 🙂
You are keeping me busy with crochet! I’m working on your crochet infinity scarf now, and I’m thinking this might have to be next. Thank you for feeding my new-found love of crochet.
Awesome! I am so glad you are enjoying crocheting through this cold winter! 🙂
Would punching work for regular fabric, too? Do you know? I ADORE the look of this pattern!
It may if you sew a stiff interfacing to it, or apply Phoomf to it. It’s at Jo-Ann…two sided sticky filler wonder. Stick fabric to both sides, and cut it out. You should be good to go. 🙂
That is lovely. =)
Thank you Charity. 🙂
Gorgeous! And to think I almost passed up that floor length leather skirt at the .50 sale. So glad I grabbed it! Thank you so much for sharing!
goodness. i am so glad you didn’t either! what a steal!
AH! I love, love, love this. I have been wanting to do something with leather and crochet for a while. Thanks for the inspiration!
This is awesome I love it 🙂
I’m SO going to make this! It’s really cute and so easy! I’d never thought of it, but it’s so simple 😀
This is genius. The colors and textures work so well together!
What do you mean by gauge 4 x 4 inch square. What part of the clutch is that? Thanks
LOVE LOVE LOVE LOVE THIS!! Thanks so much for sharing! 🙂
Dom.
Craftedblog.com
What a pretty pattern! Thank you very much for posting! :). 🙂
________
Lee Ann
Crochetgottaloveit.blogspot.com
Thanks Lee Ann!
Question. I’m working on this right now.. when I crochet two stitches into the foundation row the following rows end up being really wonky/ripply. Did you have this problem and the blocking corrected it?
I pulled it out and did one stitch in each foundation hole and it lays flat that way. I’m wondering if it could be that my holes are bigger and therefore closer together causing the wavey effect.
Good question Courtney! It does sound like your holes could be bigger. I say make whatever adjustments you need to make so that it is not wavy, then complete the rest of the clutch to fit the dimensions of your flap. You just want to be sure your gauge is tight enough for the stitches to be nice and dense for the clutch. I hope that helps! If worse comes to worse, you may need to start over with a new flap?
Thank you! It does help. I figured it was probably the bigger holes causing the waves, just wanted to be sure.
I’m waiting for it to dry now (after blocking) and I think its going to be just fine. Can’t wait to get it finished! Thanks for a great tutorial.
It’s beautiful, Delia! Thanks for the wonderful and generous tutorial! I have a question here, what type of leather should i use for sewing? How to choose the “easy-to-work-with-leather”? Thanks again. I really enjoy reading your marvelous blog =)
Thanks Kate! An easy to work with leather would be something not too thick but with enough body to work as a flap. You don’t want something too flimsy, but definitely stay away from vegetable tan leather which can be really stiff. An old leather bag or jacket that you don’t mind upcycling, works great. It can even be pleather. I hope that helps? Let me know if you have any more questions.
<3
Thank you so much for this pattern, it’s lovely! 🙂 I’m still a beginner when it comes to crochet, but I managed to finish the clutch today.
Here are some pictures:
http://shrani.si/f/3c/4p/eWZafos/img20150823124813562.jpg
http://shrani.si/f/6/cj/1BPUZy7H/img20150823124740998.jpg
It’s not quite as pretty as yours (and I can’t really take pictures that well), but I’m proud nonetheless 🙂 Thanks again, xx
Oh my goodness, it’s lovely! I really love the colors you chose. So clean and classic. Thank you for sharing your pics with me! I am so glad you like the pattern. <3
I am thoroughly enjoying your expressions of creativity. The mixture of textures makes this clutch super chic. Thanks so much for sharing !
Thank you Angel! That is so kind of you to say.
Hi Delia,
I was working the pattern, but I couldn’t get the foundation row connecting the leather and the bag to be pretty and even. Instead of straight rows flowing from the beginning leather, my foundation row and therefore every row after seemed to fan out and looked unappealing. Any words of advice?
Also thanks for the pattern, it’s lovely! Perfect for my purposes.
Emily, that foundation row can be a bit tricky. I feel for you! It could be a few things… I’m just going to list a bunch of possibilities to see if any of them help. It may be that the holes are too close together. You can remedy this by going down a hook size and working a tighter gauge throughout the piece. Or you can start over with a new flap. If the work is fanning out, it may also be that the row count is off. It can feel tedious, but counting the stitches for each row can keep things nice and square. That said, the first row should look a little bumpy, if the leather is flexible, but it should even out as more rows are added. I hope that helps. If not, please reach out again and I’ll try to help trouble shoot with you some more. You can comment here or email me: [email protected]
HELP! I found your pattern on pinterest but it is buckling like crazy within the first few rows. It seems as if there are way too many stitches for the size of the leather. Did this happen to you or anyone else??
I am so sorry to hear that. Before wet blocking the purse, it does scrunch up a little bit. From what you described, it sounds like more than a little bit. You may need to re-do the flap and adjust the spacing of the holes. It also helps to loosen up your tension. I hope that helps! Please me know if you have any more questions and I’ll see if I can help you trouble shoot. <3
Hi, I would like to make this with some home spun wool i have and was wondering how much yardage you used. I am going to dye it and dont want to dye too little and have it be off.
Hi Jess! Great question. My apologies for not including that. This is one of my earlier patterns so I am going to have to guess about 100 yards. That is not exact though. If you want to be sure you have enough, I suggest more like 130-150 yards, just in case. It’s not a large piece, but it is worked with a smaller hook and tighter tension. I wish I could be more exact for you, but I hope this helps.