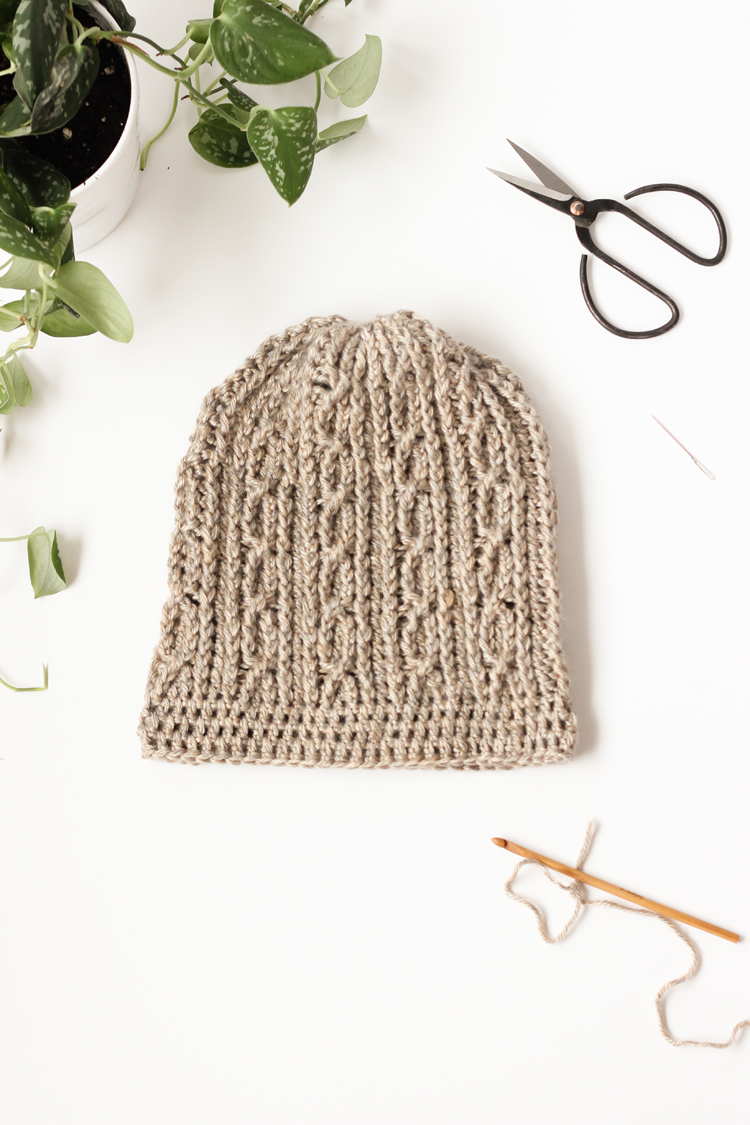
Yesterday, I released my Ashton Beanie Crochet Pattern, and today I’m sharing a free beanie pattern!
It sports cables just like the Ashton Beanie, but it’s a less complicated cable and the hat comes in just one Adult Medium/Large size.
I call it the Skip Twist Cabled Beanie Pattern because of the way the cables are worked up. You’ll see, you’ll see…
Let’s get to it!
UPDATE: If video is more your speed, I have a video HERE.
MATERIALS
- I/9 or 5.5 mm hook
- Worsted Weight Yarn – 5 oz, 142 g, 250 yds.
- Yarn Needle
- Scissors
ABBREVIATIONS
- ch – chain
- sl st – slip stitch
- dc – double crochet
- fpdc – front post double crochet
- fptc – front post triple crochet
GAUGE
- 14 stitches x 12 rows = 4 x 4 inch square (10 x 10 cm)
- 14 chain = 4 inches (10 cm)
NOTES
Yarn –
Worsted weight yarns can vary between brand and type. For example, this Vanna’s Choice brand is thicker than this Heartland yarn even though they are both manufactured by Lion Brand. This pattern was designed using a thinner, softer worsted weight yarn. If you use a standard worst weight yarn like Vanna’s Choice or Red Heart then you may need to adjust hook size to maintain gauge, and the resulting hat may have more slouch in the back.
Tutorials –
Before we get into the pattern (scroll to the end), we’ll cover the looped foundation row, crocheting in the chain space, how to complete the cables, and how to finish the hat.
TUTORIALS
Looped Foundation Row
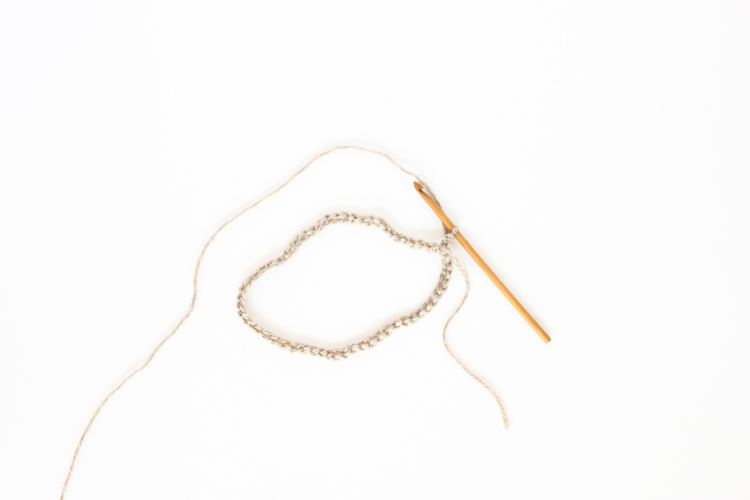 This hat is worked in a looped foundation row, which means, you will slip stitch the end of your chain into the first chain to finish the row. There is no turning. Just finish each row with a sl st and then ch 3 for the next row.
Crocheting In The Chain Space
Instead of inserting your hook under the top loops of the previous stitches, you will insert you hook under all the stitches in what is called the “chain space.”
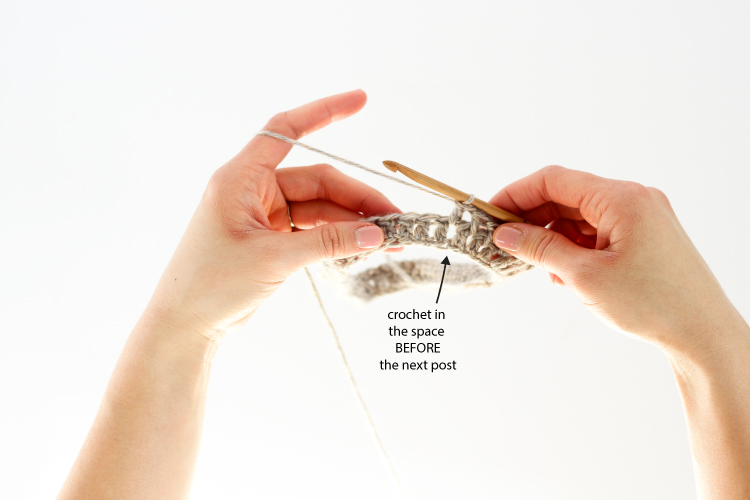 Note: When completing a normal dc in the chain space, you will work the stitch before the next post. This may look wrong, as it will sometimes look like you are working in a stitch you already worked (especially after a fpdc), but as you work more stitches it will pull everything to the left so it looks “right.”
Front Post Double Crochet
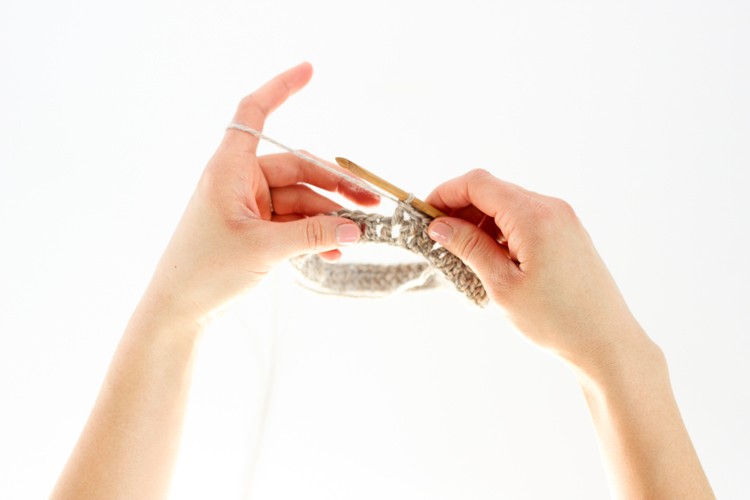
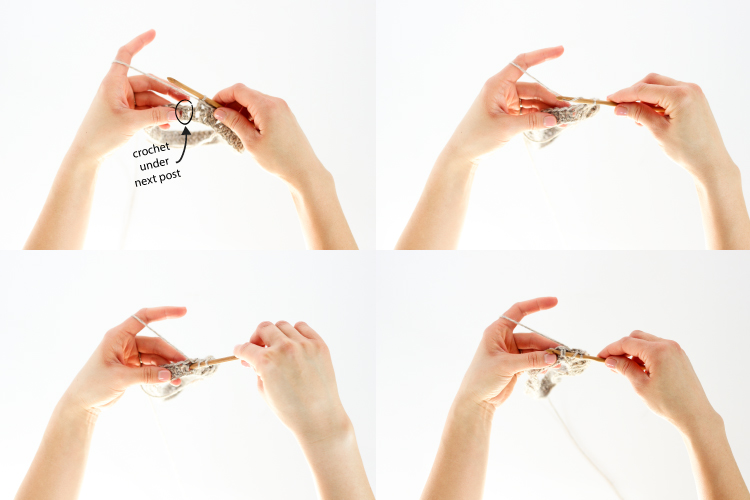
Insert your hook under the post of the stitch from the previous row. This pulls the post forward, creating texture.
Note: A front post triple crochet, is worked the same way, except you will complete a triple crochet stitch instead of a double crochet stitch.
Cabling
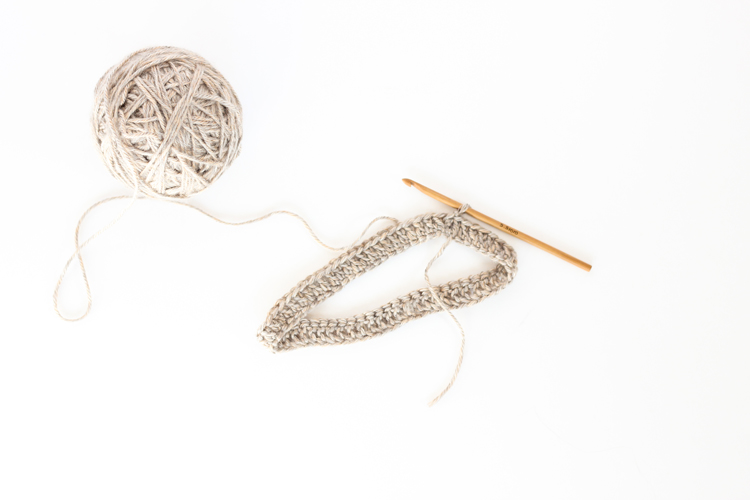
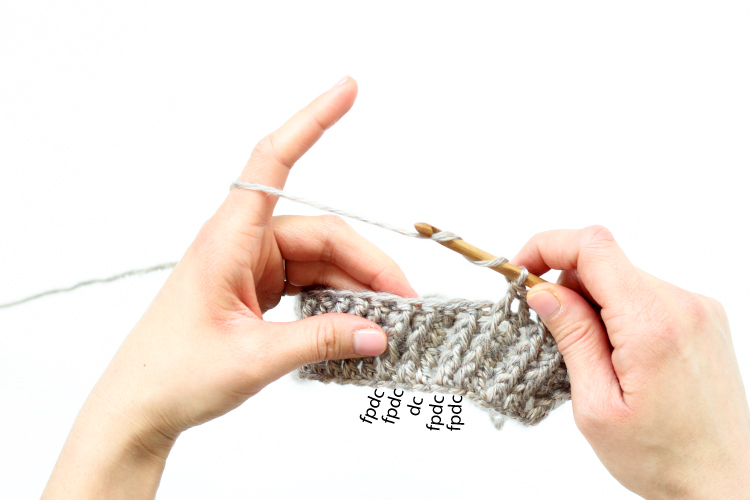
At this point, you will have built up several rows that show a good pattern of fpdc, fpdc, dc, fpdc, fpdc and so on.
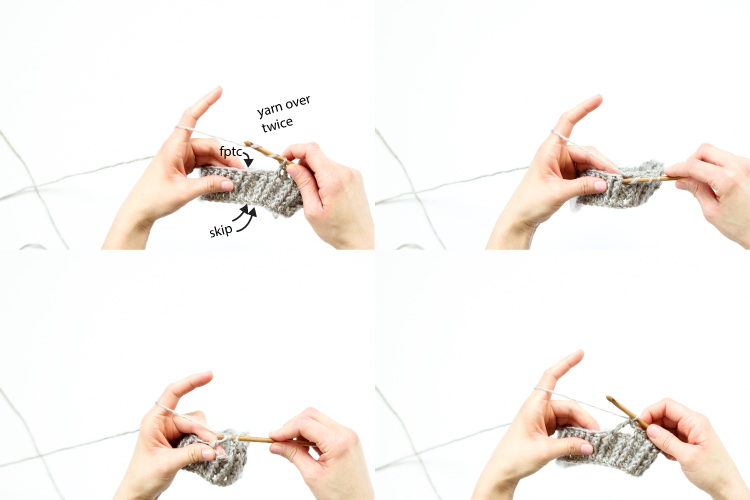
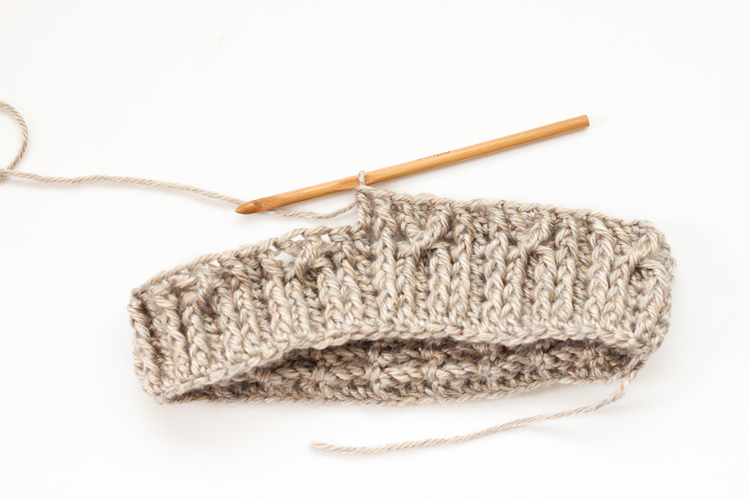
Now, we are going to start pairing two fpdc groups together for each cable. Work one fpdc, then skip the next fpdc, and the dc. Yarn over twice, and insert your hook under the post of the next fpdc. Complete a fptc.
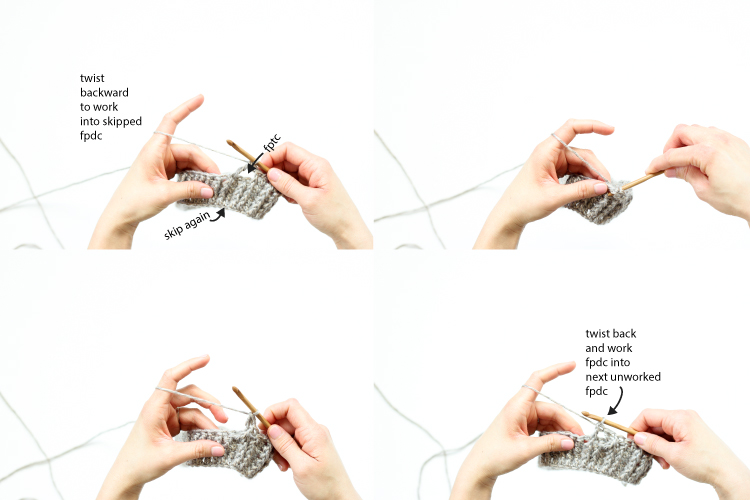
Now, twist back to the stitches you have skipped. Skip the dc again, and work a fptc into the first skipped fpdc. Make sure to twist away from your body, so the stitch is worked behind your first fptc. That twice skipped dc will remain skipped until the next row.
To complete the cable, reach back over to the left and work a fpdc into the next fpdc stitch. Dc in the next, and then start a new cable group.
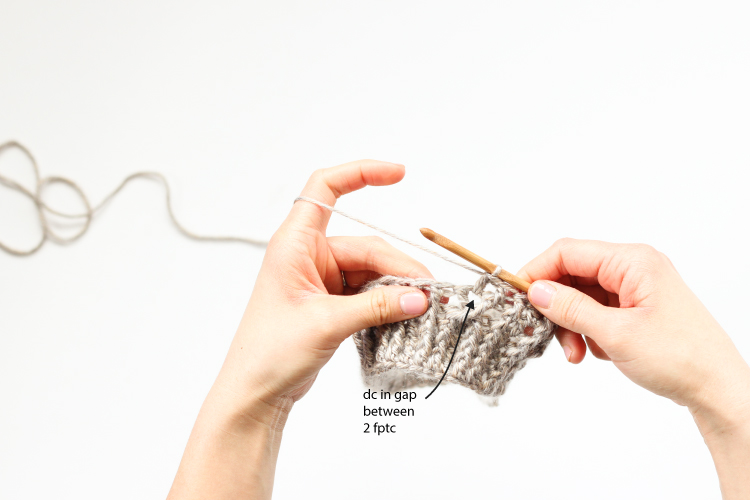
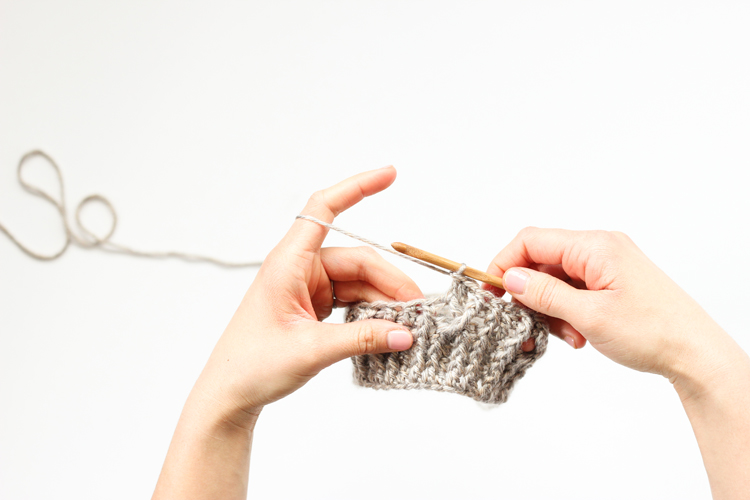
The cable isn’t quite complete until you finish the next row, which consists of the same fpdc and dc you completed at the beginning of the pattern. The only change, is that when you get to the gap between the twisted fptc, you will insert a new dc in that space. Thus reinstating that dc that was skipped twice in the previous row.
Finishing the Hat
Once you have completed the pattern…
Weave in all loose ends.
Ch 60. Sl st into beginning chain, forming a looped row.
Row 1: Ch. 3, dc into each stitch around, sl st into top of ch 3. (60, including ch 3)
Row 2: Ch 3, *2fpdc, dc.* Repeat from * to * 18 times, 2 fpdc, sl st to the top of ch 3. (60)
Rows 3-5: Repeat Row 2.
Row 6: Ch 3, *fpdc, skip two stitches (fpdc, dc) and fptc into next fpdc stitch. Twist back and fptc into 1st skipped fpdc stitch, leaving the skipped over dc stitch unworked. Cross our 1st fptc and fpdc in next, dc.* Repeat from * to * 8 times. fpdc, skip two stitches (fpdc, dc) and fptc into next fpdc stitch. Twist back and fptc into 1st skipped fpdc stitch, leaving the skipped over dc stitch unworked. Cross our 1st fptc and fpdc in next, sl st to top of ch 3. (50)
Row 7: Ch 3, *2 fpdc, dc in the space between the two twisted fptc from previous row. 2 fpdc, dc.* Repeat from * to * 8 times. 2 fpdc, dc in the space between the two twisted fptc from previous row. 2 fpdc, sl st to top of ch 3. (60)
Row 8-9: Repeat Row 2.
Row 10: Repeat Row 6.
Row 11: Repeat Row 7.
Row 12-13: Repeat Row 2.
Row 14: Repeat Row 6.
Row 15: Repeat Row 7.
Row 16-17: Repeat Row 2.
Row 18: Repeat Row 6.
Row 19: Repeat Row 7.
Row 20-21: Repeat Row 2.
Row 22: Repeat Row 6.
Row 23: Repeat Row 7.
Row 24-25: Repeat Row 2.
Row 26: Repeat Row 6.
Row 27: Repeat Row 7.
Row 28: Repeat Row 2.
Row 29: Ch 3, dc in chain space in each stitch around. (60)
Row 30-31: Repeat Row 29.
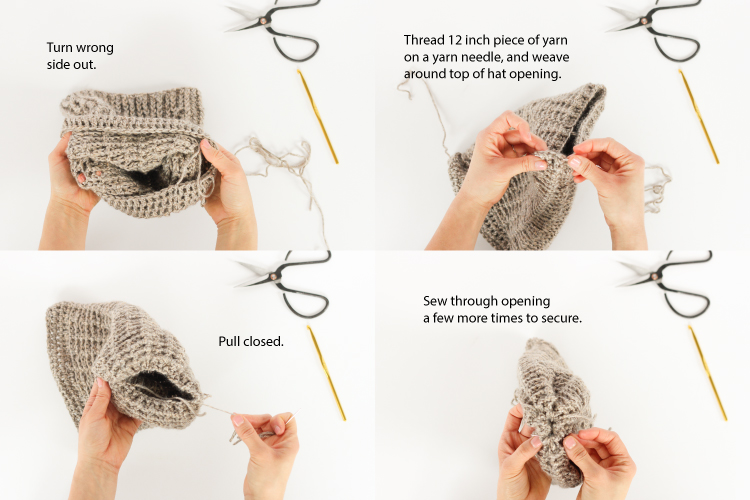
Tie off end, cut a 10 inch tail and weave into hat. Cinch top of hat closed according to tutorial.
___________________________________
ALTERNATE RIBBED BAND VERSION used in the video:
Row 29: Ch 2, hdc in each stitch around. (60)
Row 30-32: Ch 3, *fpdc, bpdc*, repeat 28 times, fpdc and slip stitch to top of ch 3. (60)
Row 30-31: Repeat Row 29.
Tie off end, cut a 10 inch tail and weave into hat. Cinch top of hat closed according to tutorial.
Hungry for more crochet cables? Check out the Ashton Beanie Pattern and make a cabled hat for newborns through adults.










Beautiful hat!! Cables are a favorite! Thank you for the pattern and picture tutorial!!
Thank you Darlene! <3
Oooh, I love this one too! I love the lacy look of the cables! So pretty!
Hi Delia…I am half way through with this hat. I am using Vanna’s Choice yarn in pearl mist color. I must say, this seems to be a very stiff, scratchy yarn. Your hat looks so soft and slouchy. What kind of yarn did you use and what color? Do you think this yarn will soften up as I wear this hat?
Kat,
That’s a great question. Vanna’s Choice can be a scratchier yarn. I’m sorry to say it won’t really soften up that much with washing. I used Lion Brand Heartland yarn. It is a lot silkier and smoother. I am sorry that I can’t remember the color exactly, but I looked it up online and I think I got Grand Canyon. It’s a nice taupe color. I hope that helps!
I love this pattern! It was my first attempt at an intermediate pattern and cabling and it turned out really well – the video definitely helped in the process. I used a contrasting yarn for the ribbed band of the hat and I love it!
It makes me so happy to hear that! <3 A contrasting band is a great idea!
Hi Delia, I love this pattern. I am a leftie and you mention to work right of the post to keep cables and stitches straight. So will it work if I am crocheting in the opposite direction? Any left handed videos or instructions? Thanks!
What are the multiples in this hat if I want to make it bigger or smaller please? I tried 70 but for some reason I come out with 72 in the 2nd row
Okay, I tried working it out… It has 7 twisted cables and 6 pairs of ribbed lines. To make it bigger, you can try adding 9 stitches or three groups of *2 fpdc, dc* in Row 2. Then you will work another twisted cable and pair of ribbed lines with a total of 69 stitches per row. The chain stitches should fall back as if they are a dc stitch in between the raised stitches. I hope this helps!
I have been looking for something like this! So pretty yet practical too! Thanks for sharing.
So glad you like it! Thank you for your kind comment.