Hi I Am Momma fans! I’m Delia from Delia Creates.
I absolutely adore Cheri! She is such a, generous, talented and inspiring person. I love reading her blog so it’s a pleasure to be her guest today!
Refashioning old clothing is one of my favorite things to sew. Not only is it environmentally responsible, it’s also usually financially responsible (except in my case because I’m becoming a bit of a sweater/t-shirt hoarder). 🙂
Another reason I like to use thrifted clothing as “fabric” is that it is made of material I likely cannot find by the bolt. It can be a little more unique and polished looking, thus making my finished item also unique and polished.
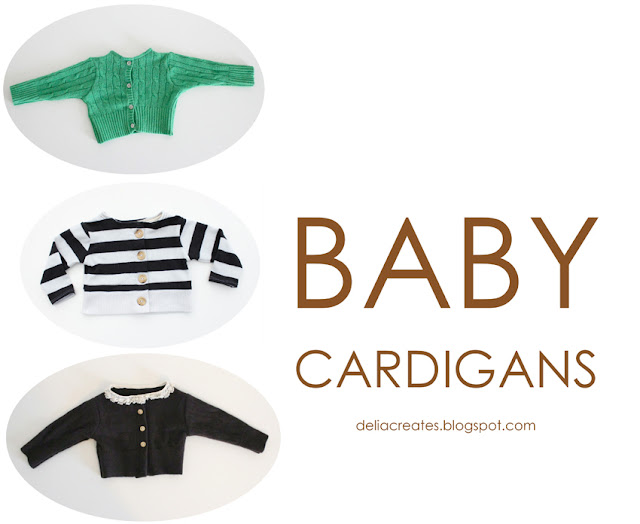
I got to put my refashioning skills to the test quite a bit, recently, when I competed in Project Run & Play. For the first week’s challenge I made a cute little baby cardigan. Today, I’m going to share the tutorial.
I also shared a cardigan tutorial last year. Feel free to call me cardigan obsessed. I won’t protest. 🙂
Materials you’ll need:
a thrifted sweater/knit top
fusible sewing tape like stitch witchery OR fusible interfacing
buttons
coordinating thread
twill tape
a baby onsie/shirt to make a pattern from
paper for making a pattern: grocery ads, white copy paper taped together, or freezer paper all work well
Oh and…A serger is NOT required if you use a sweater that doesn’t fray …even though you’ll see me use it in some of my pictures. As I made more cardigans, I found that serging wasn’t even particularly ideal for this project either! So, if you don’t have a serger, sew on!
1. Make a pattern. Using a onsie or shirt that has been turned inside out. Get the general shape of the back of the onsie. Be sure to use a onsie with a regular neckline, not the envelope style neckline.
As you can see, I cut one piece on the fold, then cut it in half. I kept one half whole and labeled it as the back of the cardigan. I scooped the neck out of the other half a bit more and labeled it as the front piece. I also made a note to add 2 inches to the inside edge.
As for the sleeves, I probably could have added more curve to the arm pit, but you get the idea.
2. Shopping! Choose your sweater wisely. An interlock type knit sweater or wool is the easiest to sew. Loosely knitted sweaters (with large loops and holes) or cable knit type sweaters require a bit more skill and patience. Be sure your pattern pieces will fit on the sweater.
3. Trace and cut your pieces out. Be sure to the cut the ‘back’ piece on the fold, as well as the sleeves. You’ll need two separate ‘front’ pieces. If you are using a patterned or striped material, try folding the sweater right sides together before tracing and cutting your pieces at one time, so that everything lines up nicely.
Also, take advantage of the finished sweater hems for the bottom of your cardigan, as well as for the sleeve hems. I didn’t have enough hem for my sleeves here but you can see other cardigans at the end, in which I did.
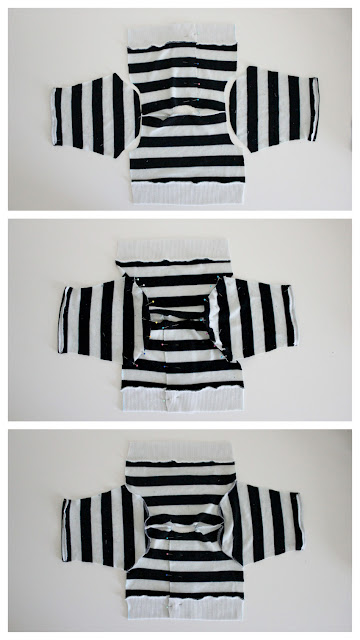
4. Now, let’s get sewing! Lay your two front pieces on top of the back piece, right sides together. The front pieces should overlap. I pinned all over to prevent shifting.
* Sew just the shoulders.
5. Now hem the sleeves, if you weren’t able to use existing sweater hems.
6. Let’s bring the cardigan together…
*This is bird’s eye view to help you visualize how it works. When pinning the sleeves on, you actually need to open up the cardigan (take all those pins out after you sew the shoulders, except for the ones keeping the front pieces overlapped) and turn it right side up. Then with the right side of the sleeves facing the right side of the cardigan, pin evenly all the way around.
*Sew or serge. After I had made a few cardigans I discovered that serging is not necessary and sometimes not even preferred.
If you choose a sweater that doesn’t fray, then you can use a straight stitch or modified zig zag or stretch stitch. Even store bought shirts are sewn this way:
See how the seam allowance just curled under?
*Alright, now fold the cardigan in half, right sides together, and pin up the sleeves and the sides of the cardigan. Sew/serge.
7. It’s time to take care of the raw front edges. Take your stitch witchery or interfacing, cut it to size and iron the raw edges of the front pieces over, following the stitch witchery package instructions. Make sure both sides overlap each other nicely.
You can proceed with step 8 or you can sew up the front pieces if you choose. Sewing adds more stability but isn’t necessary as the buttons and button holes will keep your cardigan placket in place as well. You can also fold under the raw edge twice for a cleaner look on the inside. Just be sure to add another 1/2 or so to each side when you cut it out.
8. Finishing the neckline:
*Measure out some twill tape long enough to wrap around the neckline of your cardigan with at least 1/2 an inch overhang on each end.
*Pin the twill tape to the right side of the neckline. Sew close to the edge with about 1/8 inch seam allowance. Be careful not to stretch the neckline as you sew.
*Flip the twill tape over to the inside of the cardigan, tucking the overhanging raw edges of the twill tape under.
* Pin in place and sew.
*** It bears repeating…Be careful not to stretch the neckline.
Also, lengthen your stitch if you need to (I did).
*I didn’t like the look of the white thread, so I picked it out and resewed it with black, adding another line of parallel stitching. Much better…
9. Last step, buttons!
*Measure out how you want your buttons to go. Have them line up from top to bottom or have just one or two buttons at the top. You decide.
*Machine sew or hand sew on your buttons and button holes.
*If you would rather skip this step, choose a larger cardigan to make baby sized…
…like I did with this green one. I just used the existing placket. Super easy!
I almost used bias tape as the facing, instead of twill tape. It might work but I think twill tape is more flexible and better looking (just my personal opinion).
And, you’re done!
Well, almost…
In addition to the striped cardigan and the green cardigan, I also made a brown cardi with a couple differences, just to give you more ideas and options.
This method is a great way to make a little boy cardigan, minus the lace trim of course.
*Cut the front pieces of your cardigan without adding the 2 inch extensions. Then cut separate strips of sweater knit about three inches wide and one inch longer than the raw edges of the front cardigan pieces.
* Fold the strips in half, sew with a 1/2 seam allowance. Snip off the corners and reduce bulk. Turn the strips right side out.
* Pin and sew the strips to the right sides of the cardigan pieces. Flip them over and sew close to the seam. Even out the strip to match the neckline if needed.
* Proceed with the tutorial as normal. As you can see, I didn’t use my serger at all for this cardigan. After I sewed with a 1/2 inch seam allowance and cut off a little bit of the bulk.
When finishing the neckline, I sandwiched in some cream colored cotton lace trim.
I didn’t want to put a buttonhole through the trim so I hand sewed in a hook and eye closure for the very top.
Easy as that!
Natalie’s sporting her new cardigan with her new color blocked baby shoes…another refashion I plan on sharing on my blog (psst update: I’ll share it next week:)).
With cardigans, the possibilities are limitless! Add a collar, some trim on the bottom, color blocked sleeves and a yoke detail like I did here:
Or make it into a coat with a mock turtleneck like I did here:
They are just so darn cute!
Once you pick out a thrifted sweater to chop up, sometimes it’s the shopping that takes me forever! :)…you can whip up a basic baby cardigan in about an hour!
Okay, I know this post is getting crazy long, but here is a quick tip for keeping serged ends from unraveling.
Simply fold the serged seam allowance to one side and sew a straightline for about 1 inch. Be sure to back stitch when you start and end. I learned this by looking at store bought onsies like this one here.
See that small line of stitching? It’s pretty slick and it’s not noticeable unless you’re looking for it.
You can also add a small dab of fabric glue to the end to keep it from fraying.
*If you sew your sweaters (instead of serging) then you don’t need to do this.
And now, that’s really it. 😉
Hope you’re someplace warm. It’s been 17 below zero here. Brrrr.


So cute! I especially love the one with the yellow collar and single button.
I've been following your sewing posts for a while, but not had the confidence in my sewing skills to try anything out (I'm more of a knitter usually…) but as my five-month-old has just stained his last cardie purple with beetroot, this seems like the perfect time to have a go!
Thanks for
These are amazing! I love the one with lace. Definitely gonna make my baby girl one! Thanks for sharing.
I'm going to be sewing my 4 year old a cardigan from an old one I don't ever wear this week and I really appreciate all of these tips!
I was just going to hunt down where I had pinned this, so perfect timing that you just reposted it here. This will be my sewing project for today. It is still so cold here in Idaho so I'm making lots of layering pieces for my little girl. Thanks for the inspiration!
Oh so adorable!! I have a friend who made some baby cardigans for her little one. I'm a novice seamstress, so I'm going to have to ask her to help me with this asap. This would be perfect for all of my friends with kids.
Oh, how I love cardigans! You've got me all jazzed up to go chop some up! Love love all the little details you've added!
oh so cute!
Wolves in London – oh and little baby boy cardigan makes my heart happy! Enjoy sewing for your little one.
EHC – perfect! Happy sewing!
Cait, Stef, the Mouse House thank you! 🙂
Crystalyn Bryan – upcycles are the best! Happy sewing to you too! 😉
Rachel O – these are addicting and so fun. I'm excited for you!
These are so cute! I LOVE the one with the yoke at the end. Love it.
Thanks for this last tip about keeping serged ends from unraveling!
I started thinking I had to be doing something wrong with my serger.
What’s Going down i am new to this, I stumbled upon this I have discovered It positively useful and it has helped me out loads.rs accounts for sale.I hope to contribute & aid other customers like its helped me. Great job.