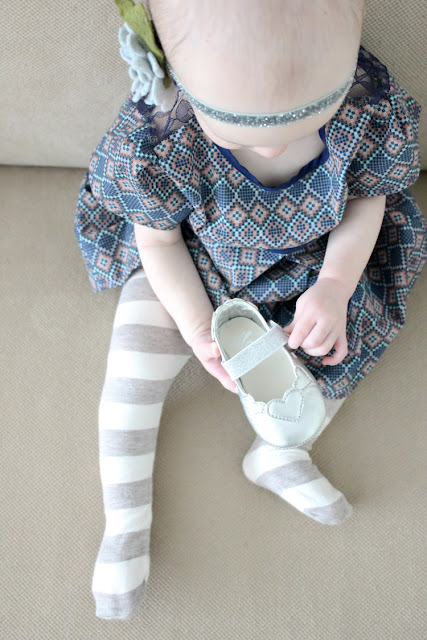
I am happy to report that Natalie is finally growing into the dress! 😉
________________________________
Hi iCandy readers!
I am thrilled to be here with Jen & Autie. I love all their creative garments and detailed tutorials. I feel honored to be here today for their Basic Bodice Series!
Over Christmas I made a dress for my daughter Natalie using the bodice pattern I drafted for Project Run & Play Season 5. She’s petite, so even though it was 6 month size, it fit her great for a while until I made this Christmas dress. (She was 9 months for Christmas). This series, was a great motivator for me to come up with a new bodice and to try her Christmas dress again but with a better fitting neckline, and some extra details.
My daughter is slender for 10 months old, so I took this pattern – Simplicity 3656 – that my mom gifted to me to make a better fitting bodice for her. I used the 3-6 month size bodice (I was guessing that Simplicity patterns ran large and I was right), and using the previous bodice I drafted, I brought it in quite a bit at the sides, at the shoulder and a bit at the sleeves (but had to adjust the sleeve pattern too). Guess what?
It’s still too big. Ha!
It will be great for her to grow into and it works for now if she wears a long sleeve body suit underneath. Which I totally planned. 😉 Right.
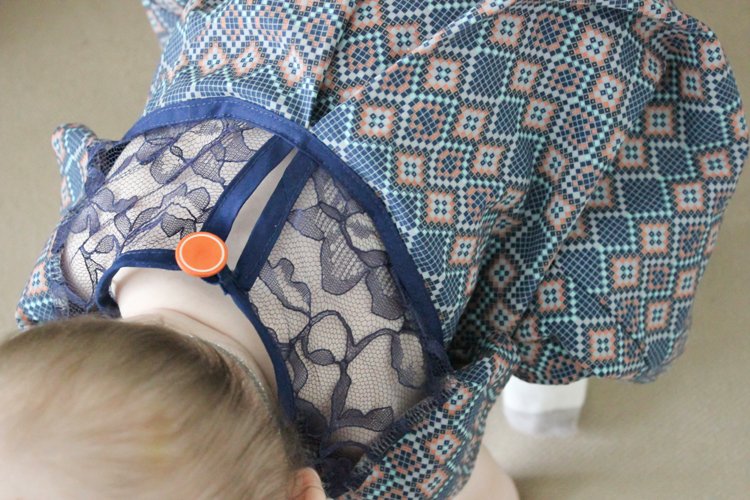
Well, I kind of actually did since I made it short sleeve with a lace back like my finale look for Project Run & Play, which is not warm enough for our frigid winters. I admit that I thought it would fit a little truer to size than does though. 😉
Okay, so to make one you’ll need:
-basic bodice pattern pieces and a sleeve pattern
-quarter inch bias tape (I used about a yard)
-optional: a scrap of lace fabric (doesn’t take much… you can omit this and just use the main fabric if you like)
-shank button
-main fabric – 2/3 yd. was plenty for my 6-9 month dress, I used this quilter’s cotton from Joann because I LOVE this print, but a linen or other apparel fabric would be great as well
-matching thread
1. Cut out your bodice pieces and trim 1/2 an inch from the front and back necklines. You want to do this because you will not be losing it to a seam allowance like you would with a facing or lining. *When cutting out the back piece, cut off the button placket so that when lined up, the back pieces are the same width as the front bodice piece.
2. Next, crop the bodice starting right under the armpit of the sleeve opening. You could crop your pattern instead and then just cut the bodice out. I didn’t want to make a new bodice pattern, so I did it this way – either way works.
3. Cut two skirt pieces. To determine how large your skirt pieces should be, use this equation:
(bodice width (before you cropped it) x 1.5 ) + 2 to 3 inches = width of each skirt piece
Choose whatever length you would like. You can make it shorter for a tunic look, or longer for a dress. My measurements were 19 inches wide x 15 inches long ( for a wide hem).
Now that you have all your pieces, grab that bias tape and go to step 4.
4. Take your bodice pieces. Pin and sew the shoulders together with right sides together (RST). You can sew down the seam allowance to the front of the bodice so that it doesn’t show through the lace. I didn’t this time, but it can create a cleaner look if you don’t mind the top stitching at the shoulder.
5. Sew your bias tape on the inside edges of the back pieces (straight).
6. Open up the bias tape and pin around the neckline, leaving over hang at the ends at the back. Sew in the first crease on the inside.
7. Fold the bias tape over and top stitch around close to the edge. Fold one of the ends inward so that it is flush with the side before sewing.
8. Fold the other end into a loop and sew in place. I used a zig zag stitch to ensure a lot of strength, as it will be pulled on a lot as you dress and undress your child.
9. Take your skirt pieces, mark the center and form a box pleat around it so that the finished width is an inch wider than the (cropped) bodice on each side. Press the box pleat from top to bottom with an iron.
10. Sew bias tape on to the top of the skirt pieces, sandwiching the pleat into place.
11. Serge the bottom of the bodice and then pin and sew the skirt piece on. When sewing the back piece on make sure the back bodice pieces are touching but not overlapping.
12. Take your bodice piece and trim the arm openings and sides to match the pattern. Make the sides ease out a bit to the skirt width.
13. Prepare your sleeves: serge the the ends of the sleeves, press it over 1/2 an inch and top stitch in place.
14. Pin the sleeves to the bodice and sew. I pleated the top of the sleeves and I used a serger. I did not have matching serger thread, but if you can use matching serger thread it will camouflage the seam at the sleeves under the lace. 🙂 It’s what I did for my lace tunic and it worked great.
15. Pin the dress together at the sleeves and side of the skirt. Serge/sew it up.
16. For smaller dresses I like to hem the sleeves before attaching them, but the serged seam allowance is a bit obvious when I do this. I’ve learned to straight stitch the seam allowance down about a half inch. This helps keep the serged end from fraying and from sticking out of the sleeve (and tickling their underarm). This is actually great for knit shirt sleeves and hems too.
17. Hem the dress and hand stitch a button to the back. I used a blind hem for this dress but a straight stitch works great as well. And you’re done!
I’m hoping this fits her this Spring? this Summer! Grow baby…but don’t. 🙂
Even though this dress is a little big for her now, the bodice pieces are the perfect size for making her a dress coat, since you want a coat to be a little bit bigger. Go HERE to see the one I made.
Thanks for having me over Jen & Autie!
_____________________
I have plans to make this dress again but with a better bodice pattern to start with. Perhaps from the Geranium pattern I just bought!
I’m making a Geranium for Natalie’s Easter dress and I already love the pattern. I hope to show you maybe next week! 🙂
Have a lovely day!


love this little dress, the lace is just so awesome! – do you think it would work sleeveless with the bias tape around the arm holes? I think I need to add this to may 'to make' for baby girl for spring!!!
Wonderful fabric choice! (And a beautiful little girl.)
I absolutely want a try!! the baby is very cute.
http://www.louisvuittondeutsche.com
she's so adorable! and her eyes are beautiful!