

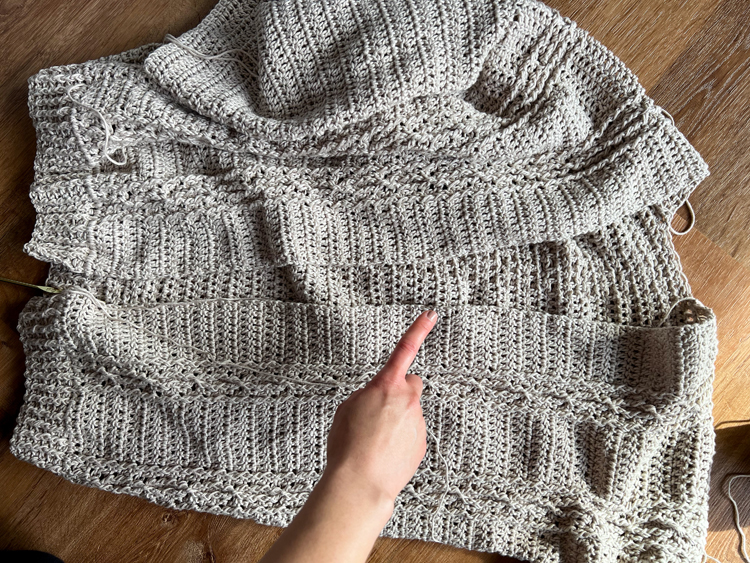
If you made my Rectangle Cardigan and want to level up a little, this free cabled cardigan pattern adds a fun twist…

See what I did there? 😉
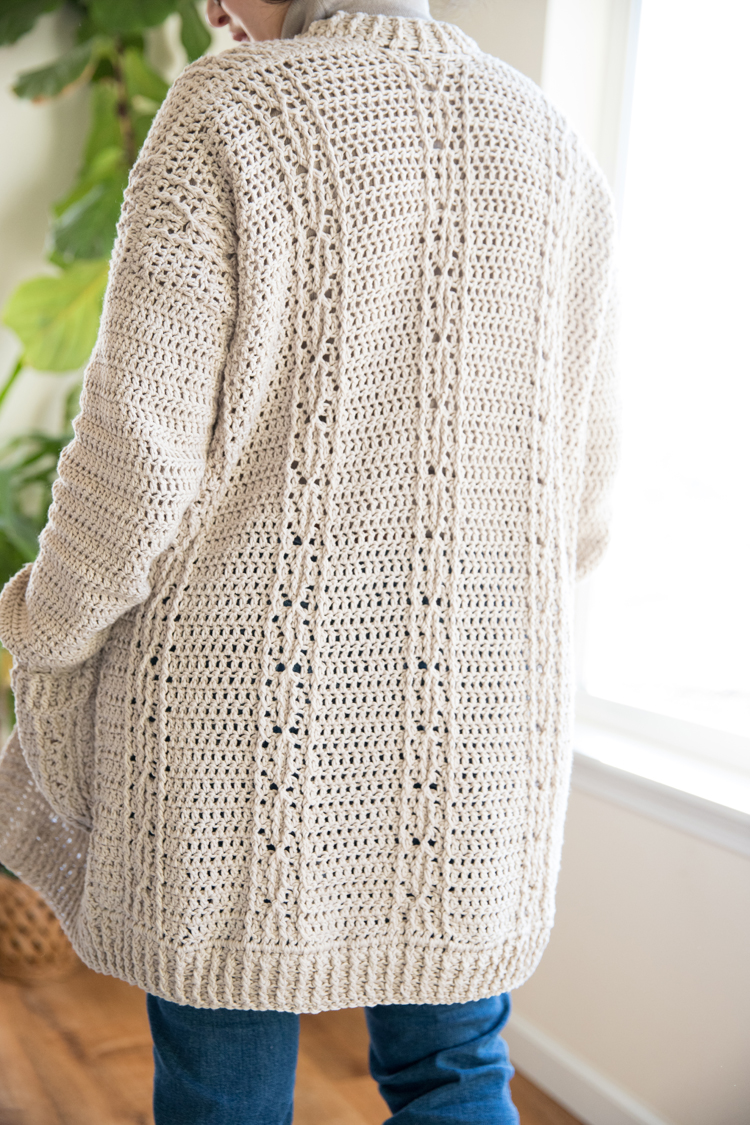
It’s still just five rectangles (seven if you count the pockets) just like the beginner friendly Rectangle Cardigan, but it incorporates intermediate level stitches. Still…I think that if you have made the Rectangle cardigan, you are likely ready for this one.

It is also worked in a cotton yarn which adds more drape and definition. If you compare the two patterns, you’ll notice that this also alters the stitch count because cotton behaves a little differently than wool and synthetic yarns. This is true for sewing with fabric as well. I mention this, so you know that the fit may vary a bit if you decide to work this pattern up in a yarn with a different fiber content. I talk more about this in the sizing section below.

This might be the longest pattern I’ve ever written to date because I had to divide pieces and sizes up into sections. If you want an ad free PDF version of this pattern, you can purchase it in my shop:
Materials
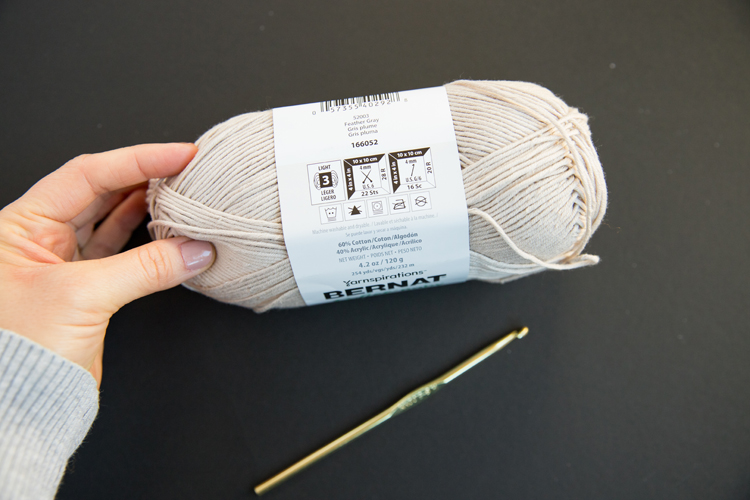
- DK/Light/Size 3 cotton blend yarn*
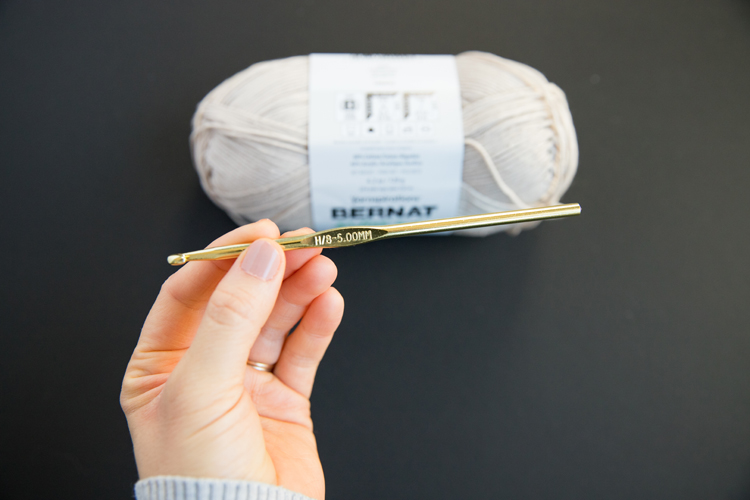
- H/8 or 5.00 mm hook
- Yarn needle
- Scissors
Optional: Quilter’s clips or stitch markers to hold pieces together when seaming them
Material Notes
*This pattern is designed for cotton or cotton blend yarns. If you want to use a synthetic or wool yarn, size up or expect a slimmer fit.
*I used less than 8 skeins of Bernat, Softee Cotton Yarn in Feather Gray to make a size small. Estimating on the generous side, to account for waste inherent in the crocheting process, here are some approximate yarn amounts needed for each size:
XXS, XS – 7 skeins, about 1650 yds, 1750 yds
S, M – 8 skeins, about 1850 yds, 1950 yds,
L, XL, XXL – 9 skeins, about 2050 yds, 2150 yds, 2250 yds
These are just estimates. I recommend buying an extra if you’re not sure so that you can ensure the dye lot is the same if you find you need a little more yarn.
Sizing
This section is lengthy, but worth reading through to ensure you get a good fit.
PLEASE NOTE: The finished sizes are almost identical to the Rectangle cardigan, but this cardigan was designed for cotton yarn. This means that the stitch count will be smaller, even though the sizing is the same. If you want to use a synthetic or wool yarn, I recommend sizing up one size or expect a slimmer fit.
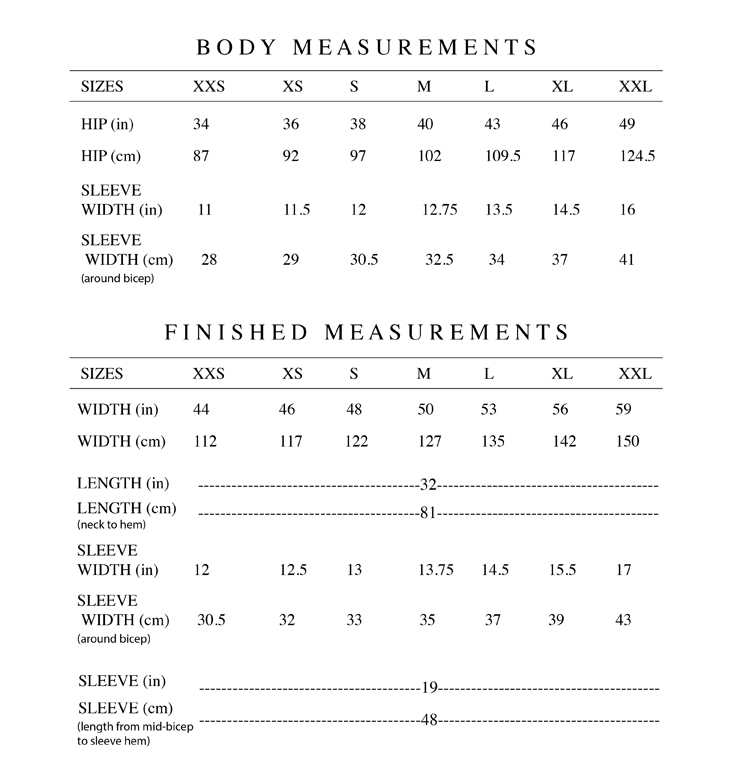
Typically, you will use hip measurement to determine which size to make, because most often in women’s sizing, hips are bigger than waist and bust. If this is not the case, then use whichever measurement is largest (of bust, waist, or hips) to select your size.
Remember, this is a rectangle that will be the same size from top to bottom, so it just needs to be wide enough to accommodate the widest part of your body.

This is a split front cardigan that doesn’t need to close over the front of your body. Use your best judgement to get the fit you want – oversized and baggy or more form fitting. Ten inches of ease has been added, so it’s best to use finished measurements as a guide.
Note: For most, the sleeve will begin mid-bicep, but this may vary for you. Please use the sleeve length as a guide, but do a fit before seaming the sleeve in, especially if you are between sizes. If you make adjustments to the sleeve width, remember that you will have to account for this change when you seam the sides together for the arm hole. The sleeve width should stretch to fit the arm hole, so you have some flexibility here.
DISCLAIMER: This FREE pattern has not been tested in all sizes. Instead of hiring a pool of testers and putting this out as a paid pattern, I’ve decided to put it out for free and update it as needed. The sizing should be pretty forgiving, as it is a split front cardigan, but as you work up each rectangle, test the fit as you go.

This is most important for the sleeve opening (try this on after you have seamed the sides and shoulders) and the sleeve length (measure from about mid-bicep, where the cardigan shoulder should end, to wrist or wherever you prefer your sleeve to end, I like mine over most of my hands when stretched out). As you measure it on your body, remember that you will be adding about 2.5 inches with the bottom hem band and about 1.5 inches at the collar and the sleeve bands.
SIZING ADJUSTMENTS
Lengthening/Shortening
Because this cardigan is made from rectangles you can add or subtract rows to get the length you want.
After seaming together the shoulders of the cardigan body, try it on. Now you can measure the sleeve length and cardigan length to adjust it to your preferences. Keep in mind that the yarn will stretch as it hangs on your body. This is especially true for cotton yarn.
If you want to lengthen or shorten the cardigan body, you can remove the shoulder seams and add or remove rows. Remember to add 2.5 inches to account for the ribbed hem band.
REMEMBER: Whatever changes you make to the back piece, you also need to make to the front pieces. This will also impact the collar ribbing pattern portion so be mindful that the stitch count will be different and you may need more yarn if you lengthen the cardigan body
For reference, I am 5’3 (and a half ;)) with a longer torso and shorter legs. This cardigan hits me at the low to mid thigh, a couple inches above my knees.

Sleeve Adjustments
WIDTH: Because the width of the cardigan changes with each size, the sleeve is written to be the same length for any size. For most, the sleeve will begin mid-bicep so you’ll want to use that measurement to determine the proper width. This may vary for you if you have
broader shoulders, so I recommend doing a fit before seaming the sleeve in, especially if you are between sizes.
If you make adjustments to the sleeve width, remember to make the arm hole bigger when you seam the cardigan body sides together. The sleeve width should stretch to fit the arm hole, so you have some flexibility there.
LENGTH: Like with cardigan body length, seam together the shoulders of the cardigan body and measure where you want your sleeve to end. Remember that the sleeve will stretch and drape a bit longer when worn. Use the gauge to guide you on how many rows to remove or add to the pattern, and be sure to add 1.5 inches for the sleeve band.
Abbreviations
- ch = chain
- sl st = slip stitch
- sc = single crochet
- dc = double crochet
- fpdc = front post double crochet
- bpdc = back post double crochet
- fptc = front post triple crochet
Gauge
4 x 4 inch square = 14 double crochet by 8 rows
This is the gauge un-stretched. If you use a cotton yarn, when you hold it up and wear it, it will stretch a little larger.
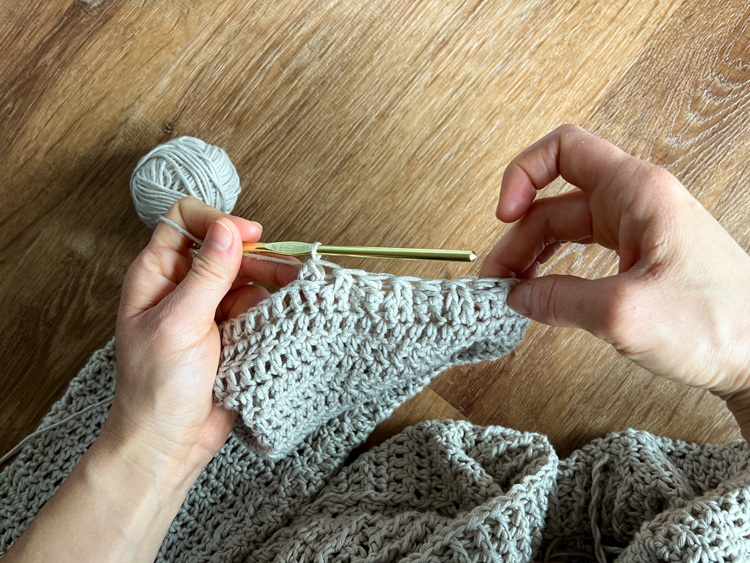
Video Tutorial
When you scroll by this video, it should pop to the top or side of your screen so that you can watch while you read. Or you can return to this spot to view it in a larger format. The tutorial will begin after the initial ads.
This tutorial shows you how to complete the cable stitches in detail, but only briefly covers the cardigan construction. For more in depth instruction on how to seam the cardigan pieces together, please refer to the Rectangle Cardigan.
Written Pattern & Tutorial
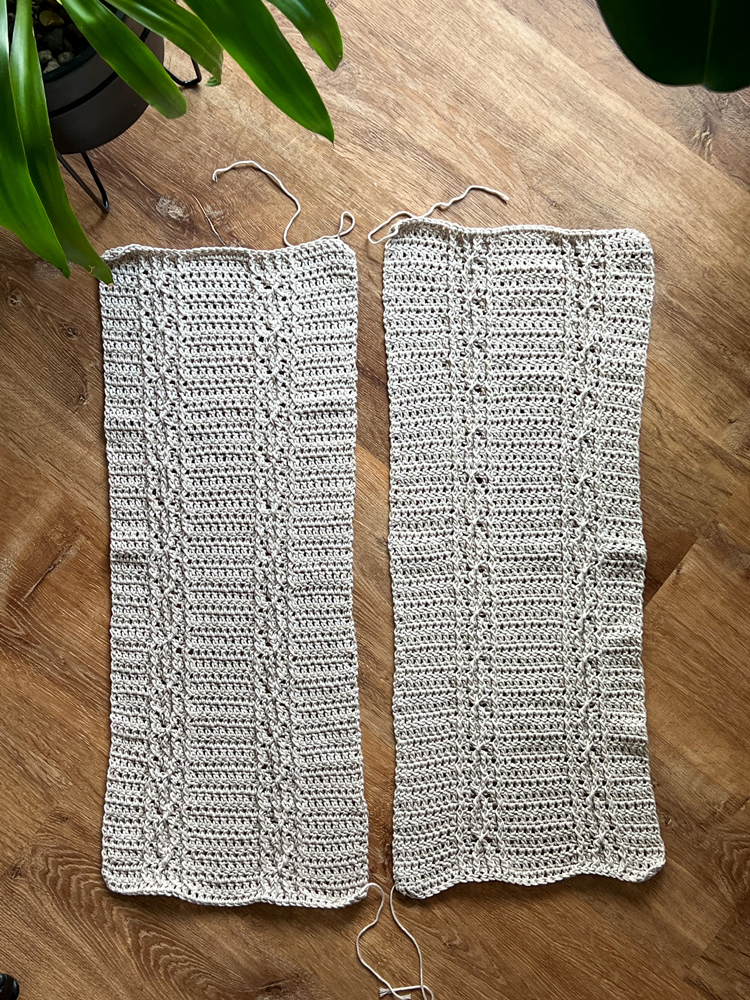
You will be creating 5 rectangles: 1 back, 2 front pieces (mirror images), and 2 sleeves (plus two optional pockets).
Sizing is as follows: XXS (XS, S, M, L) and XL (XXL). For sizes XL and XXL, the pattern has been altered to include an additional group of cables, so it’s easier to separate it into its own section.
Follow the number indicated in the same position as your size. So if you are a size M, you would use the starred number: 1(2, 3, 4*, 5). Sometimes it helps to copy and paste the pattern into a word document so you can print it and highlight the number for your size.
PLEASE NOTE that this pattern is for personal use only.
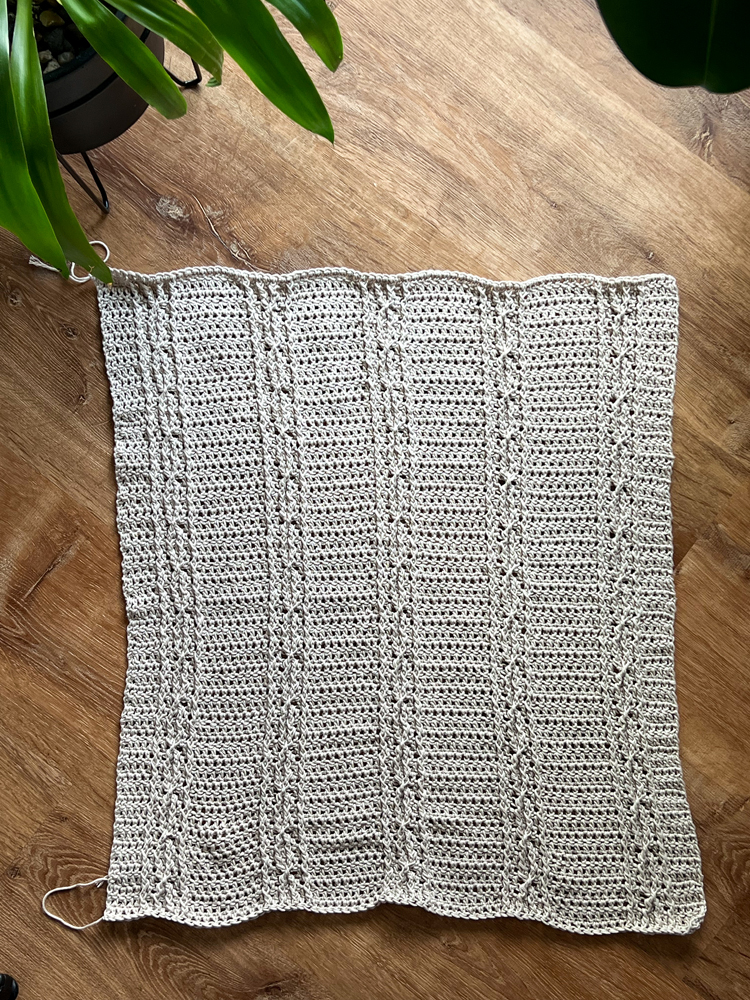
Back Piece SIZES XXS (XS, S, M, L) – make one
Chain 74 (78, 82, 86, 92)
Row 1: Dc in third chain from the hook, work 71 (75, 79, 83, 89) dc in the remaining chains. Total stitches (skipped chains count as one stitch) = 73 (77, 81, 85, 91).
Row 2: Ch 2. Work 2 (4, 4, 4, 5) dc stitches. Begin with what I call a “cable cluster” because it is a group of 4 fpdc stitches with regular dc stitches in between that will be cabled later. To create a cable cluster or group, work: 1 fpdc, 1 dc, 1 fpdc, 1 dc, 1 fpdc, 1 dc, 1 fpdc. Then work 8 (8, 9, 10, 11) dc stitches. Create another cable cluster. Work 8 (8, 9, 10, 11) dc stitches. Create another cable cluster. Work 8 (8, 9, 10, 11) dc stitches. Create another cable cluster. Work 8 (8, 9, 10, 11) dc stitches. Create another cable cluster. Work 3 (5, 5, 5, 6) dc stitches.
You should have a total of five cable clusters and total stitch count should = 73 (77, 81, 85, 91).
Row 3: Ch 2. Work 2 (4, 4, 4, 5) dc. Now work in each cable cluster from the back. Work: 1 bpdc, 1 dc, 1 bpdc, 1 dc, 1 bpdc, 1 dc, 1 bpdc. Then work 8 (8, 9, 10, 11) dc. Work in the back of the cable cluster. Work 8 (8, 9, 10, 11) dc. Work in the back of the cable cluster. Work 8 (8, 9, 10, 11) dc. Work in the back of the cable cluster. Work 8 (8, 9, 10, 11) dc. Work in the back of the cable cluster. Work 3 (5, 5, 5, 6) dc. Total stitch count = 73 (77, 81, 85, 91).
Row 4: Ch 2. Work 2 (4, 4, 4, 5) dc. Now, we are going to start to cable and twist the middle two fpdc in each cluster. Work 1 fpdc, 1 dc. Skip the next fpdc and dc and work a fptc in the third stitch from the hook. Cross backward and fptc in the skipped fpdc. Leave the skipped dc unworked for now. (Please see the video tutorial for more clarification as pictures aren’t good at capturing this step.) Finish the cluster with 1 dc and 1 fpdc. Then work 8 (8, 9, 10, 11) dc. Cable the cluster (see first cluster explanation). Work 8 (8, 9, 10, 11) dc. Cable the cluster. Work 8 (8, 9, 10, 11) dc. Cable the cluster. Work 8 (8, 9, 10, 11) dc. Cable the cluster. Work 3 (5, 5, 5, 6) dc. Total stitch count = 68 (72, 76, 80, 86). The skipped stitches will be picked back up in the next row.
Row 5: Ch 2. Work 2 (4, 4, 4, 5) dc. Now work in each cable cluster from the back. Work: 1 bpdc, 1 dc, 1 bpdc in the fptc from the previous row, 1 dc in the space between the two fptc to restore the dc you skipped, 1 bpdc in the second fptc from the previous row, 1 dc, 1 bpdc. Then work 8 (8, 9, 10, 11) dc. Work in the back of the cable cluster in the same way as the first. Work 8 (8, 9, 10, 11) dc. Work in the back of the cable cluster. Work 8 (8, 9, 10, 11) dc. Work in the back of the cable cluster. Work 8 (8, 9, 10, 11) dc. Work in the back of the cable cluster. Work 3 (5, 5, 5, 6) dc. Total stitch count = 73 (77, 81, 85, 91).
Row 6: Ch 2. Work 2 (4, 4, 4, 5) dc. Work the cable cluster without twisting, work: 1 fpdc, 1 dc, 1 fpdc, 1 dc, 1 fpdc, 1 dc, 1 fpdc. Then work 8 (8, 9, 10, 11) dc. Work in the cable cluster. Work 8 (8, 9, 10, 11) dc. Work in the cable cluster. Work 8 (8, 9, 10, 11) dc. Work in the cable cluster. Work 8 (8, 9, 10, 11) dc. Work in the cable cluster. Work 3 (5, 5, 5, 6) dc. Total stitch count = 73 (77, 81, 85, 91).
Row 7: Ch 2. Work 2 (4, 4, 4, 5) dc. Now work in each cable cluster from the back. Work: 1 bpdc, 1 dc, 1 bpdc, 1 dc, 1 bpdc, 1 dc, 1 bpdc. Then work 8 (8, 9, 10, 11) dc. Work in the back of the cable cluster. Work 8 (8, 9, 10, 11) dc. Work in the back of the cable cluster. Work 8 (8, 9, 10, 11) dc. Work in the back of the cable cluster. Work 8 (8, 9, 10, 11) dc. Work in the back of the cable cluster. Work 3 (5, 5, 5, 6) dc. Total stitch count = 73 (77, 81, 85, 91).
Row 8: Repeat Row 4.
Row 9: Repeat Row 5.
For Rows 10-57, repeat rows 6, 7, 8, and 9 in order, 12 times.
Rows 58-59: Repeat Rows 6 and 7. Tie off.
Back Piece SIZES XL (XXL) – make one
Chain 98 (105)
Row 1: Dc in third chain from the hook, work 95 (102) dc in the remaining chains. Total stitches (skipped chains count as one stitch) = 97 (104).
Row 2: Ch 2. Work 4 (6) dc stitches. Begin with what I call a “cable cluster” because it is a group of 4 fpdc stitches with regular dc stitches in between that will be cabled later. To create a cable cluster or group, work: 1 fpdc, 1 dc, 1 fpdc, 1 dc, 1 fpdc, 1 dc, 1 fpdc. Then work 9 (10) dc stitches. Create another cable cluster. Work 9 (10) dc. Create another cable cluster. Work 9 (10) dc. Create another cable cluster. Work 9 (10) dc. Create another cable cluster. Work 9 (10) dc. Create another cable cluster. Work 5 (6) dc.
You should have a total of six cable clusters and total stitch count should = 98 (105).
Row 3: Ch 2. Work 4 (6) dc. Now work in each cable cluster from the back. Work: 1 bpdc, 1 dc, 1 bpdc, 1 dc, 1 bpdc, 1 dc, 1 bpdc. Then work 9 (10) dc. Work in the back of the cable cluster. Work 9 (10) dc. Work in the back of the cable cluster. Work 9 (10) dc. Work in the back of the cable cluster. Work 9 (10) dc. Work in the back of the cable cluster. Work 9 (10) dc. Work in the back of the cable cluster. Work 5 (6) dc. Total stitch count = 98 (105).
Row 4: Ch 2. Work 4 (6) dc. Now, we are going to start to cable abd twist the middle two fpdc in each cluster. Work 1 fpdc, 1 dc. Skip the next fpdc and dc and work a fptc in the third stitch from the hook. Cross backward and fptc in the skipped fpdc. Leave the skipped dc unworked for now. (Please see the video tutorial for more clarification as pictures aren’t good at capturing this step.) Finish the cluster with 1 dc and 1 fpdc. Then work 9 (10) dc. Cable the cluster (see first cluster explanation). Work 9 (10) dc. Cable the cluster. Work 9 (10) dc. Cable the cluster. Work 9 (10) dc. Cable the cluster. Work 9 (10) dc. Cable the cluster. Work 5 (6) dc. Total stitch count = 93 (100). The skipped stitches will be picked back up in the next row.
Row 5: Ch 2. Work 4 (6) dc. Now work in each cable cluster from the back. Work: 1 bpdc, 1 dc, 1 bpdc in the fptc from the previous row, 1 dc in the space between the two fptc to restore the dc you skipped, 1 bpdc in the second fptc from the previous row, 1 dc, 1 bpdc. Then work 9 (10) dc. Work in the back of the cable cluster in the same way as the first. Work 9 (10) dc. Work in the back of the cable cluster. Work 9 (10) dc. Work in the back of the cable cluster. Work 9 (10) dc. Work in the back of the cable cluster. Work 9 (10) dc. Work in the back of the cable cluster. Work 5 (6) dc. Total stitch count = 98 (105).
Row 6: Ch 2. Work 4 (6) dc. Work the cable cluster without twisting, work: 1 fpdc, 1 dc, 1 fpdc, 1 dc, 1 fpdc, 1 dc, 1 fpdc. Then work 9 (10) dc. Work in the cable cluster. Work 9 (10) dc. Work in the cable cluster. Work 9 (10) dc. Work in the cable cluster. Work 9 (10) dc. Work in the cable cluster. Work 9 (10) dc. Work in the cable cluster. Work 5 (6) dc. Total stitch count = 98 (105).
Row 7: Ch 2. Work 4 (6) dc. Now work in each cable cluster from the back. Work: 1 bpdc, 1 dc, 1 bpdc, 1 dc, 1 bpdc, 1 dc, 1 bpdc. Then work 9 (10) dc. Work in the back of the cable cluster. Work 9 (10) dc. Work in the back of the cable cluster. Work 9 (10) dc. Work in the back of the cable cluster. Work 9 (10) dc. Work in the back of the cable cluster. Work 9 (10) dc. Work in the back of the cable cluster. Work 5 (6) dc. Total stitch count = 98 (105).
Row 8: Repeat Row 4.
Row 9: Repeat Row 5.
For Rows 10-57, repeat rows 6, 7, 8, and 9 in order, 12 times.
Rows 58-59: Repeat Rows 6 and 7. Tie off.
Front LEFT Piece SIZES XXS (XS, S, M, L) – make one
Chain 35 (37, 39, 41, 44)
Row 1: Dc in third chain from the hook, work 32 (34, 36, 38, 41) dc in the remaining chains. Total stitches (skipped chains count as one stitch) = 34 (36, 38, 40, 43).
Row 2: Ch 2. Work 6 (7, 8, 9, 10) dc stitches. Create a cable cluster (See back piece pattern for more explanation): 1 fpdc, 1 dc, 1 fpdc, 1 dc, 1 fpdc, 1 dc, 1 fpdc. Then work 8 (8, 9, 10, 11) dc. Create another cable cluster. Work 5 (6, 6, 6, 7) dc. Total stitch count = 34 (36, 38, 40, 43).
Row 3: Ch 2. Work 4 (5, 5, 5, 6) dc. Work in back of cable cluster: 1 bpdc, 1 dc, 1 bpdc, 1 dc, 1 bpdc, 1 dc, 1 bpdc. Then 8 (8, 9, 10, 11) dc. Work in the back of the cable cluster. Work 7 (8, 9, 10, 11) dc. Total stitch count = 34 (36, 38, 40, 43).
Row 4: Ch 2. Work 6 (7, 8, 9, 10) dc. Begin cabling: Work 1 fpdc, 1 dc. Skip the next fpdc and dc and work a fptc in the third stitch from the hook. Cross backward and fptc in the skipped fpdc. Leave the skipped dc unworked for now. Finish the cluster with 1 dc and 1 fpdc. Then work 8 (8, 9, 10, 11) dc. Cable the cluster (see first cluster explanation). Work 5 (6, 6, 6, 7) dc. Total stitch count = 32 (34, 36, 38, 41).
Row 5: Ch 2. Work 4 (5, 5, 5, 6) dc. Now work in each cable cluster from the back. 1 bpdc, 1 dc, 1 bpdc in the fptc from the previous row, 1 dc in the space between the two fptc to restore the dc you skipped, 1 bpdc in the second fptc from the previous row, 1 dc, 1 bpdc. Then work 8 (8, 9, 10, 11) dc. Work in the back of the cable cluster in the same way as the first. Work 7 (8, 9, 10, 11) dc. Total stitch count = 34 (36, 38, 40, 43).
Row 6: Ch 2. Work 6 (7, 8, 9, 10) dc. Work the cable cluster without twisting, work: 1 fpdc, 1 dc, 1 fpdc, 1 dc, 1 fpdc, 1 dc, 1 fpdc. Then work 8 (8, 9, 10, 11) dc. Work in the cable cluster. Work 5 (6, 6, 6, 7) dc. Total stitch count = 34 (36, 38, 40, 43).
Row 7: Ch 2. Work 4 (5, 5, 5, 6) dc. Work in each cable cluster from the back: 1 bpdc, 1 dc, 1 bpdc, 1 dc, 1 bpdc, 1 dc, 1 bpdc. Then work 8 (8, 9, 10, 11) dc. Work in the back of the cable cluster. Work 7 (8, 9, 10, 11) dc. Total stitch count = 34 (36, 38, 40, 43).
Row 8: Repeat Row 4.
Row 9: Repeat Row 5.
For Rows 10-57, repeat rows 6, 7, 8, and 9 in order, 12 times.
Rows 58-59: Repeat Rows 6 and 7. Tie off.
Front LEFT Piece SIZES XL (XXL) – make one
Chain 47 (50)
Row 1: Dc in third chain from the hook, work 44 (47) dc in the remaining chains. Total stitches (skipped chains count as one stitch) = 46 (49)
Row 2: Ch 2. Work 1 dc. Create a cable cluster: 1 fpdc, 1 dc, 1 fpdc, 1 dc, 1 fpdc, 1 dc, 1 fpdc. Then work 9 (10) dc. Create another cable cluster. Work 9 (10) dc. Create another cable cluster. Work 5 (6) dc. Total stitch count = 46 (49).
Row 3: Ch 2. Work 4 (5) dc. Work in back of cable cluster: 1 bpdc, 1 dc, 1 bpdc, 1 dc, 1 bpdc, 1 dc, 1 bpdc. Then work 9 (10) dc. Work in the back of the cable cluster. Work 9 (10) dc. Work in the back of the cable cluster. Work 2 dc. Total stitch count = 46 (49).
Row 4: Ch 2. Work 1 dc. Begin cabling: Work 1 fpdc, 1 dc. Skip the next fpdc and dc and work a fptc in the third stitch from the hook. Cross backward and fptc in the skipped fpdc. Leave the skipped dc unworked for now. Finish the cluster with 1 dc and 1 fpdc. Then work 9 (10) dc. Cable the cluster (see first cluster explanation). Work 9 (10) dc. Cable the cluster. Work 5 (6) dc. Total stitch count = 43 (46).
Row 5: Ch 2. Work 4 (5) dc. Work in back of cable cluster: 1 bpdc, 1 dc, 1 bpdc in the fptc from the previous row, 1 dc in the space between the two fptc to restore the dc you skipped, 1 bpdc in the second fptc from the previous row, 1 dc, 1 bpdc. Then work 9 (10) dc. Work in the back of the cable cluster the same as the first. Work 9 (10) dc. Work in the back of the cable cluster. Work 2 dc. Total stitch count = 46 (49).
Row 6: Ch 2. Work 1 dc. Work the cable cluster without twisting, work: 1 fpdc, 1 dc, 1 fpdc, 1 dc, 1 fpdc, 1 dc, 1 fpdc. Then work 9 (10) dc. Work in the cable cluster. Work 9 (10) dc. Work in the cable cluster. Work 5 (6) dc. Total stitch count = 46 (49).
Row 7: Ch 2. Work 4 (5) dc. Work in back of cable cluster: 1 bpdc, 1 dc, 1 bpdc, 1 dc, 1 bpdc, 1 dc, 1 bpdc. Then work 9 (10) dc. Work in the back of the cable cluster. Work 9 (10) dc. Work in the back of the cable cluster. Work 2 dc. Total stitch count = 46 (49).
Row 8: Repeat Row 4.
Row 9: Repeat Row 5.
For Rows 10-57, repeat rows 6, 7, 8, and 9 in order, 12 times.
Rows 58-59: Repeat Rows 6 and 7. Tie off.
Front RIGHT Piece SIZES XXS (XS, S, M, L) – make one
Chain 35 (37, 39, 41, 44)
Row 1: Dc in third chain from the hook, work 32 (34, 36, 38, 41) dc in the remaining chains. Total stitches (skipped chains count as one stitch) = 34 (36, 38, 40, 43).
Row 2: Ch 2. Work 4 (5, 5, 5, 6) dc. Create a cable cluster: 1 fpdc, 1 dc, 1 fpdc, 1 dc, 1 fpdc, 1 dc, 1 fpdc. Then work 8 (8, 9, 10, 11) dc. Create another cable cluster. Work 7 (8, 9, 10, 11) dc. Total stitch count, including ch 2 as one stitch = 34 (36, 38, 40, 43).
Row 3: Ch 2. Work 6 (7, 8, 9, 10) dc. Work in back of cable cluster: 1 bpdc, 1 dc, 1 bpdc, 1 dc, 1 bpdc, 1 dc, 1 bpdc. Then 8 (8, 9, 10, 11) dc. Work in the back of the cable cluster. Work 5 (6, 6, 6, 7) dc. Total stitch count = 34 (36, 38, 40, 43).
Row 4: Ch 2. Work 4 (5, 5, 5, 6) dc. Begin cabling: Work 1 fpdc, 1 dc. Skip the next fpdc and dc and work a fptc in the third stitch from the hook. Cross backward and fptc in the skipped fpdc. Leave the skipped dc unworked for now. Finish the cluster with 1 dc and 1 fpdc. Then work 7 (8, 9, 10, 11) dc. Cable the cluster (see first cluster explanation). Work 7 (8, 9, 10, 11) dc. Total stitch count = 32 (34, 36, 38, 41).
Row 5: Ch 2. Work 6 (7, 8, 9, 10) dc. Now work in each cable cluster from the back. 1 bpdc, 1 dc, 1 bpdc in the fptc from the previous row, 1 dc in the space between the two fptc to restore the dc you skipped, 1 bpdc in the second fptc from the previous row, 1 dc, 1 bpdc. Then work 8 (8, 9, 10, 11) dc. Work in the back of the cable cluster in the same way as the first. Work 5 (6, 6, 6, 7) dc. Total stitch count = 34 (36, 38, 40, 43).
Row 6: Ch 2. Work 4 (5, 5, 5, 6) dc. Work the cable cluster without twisting, work: 1 fpdc, 1 dc, 1 fpdc, 1 dc, 1 fpdc, 1 dc, 1 fpdc. Then work 8 (8, 9, 10, 11) dc. Work in the cable cluster. Work 7 (8, 9, 10, 11) dc. Total stitch count = 34 (36, 38, 40, 43).
Row 7: Ch 2. Work 6 (7, 8, 9, 10) dc. Work in each cable cluster from the back: 1 bpdc, 1 dc, 1 bpdc, 1 dc, 1 bpdc, 1 dc, 1 bpdc. Then work 8 (8, 9, 10, 11) dc. Work in the back of the cable cluster. Work 5 (6, 6, 6, 7) dc. Total stitch count = 34 (36, 38, 40, 43).
Row 8: Repeat Row 4.
Row 9: Repeat Row 5.
For Rows 10-57, repeat rows 6, 7, 8, and 9 in order, 12 times.
Rows 58-59: Repeat Rows 6 and 7. Tie off.
Front RIGHT Piece SIZES XL (XXL) – make one
Chain 47 (50)
Row 1: Dc in third chain from the hook, work 44 (47) dc in the remaining chains. Total stitches (skipped chains count as one stitch) = 46 (49)
Row 2: Ch 2. Work 4 (5) dc. Create a cable cluster (See back piece pattern for more explanation): 1 fpdc, 1 dc, 1 fpdc, 1 dc, 1 fpdc, 1 dc, 1 fpdc. Then work 9 (10) dc. Create another cable cluster. Then work 9 (10) dc. Create another cable cluster. Work 2 dc. Total stitch count: 46 (49).
Row 3: Ch 2. Work 1 dc. Work in back of cable cluster: 1 bpdc, 1 dc, 1 bpdc, 1 dc, 1 bpdc, 1 dc, 1 bpdc. Then work 9 (10) dc. Work in the back of the cable cluster. Work 9 (10) dc. Work in the back of the cable cluster. Work 5 (6) dc. Total stitch count = 46 (49).
Row 4: Ch 2. Work 4 (5) dc. Begin cabling: Work 1 fpdc, 1 dc. Skip the next fpdc and dc and work a fptc in the third stitch from the hook. Cross backward and fptc in the skipped fpdc. Leave the skipped dc unworked for now. Finish the cluster with 1 dc and 1 fpdc. Then work 9 (10) dc. Cable the cluster (see first cluster explanation). Work 9 (10) dc. Cable the cluster. Work 2 dc. Total stitch count = 43 (46).
Row 5: Ch 2. Work 1 dc. Work in back of cable cluster: 1 bpdc, 1 dc, 1 bpdc in the fptc from the previous row, 1 dc in the space between the two fptc to restore the dc you skipped, 1 bpdc in the second fptc from the previous row, 1 dc, 1 bpdc. Then work 9 (10) dc. Work in the back of the cable cluster the same as the first. Work 9 (10) dc. Work in the back of the cable cluster. Work 5 (6) dc. Total stitch count = 46 (49).
Row 6: Ch 2. Work 4 (5) dc. Work the cable cluster without twisting, work: 1 fpdc, 1 dc, 1 fpdc, 1 dc, 1 fpdc, 1 dc, 1 fpdc. Then work 9 (10) dc. Work in the cable cluster. Work 9 (10) dc. Work in the cable cluster. Work 2 dc. Total stitch count = 46 (49).
Row 7: Ch 2. Work 1 dc. Work in back of cable cluster: 1 bpdc, 1 dc, 1 bpdc, 1 dc, 1 bpdc, 1 dc, 1 bpdc. Then work 9 (10) dc. Work in the back of the cable cluster. Work 9 (10) dc. Work in the back of the cable cluster. Work 5 (6) dc. Total stitch count = 46 (49).
Row 8: Repeat Row 4.
Row 9: Repeat Row 5.
For Rows 10-57, repeat rows 6, 7, 8, and 9 in order, 12 times.
Rows 58-59: Repeat Rows 6 and 7. Tie off.
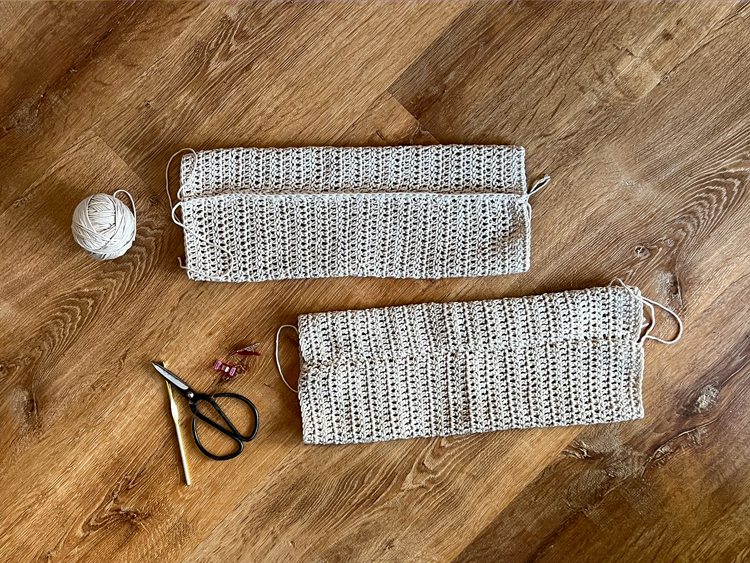
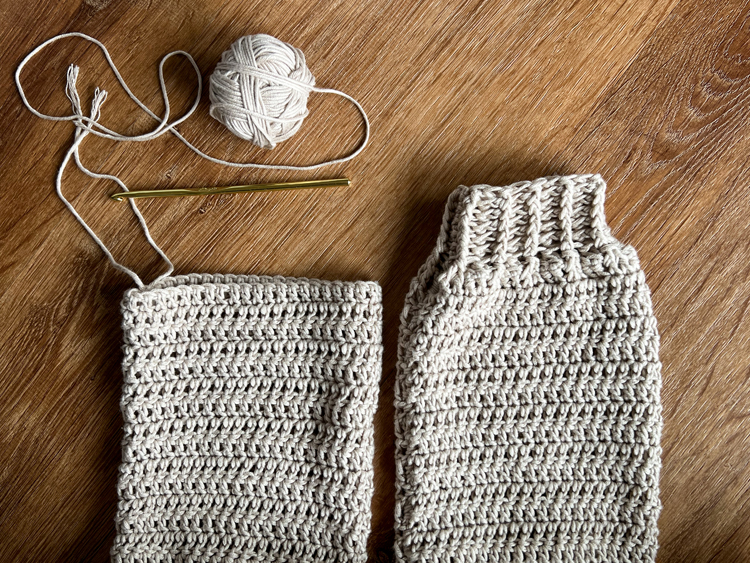
Sleeves SIZES XXS (XS, S, M, L, XL, XXL)
Chain 42 (44, 46, 49, 52, 56, 62).
Row 1: Dc in third chain from the hook, work 39 (41, 43, 46, 49, 53, 59) dc in the remaining chains. Total stitches (skipped chains count as one stitch) = 41 (43, 45, 48, 51, 55, 61).
Row 2: Ch 2. Work 40 (42, 44, 47, 50, 54, 60) dc. Total stitch count = 41 (43, 45, 48, 51, 55, 61).
Rows 3 – 33: Repeat Row 2. Tie off.
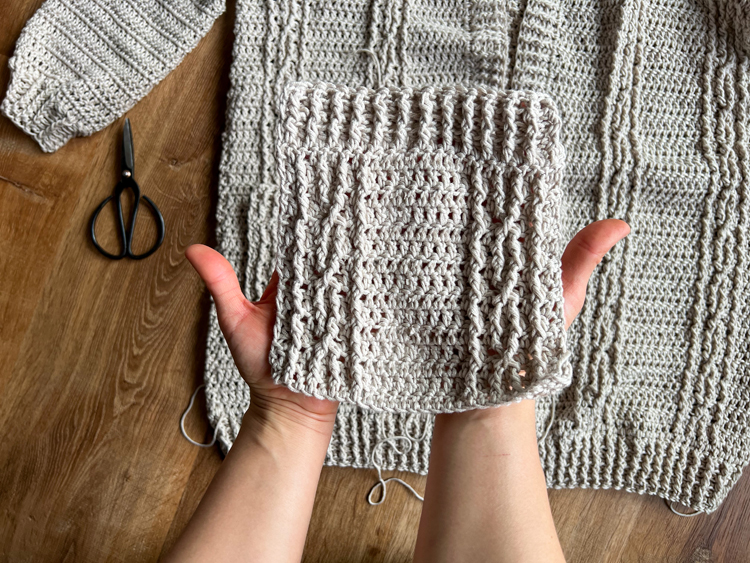
Pockets SIZES XXS (XS, S, M, L) – make one, optional
Chain 29 (29, 30, 31, 32).
Row 1: Dc in third chain from the hook, work 26 (26, 27, 28, 29) dc in the remaining chains. Total stitches (skipped chains count as one stitch) = 28 (28, 29, 30, 31).
Row 2: Ch 2. Work 2 dc. Create a cable cluster: 1 fpdc, 1 dc, 1 fpdc, 1 dc, 1 fpdc, 1 dc, 1 fpdc. Then work 8 (8, 9, 10, 11) dc. Create another cable cluster. Work 3 dc. Total stitch count, including ch 2 as one stitch = 28 (28, 29, 30, 31).
Row 3: Ch 2. Work 2 dc. Work in back of cable cluster: 1 bpdc, 1 dc, 1 bpdc, 1 dc, 1 bpdc, 1 dc, 1 bpdc. Then 8 (8, 9, 10, 11) dc. Work in the back of the cable cluster. Work 3 dc. Total stitch count = 28 (28, 29, 30, 31).
Row 4: Ch 2. Work 2 dc. Begin cabling: Work 1 fpdc, 1 dc. Skip the next fpdc and dc and work a fptc in the third stitch from the hook. Cross backward and fptc in the skipped fpdc. Leave the skipped dc unworked for now. Finish the cluster with 1 dc and 1 fpdc. Then work 8 (8, 9, 10, 11) dc. Cable the next cluster (see first cluster explanation). Work 3 dc. Total stitch count = 26 (26, 27, 28, 29).
Row 5: Ch 2. Work 2 dc. Now work in each cable cluster from the back. 1 bpdc, 1 dc, 1 bpdc in the fptc from the previous row, 1 dc in the space between the two fptc to restore the dc you skipped, 1 bpdc in the second fptc from the previous row, 1 dc, 1 bpdc. Then work 8 (8, 9, 10, 11) dc. Work in the back of the cable cluster in the same way as the first. Work 3 dc. Total stitch count = 28 (28, 29, 30, 31).
Row 6: Ch 2. Work 2 dc. Work the cable cluster without twisting, work: 1 fpdc, 1 dc, 1 fpdc, 1 dc, 1 fpdc, 1 dc, 1 fpdc. Then work 8 (8, 9, 10, 11) dc. Work in the cable cluster. Work 3 dc. Total stitch count = 28 (28, 29, 30, 31).
Row 7: Ch 2. Work 2 dc. Work in each cable cluster from the back: 1 bpdc, 1 dc, 1 bpdc, 1 dc, 1 bpdc, 1 dc, 1 bpdc. Then work 8 (8, 9, 10, 11) dc. Work in the back of the cable cluster. Work 3 dc. Total stitch count = 28 (28, 29, 30, 31).
Row 8: Repeat Row 4.
Row 9: Repeat Row 5.
For Rows 10-13, repeat rows 6, 7, 8, and 9 in order.
Row 14: Ch 2. Work *fpdc and bpdc.* Repeat from * to * 12 times. For XXS and XS work 1 dc. For S work 1 fpdc and then 1 dc. For M work 1 fpdc, 1 bpdc, 1 dc. For L work 1 fpdc, 1 bpdc, 1 fpdc, 1 dc. Total stitch count = 28 (28, 29, 30, 31).
Row 15: Ch 2. Work *bpdc and fpdc.* Repeat from * to * 12 times. For XXS and XS work 1 dc. For S work 1 bpdc and then 1 dc. For M work 1 bpdc, 1 fpdc, 1 dc. For L work 1 bpdc, 1 fpdc, 1 bpdc, 1 dc. Total stitch count = 28 (28, 29, 30, 31).
Rows 16-19: Repeat Rows 14 and 15 in order twice.
Row 20: Repeat Row 14. Tie off.
Pockets SIZES XL (XXL) – make one, optional
Same stitch count and size for both XL and XXL.
Chain 30.
Row 1: Dc in third chain from the hook, work 27 dc in the remaining chains. Total stitches (skipped chains count as one stitch) = 29.
Row 2: Ch 2. Work 10 dc. Create a cable cluster: 1 fpdc, 1 dc, 1 fpdc, 1 dc, 1 fpdc, 1 dc, 1 fpdc. Then work 11 dc. Total stitch count, including ch 2 as one stitch = 29.
Row 3: Ch 2. Work 10 dc. Work in back of cable cluster: 1 bpdc, 1 dc, 1 bpdc, 1 dc, 1 bpdc, 1 dc, 1 bpdc. Then 11 dc. Total stitch count = 29.
Row 4: Ch 2. Work 10 dc. Begin cabling: Work 1 fpdc, 1 dc. Skip the next fpdc and dc and work a fptc in the third stitch from the hook. Cross backward and fptc in the skipped fpdc. Leave the skipped dc unworked for now. Finish the cluster with 1 dc and 1 fpdc. Then work 11 dc. Total stitch count = 29.
Row 5: Ch 2. Work 10 dc. Now work in each cable cluster from the back. 1 bpdc, 1 dc, 1 bpdc in the fptc from the previous row, 1 dc in the space between the two fptc to restore the dc you skipped, 1 bpdc in the second fptc from the previous row, 1 dc, 1 bpdc. Then work 11 dc. Total stitch count = 29.
Row 6: Ch 2. Work 10 dc. Work the cable cluster without twisting, work: 1 fpdc, 1 dc, 1 fpdc, 1 dc, 1 fpdc, 1 dc, 1 fpdc. Then work 11 dc. Total stitch count = 29.
Row 7: Ch 2. Work 10 dc. Work in each cable cluster from the back: 1 bpdc, 1 dc, 1 bpdc, 1 dc, 1 bpdc, 1 dc, 1 bpdc. Then work 11 dc. Total stitch count = 29.
Row 8: Repeat Row 4.
Row 9: Repeat Row 5.
For Rows 10-13, repeat rows 6, 7, 8, and 9 in order.
Row 14: Ch 2. Work *fpdc and bpdc.* Repeat from * to * 12 times. Work 1 fpdc and then 1 dc. Total stitch count = 29.
Row 15: Ch 2. Work *bpdc and fpdc.* Repeat from * to * 12 times. Work 1 bpdc and then 1 dc. Total stitch count = 29.
Rows 16-19: Repeat Rows 14 and 15 in order twice.
Row 20: Repeat Row 14. Tie off.
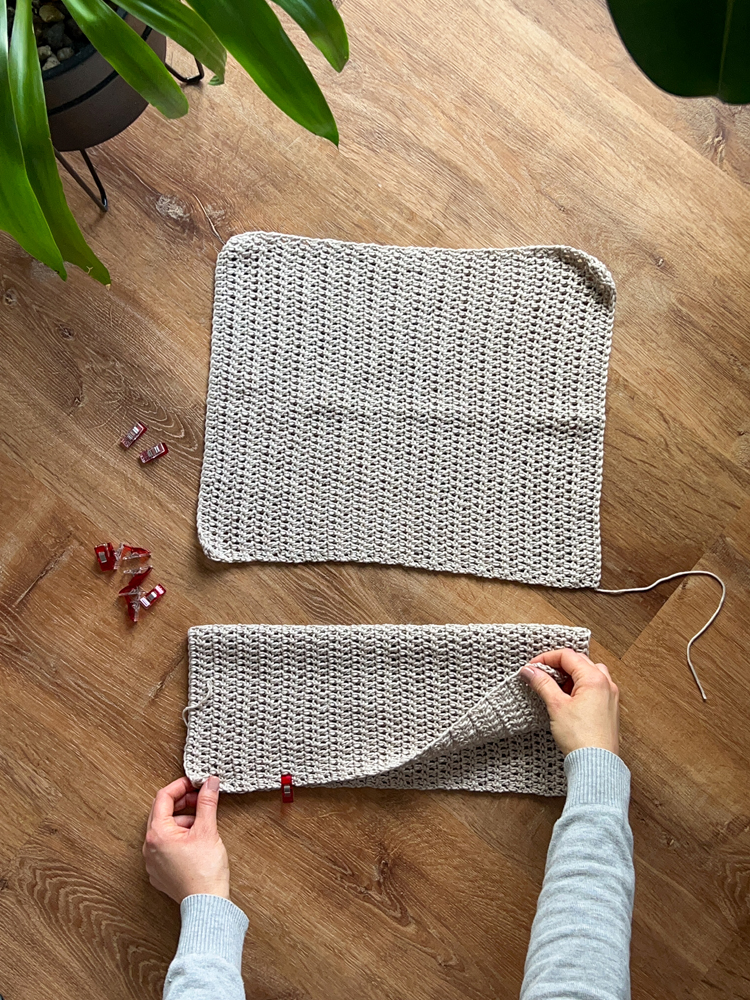
Cardigan Construction
Please refer to the Rectangle Cardigan post for more instruction on this process.
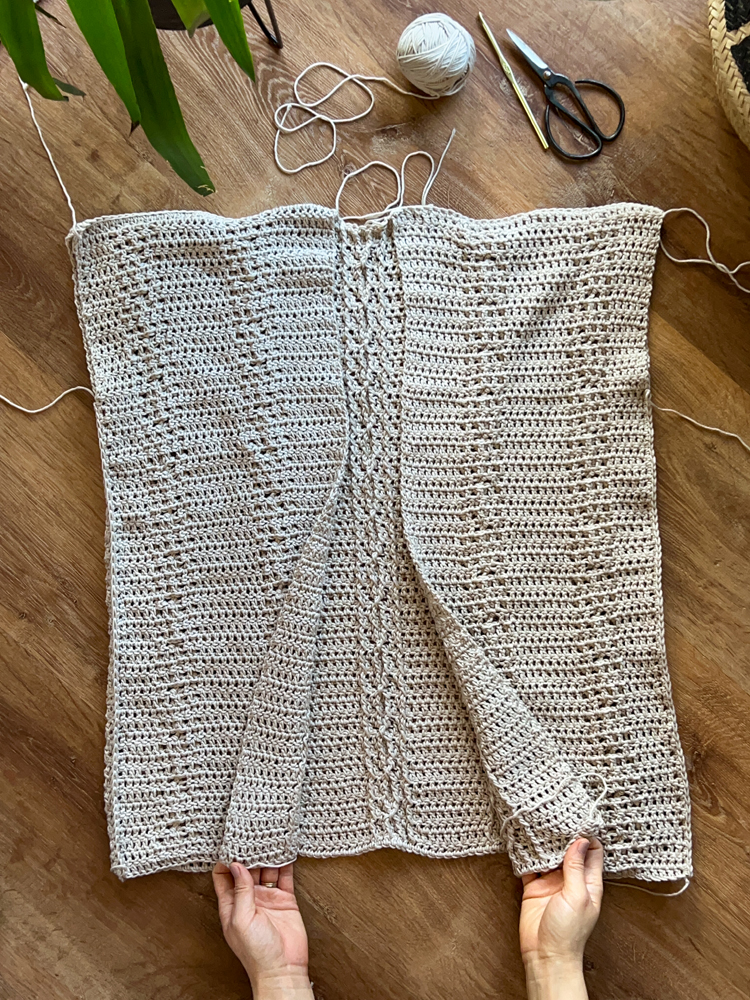
Lay the front piece face down onto the back piece (right sides or cabled sides facing each other). The sides with the starting chains tend to be less stretchy, so choose the ending rows of each piece. You want the stretcheir ends to be at your shoulders. Ensure the cables match up with each other and then seam the shoulders together with sc.
Because you are joining stitches to stitches (and not rows to rows) you only need to work 1 sc per stitch.
FIT CHECK: Now that you have seamed the shoulders, it’s time to check to see if you like the cardigan length. See the SIZING ADJUSTMENTS section if you want to change the length. Double check the sleeve length as well. It’s easier to adjust length now before you add the collar or ribbing.
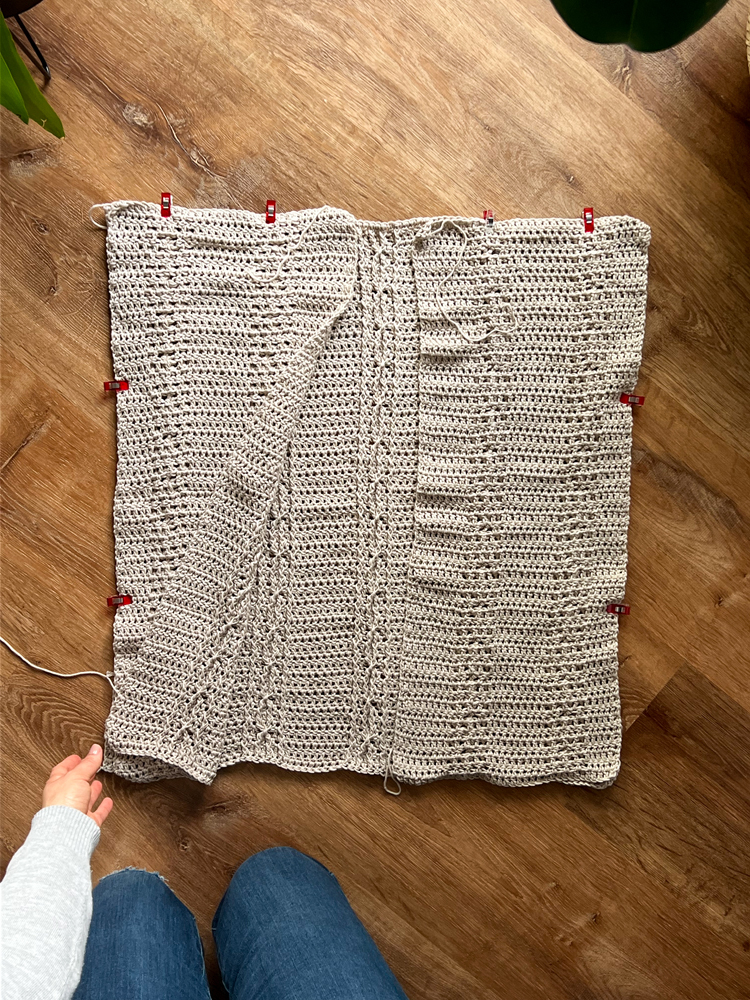
Arm Hole or Sleeve Opening
To create an arm hole, you will be seaming the sides but leaving some rows unworked. Using the guide below, count down rows from the shoulder seam to where you will start the side seam.
Use the first number to count down from the shoulder seam to the start of the side seam, for the front and back piece. Then mark with a clip or stitch marker. The second number in () combines the front and back count into the total row count of the sleeve opening.
XXS – 10 (20) || XS, S – 11 (22) || M – 12 (24) || L – 14 (28) || XL – 15 (30) || XXL – 16 (32)
NOTE: The sleeve should stretch out slightly to fill this arm hole. Make sure the stretchier end of the sleeve is attached in the arm hole.
Seam the sides from the clips/stitch markers to the bottom of the cardigan as you did the shoulders. You are joining row side to row side instead of stitch to stitch, so work 2 sc in the sides of each row, working through both front and back layers.
FIT CHECK AGAIN: Try it on again and make sure the sleeve opening feels comfortable. Hold the sleeve up to the hole to test fit as well. The sleeve should have to stretch some to fit the arm hole.
Sleeves
Fold the sleeves in half, row side to row side (not stitches to stitches). Seam together with sc stitches. Turn right side out.
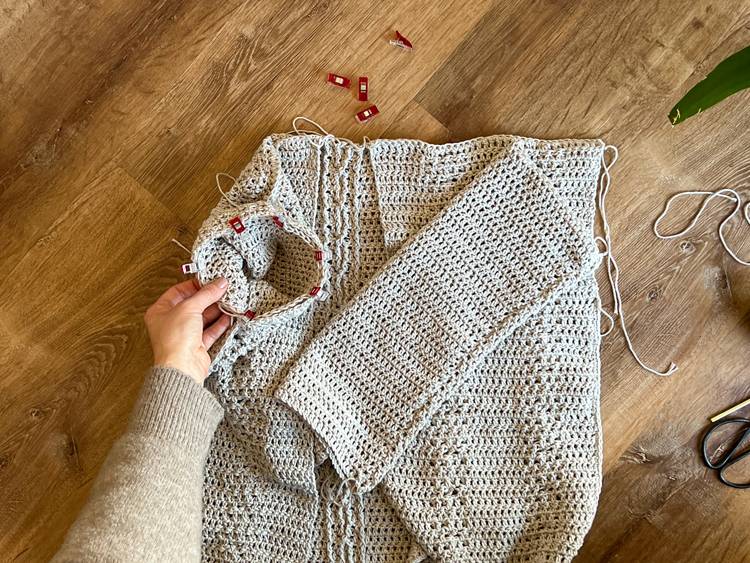
Insert the sleeves into the body of the cardigan (still inside out, right sides facing) and attached to the arm holes or sleeve openings with sc stitches. Make sure the stretchier end of the sleeve is attached here.
Hem Band
Now start adding the ribbing to the bottom hem, collar, and sleeve hems.
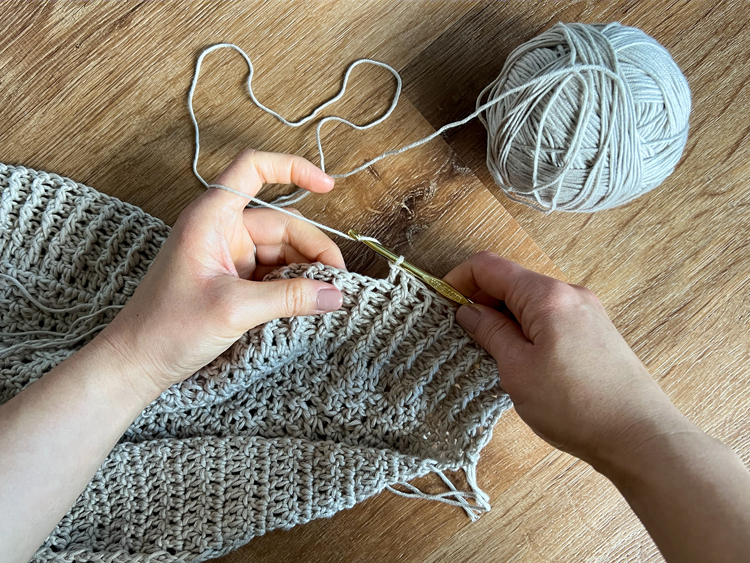
Slip stitch into one corner of the bottom of the cardigan.
Row 1: Ch 2 and then work a dc in each stitch across the entire bottom length of the cardigan. Total stitch count = 139 (147, 155, 163, 175, 187, 200) and will remain the same for each row in the hemband.
Row 2: Ch 2, then work alternating fpdc and bpdc until the end of the row. Always work a regular dc in the last stitch.
Row 3: Ch 2, then work a bpdc wherever you worked a fpdc in the previous row and vice versa. The goal is to maintain the same rises and falls of the texture from the previous row.
Rows 4, 6: Repeat Row 2
Rows 5, 7: Repeat Row 3
When you get to the end of Row 7, do not tie off. Turn into the collar and move to the next section below.
Collar
Row 1: Ch 2. Dc in each stitch up the side, across the back opening, and down the other side. Work 2 stitches into the sides of each row and one in each stitch at the back. With 66 rows on each front piece with hem band included and 9 stitches at the neck/back, the total stitch count should be = 273. This should be the same stitch count for each size.
Row 2: Ch 2, then work alternating fpdc and bpdc until the end of the row. Always work a regular dc in the last stitch.
Row 3: Ch 2, then work a bpdc wherever you worked a fpdc in the previous row and vice versa. The goal is to maintain the same rises and falls of the texture from the previous row.
Row 4: Repeat Row 2
Row 5: Repeat Row 3. Tie off.
Sleeve Hem Bands
The goal is to cinch in the sleeves to half the circumference with decreasing stitches. This means we will join two dc together with one stitch for the first round (this is worked in rounds and not rows because the sleeve is circular). The Rectangle Cardigan video tutorial demonstrates this, if you need more clarification.
Slip stitch to the seam of the sleeve.
Round 1: Ch 2. Work alternating decreasing fpdc, then decreasing bpdc. If left with one dc after your last decreasing bpdc or fpdc stitch, work a regular dc and slip stitch it to the beginning ch 2. Total stitch count after decreasing should be = 20 (21, 22, 24, 27, 29, 31).
Round 2: Ch 2. Work alternating fpdc and bpdc to match the fpdc/bpdc pattern you started in the first round. Slip stitch to the ch 2.
Rounds 3 – 7: Repeat Row 2. Tie off.
Pockets (Optional)
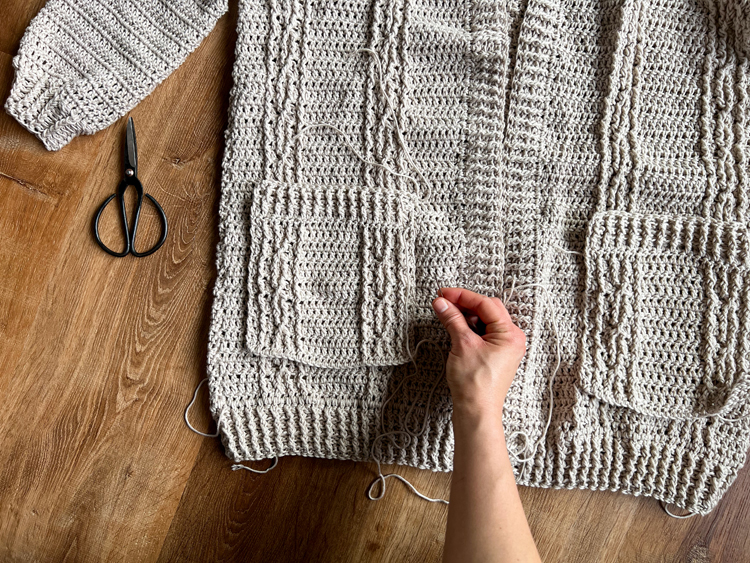
Center the pockets on the front pieces and align them with the cables. Use a yarn needle to sew the pockets in place. Take care to work extra stitches at the top corners to ensure they are secure.
Tying Off
Thread each tail onto a yarn needle and sew it into surrounding stitches in a way that disguises the tail.
Once you have sewn in a few inches, pull it snugly and snip close to the cardigan. The tension should snap it back into the cardigan, hiding the end. Repeat for all the tails.To save time on tying off joined skeins, consider joining them with a magic knot as you go.
All done!

For more free crochet patterns, check them out HERE.
Or get the ad free PDF version of this pattern in my shop:
Love it 😍. Thank you 💖
Thank you Alijona!
This is my first ever crochet sweater and it turned out so beautiful! Thank you so much for this Pattern-it’s perfect!
That makes me so happy to hear!
Hello hello! Is there another link to the video by any chance? It doesn’t show up when I scroll through on my web browser (but will show up on my phone!). It’s just too small to really see what’s going on in my phone unfortunately!
Excited to make this!
Hi Carmen,
I am so sorry that I just now saw your comment. I don’t have another video link but because it initially runs with ads it can be mistaken for a pop up ad. If you “x” out of it, you have to refresh the page to get it back. If that doesn’t work, email me [email protected] and I can troubleshoot the issue with you.
Delia
Hi beautiful cardigan could it be made with a NR 4 worsted weight yarn?
It could but the sizing will be changed and it will be heavier because it’s a thicker yarn.
Hi there – can you clarify whether the turning chain counts as a stitch? I wasn’t sure what you meant by “skipped chains count as one stitch”.
Thank you!
–
Back Piece SIZES XXS (XS, S, M, L) – make one
Chain 74 (78, 82, 86, 92)
Row 1: Dc in third chain from the hook, work 71 (75, 79, 83, 89) dc in the remaining chains. Total stitches (skipped chains count as one stitch) = 73 (77, 81, 85, 91).
Hi Elle,
I apologize that I just now saw your comment. I am quicker to reach on Instagram by DM (@deliacreates). Yes, the two chains skipped over at the beginning of the row when you work in the 3rd chain, or the turning chains, count as 1 dc stitch. I hope that helps. Please DM me if you have any more questions. I see those messages within a day or so.
Better late than never! Just found this pattern and it is exactly what I was looking for. The corresponding videos are great and I can’t wait to get started!
Your cabled cardigan is lovely. Is there a pdf of the pattern that can be easily printed? If it’s here, I’m sorry I can’t find it.
Hi! I’m sorry but I do not have an ad free printable version yet. I’m working on my shop and hope to have more ad free printable patterns available soon.