

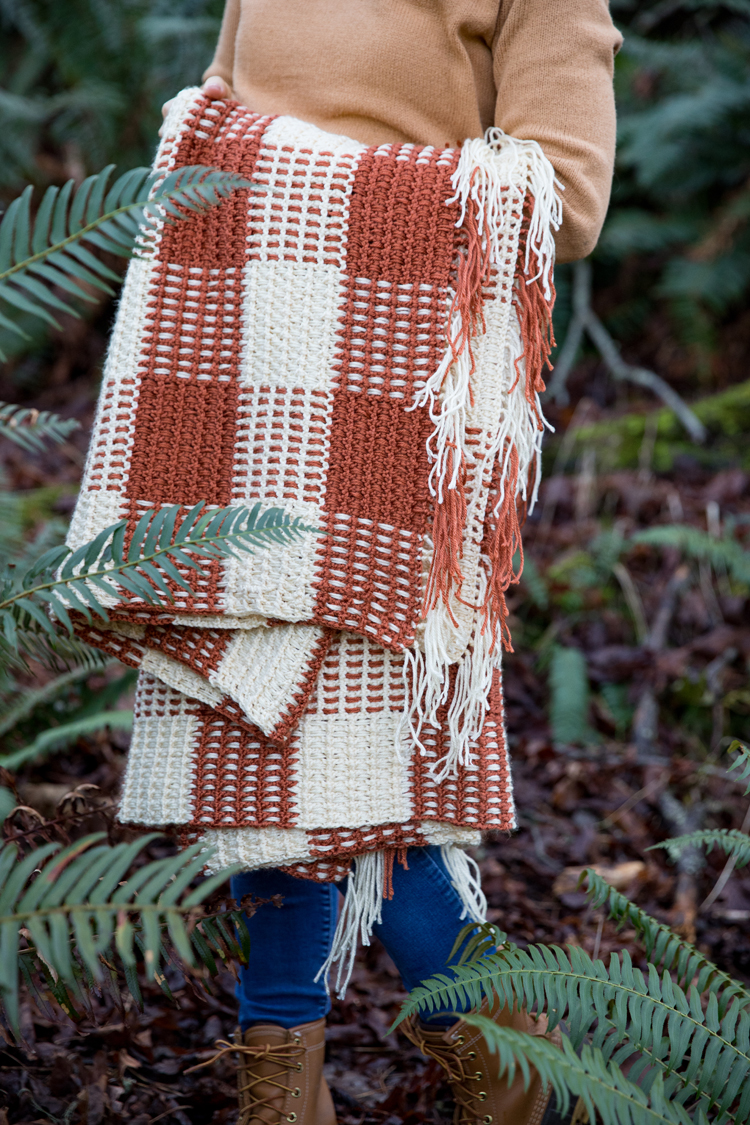
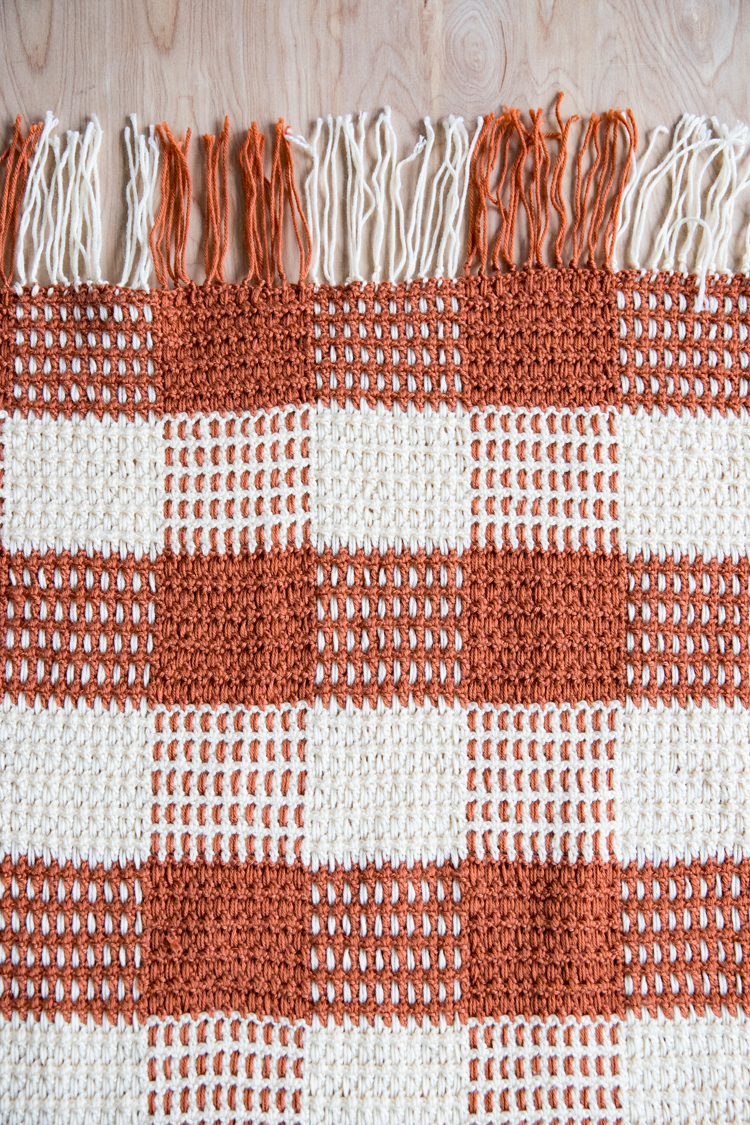
Part crochet, part… weaving?
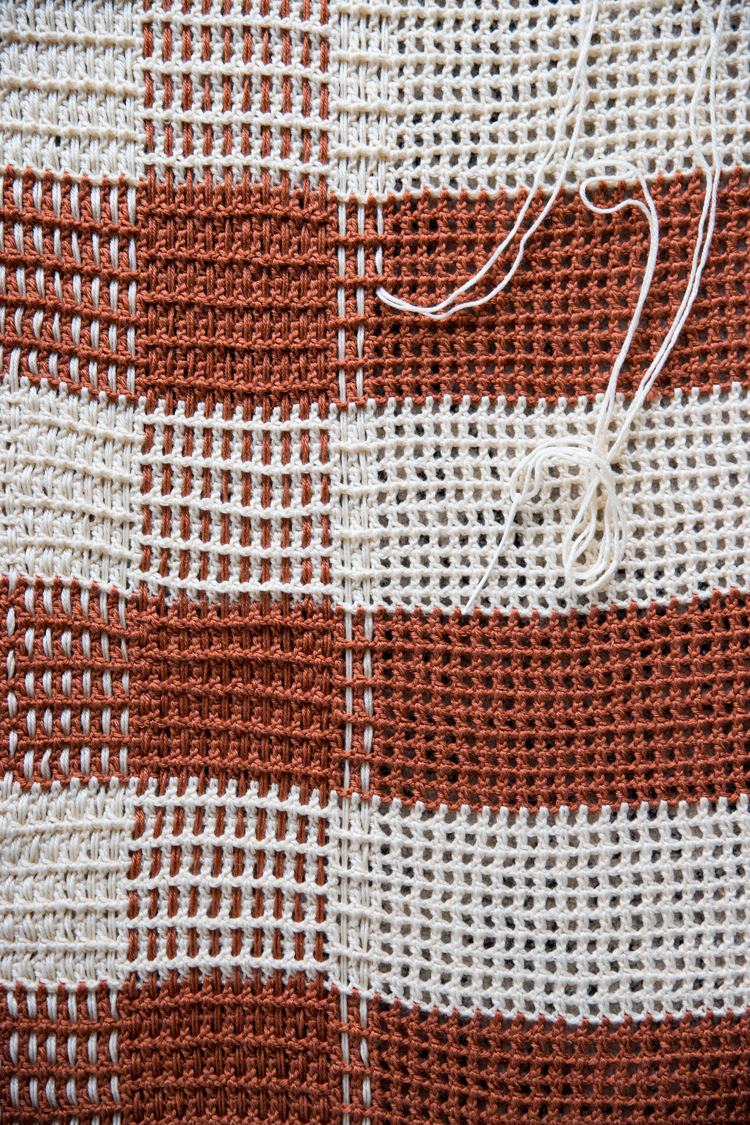
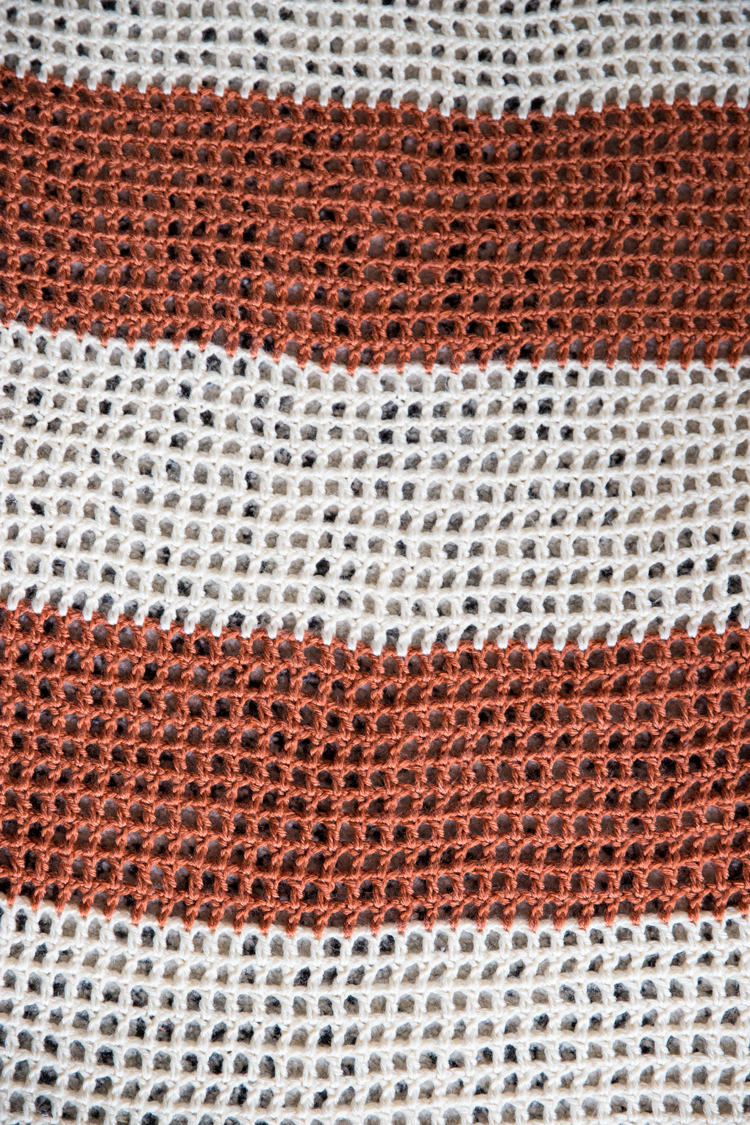
That’s right! This blanket is made up of a crocheted grid work base, and then yarn is woven through it to create a gingham pattern.
It’s totally beginner friendly too. All you need to know is how to chain and double crochet, and then sew a running stitch.
The trick is to have patience. I am convinced that there are two types of crocheters…blanket crocheters and impatient crocheters. I definitely tend to fall into the second category.
I REALLY wanted to try this technique though, so I persevered and slowly finished this throw sized blanket over almost a year. Yeah…I started in February of 2020. Haha. If you ever feel like you’re a slow crocheter, take comfort in knowing I’m soooo much slower. 😉
I think that if you don’t mind the repetition, it should go much quicker for you.
Let’s get started…
MATERIALS
- Two colors of worsted weight yarn (see material notes for amounts)
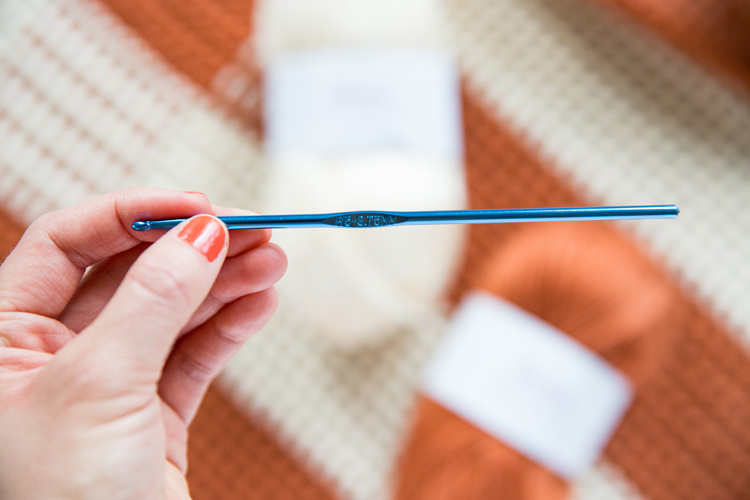
- F/5 or 3.75 MM hook
- Yarn needle
- Scissors
Material Notes:
I recommend getting 700 grams of yarn for each color.
This pattern requires approximately 1200 grams or 2,600 yards of yarn. I used this Brava yarn from WeCrochet that comes in skeins of 218 yards or 100 grams each. I used Persimmon and Cream (although I really wanted to use Brindle but it’s super popular and always out).
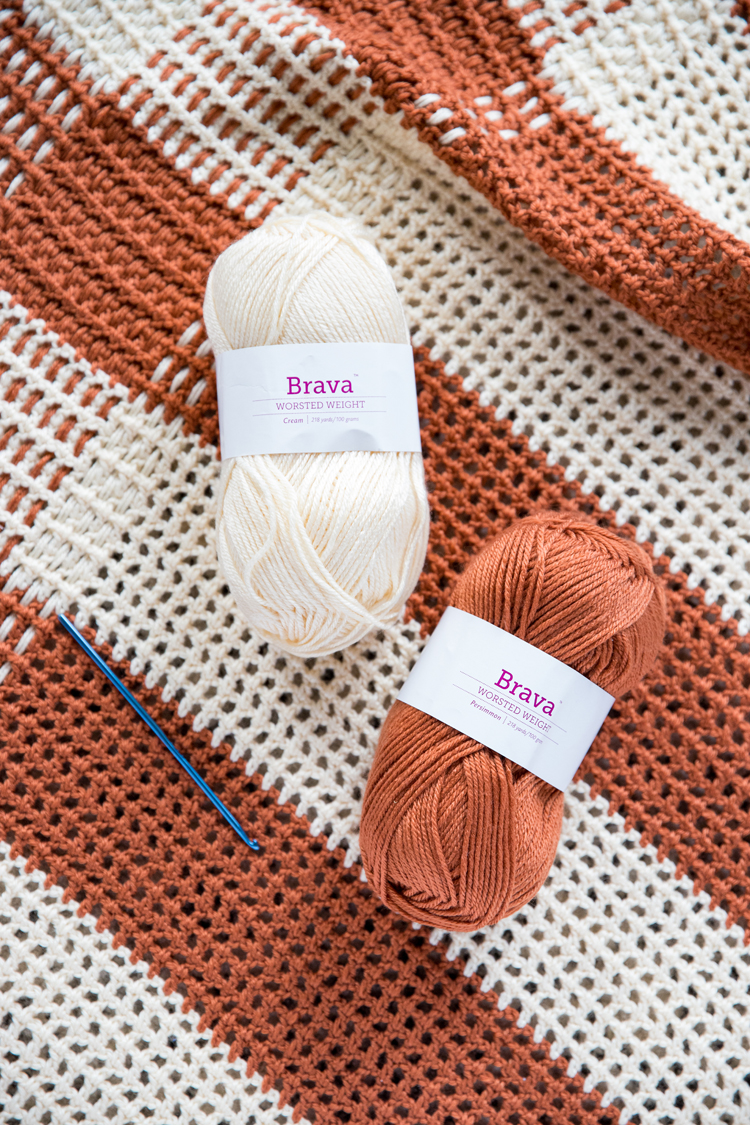
I technically used 12 skeins (6 skeins of each color), but was glad to have a couple of extras because I made a mistake (skipped a stitch while distracted crocheting) and had to redo a portion of the blanket.
Disclaimer: WeCrochet gifted me this yarn, but my love for their yarns is genuine. They are quickly becoming one of my favorite yarn suppliers! This particular Brava yarn comes in 40 different colors, is so smooth and easy to use, and is regularly $2.49 per skein. I’ve seen it go on sale for less than that before too!
ABBREVIATIONS
- ch = chain
- dc = double crochet
GAUGE
4 x 4 inches = 10 dc (9 ch in between) x 10 rows
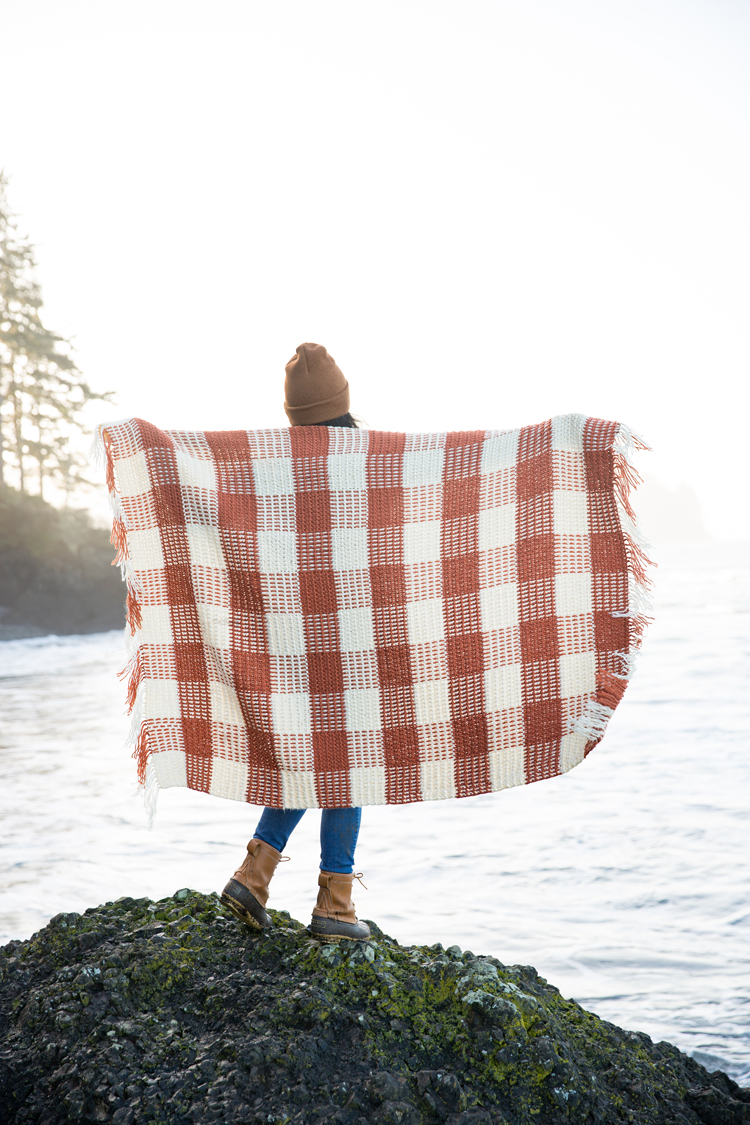
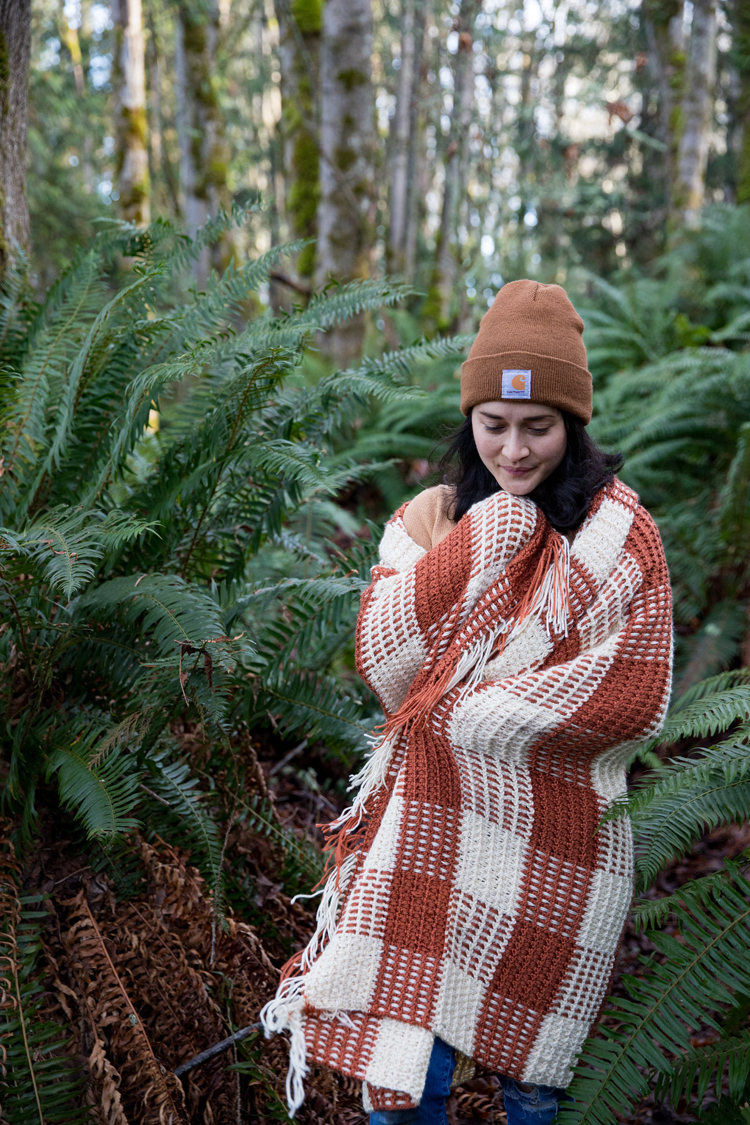
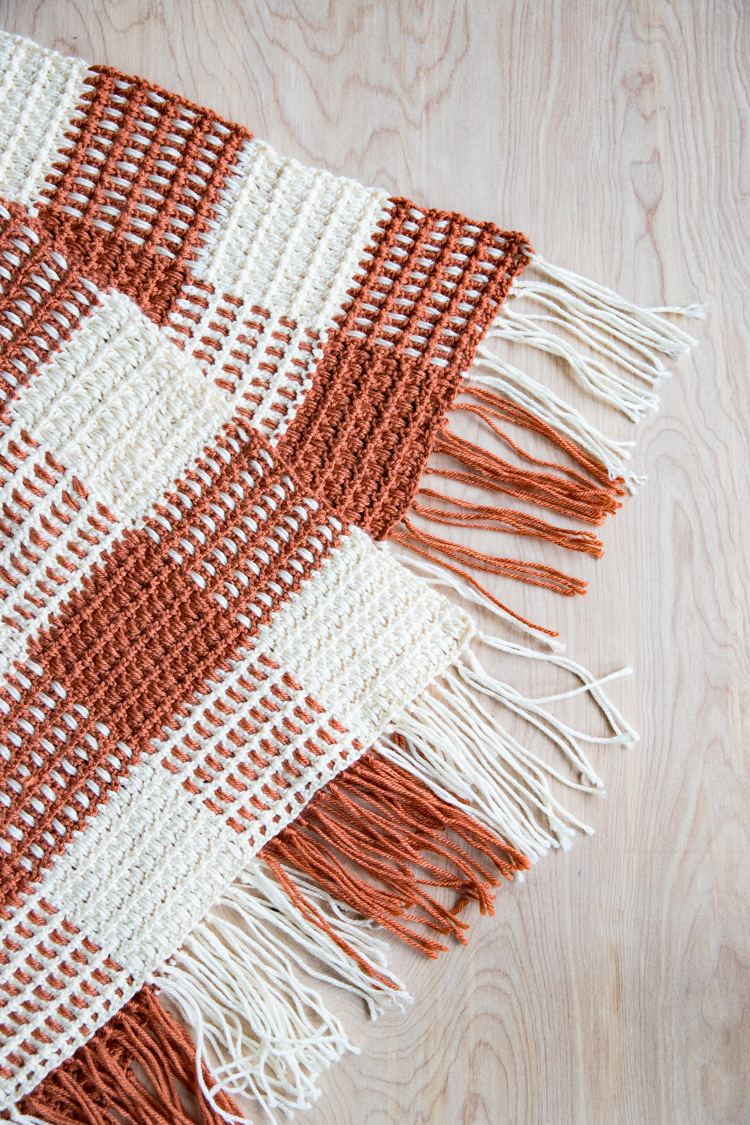
The finished size of this blanket is about 53 inches (minus the fringe) by 46 inches.
VIDEO TUTORIAL
Scroll past and the video will bump to the side or top of the screen so that you can read the pattern while you watch.
PATTERN
Note: This pattern is worked in groups of ten. The width of the blanket is divisible by ten stitches and each color is worked in rows of ten.
Chain 223 in first color. (updated 5/21/24… starting chain was listed as 224 but it should be 223)
ROW 1: Dc in fifth chain from hook. *Ch one, skip ch, dc in next.* Repeat from * to * 107 times. Ch one, skip ch, dc in last ch in the row. (total dc stitches, including beginning chains but not including ch spaces = 111 dc…2 ch = 1 dc in this pattern)
Row 2: Ch 3, skip ch, dc in dc from previous row. *Ch, skip ch, dc in dc from previous row.* Repeat 108 times. (111 dc)
Rows 3 – 10: Repeat Row 2.
Switching Colors:
In the final dc stitch of Row 10, switch colors. As you work the dc, you will yarn over, insert your hook into the dc from the previous row, yarn over, pull through so you have three loops. Yarn over and pull through the first two loops. Then STOP. Pick up your second color, yarn over and pull through the remaining two loops. Start Row 11 in the next color.
Rows 11 – 20: Repeat Row 2 in second color. Switch colors.
Rows 21-30: Repeat Row 2 in first color. Switch colors.
Continue working the grid pattern and switch colors every ten rows for a total of 140 rows.
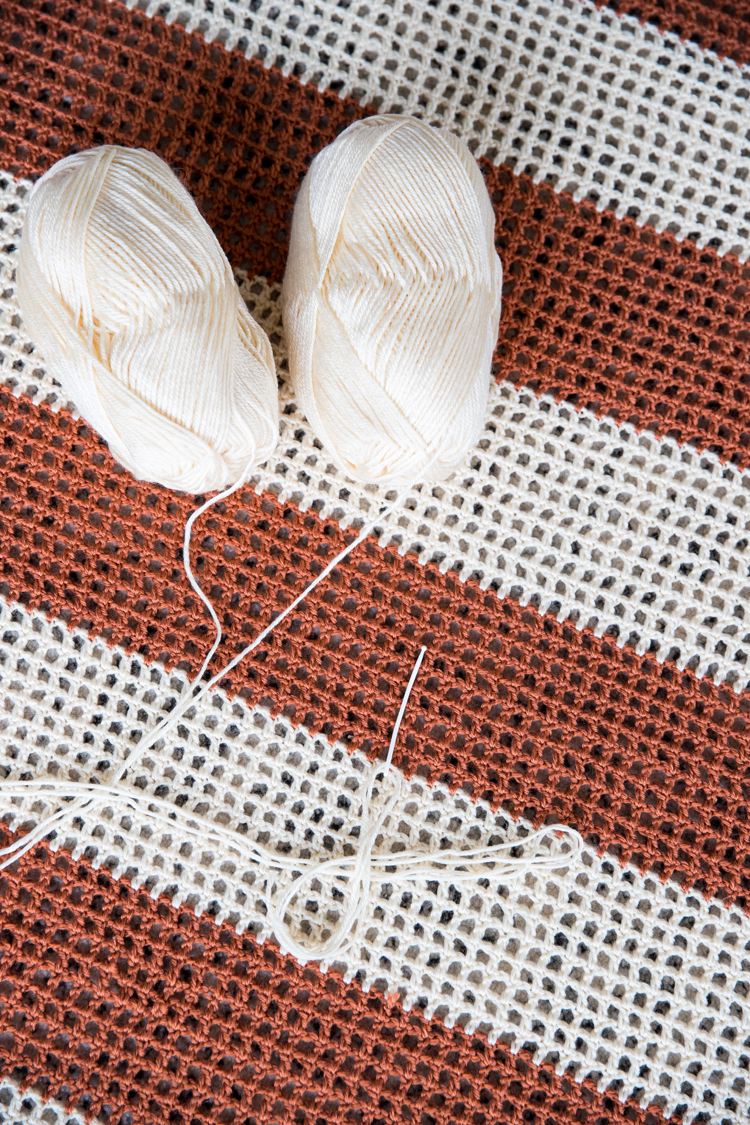
Weave in tails: At the end you will have a lot of tails from color changes and tying in new skeins. Weave in all the ends before moving onto the next step.
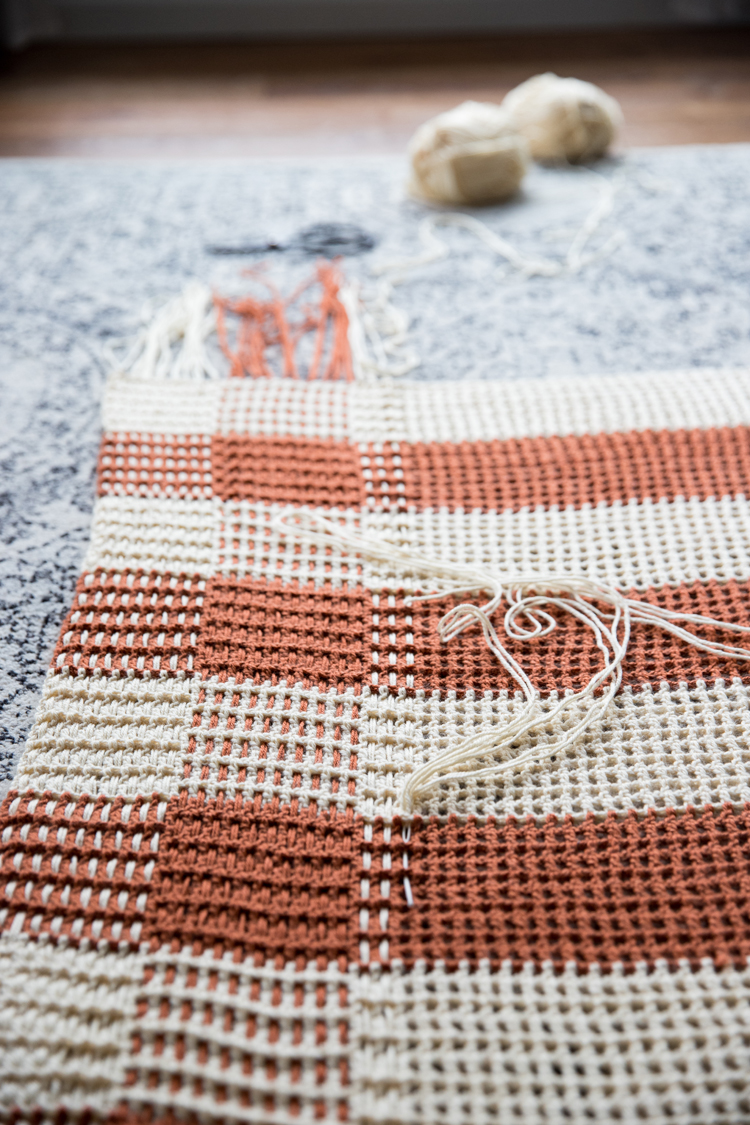
Weaving The Gingham Pattern
- Lay the blanket out flat. This is important for helping the blanket stay square while you weave into it.
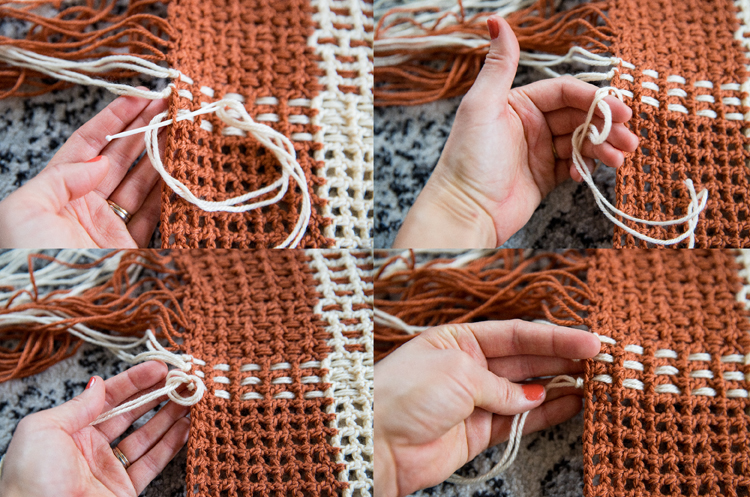
- Working with two strands of yarn at a time, thread them onto a yarn needle and sewing a running stitch between the grid lines. I staggered my stitch lines between colors, but I don’t think you need to per se.
- Leave long tails, longer than you need, on either end of the blanket. Tug on the blanket to make sure it is flat and even before tying the ends. I like to weave them through the edge of the blanket one more time before knotting them to ensure the yarn strands who slide out. Then I knot it with a simple knot with both strands.
- Work ten rows of each color, switching back and forth until you have completed the blanket.
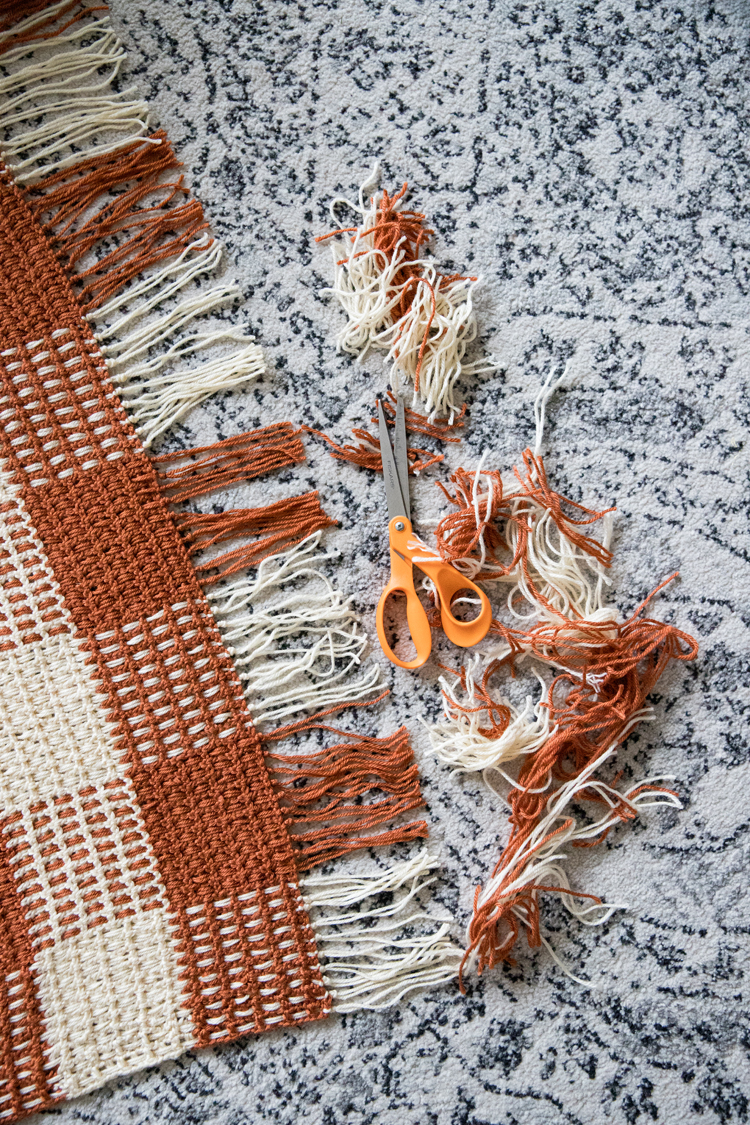
- Trim the yarn tails at the ends to create an even fringe.
You’re done!
The finished size of this blanket is about 53 inches (minus the fringe) by 46 inches. To make this blanket larger or smaller, add or minus groups of ten stitches and/or rows.
Looking at the finished blanket now, I think I could I add another 10 rows to make the blanket a little larger…Maybe I’ll make another. Maybe. Probably not. Ha! 😉
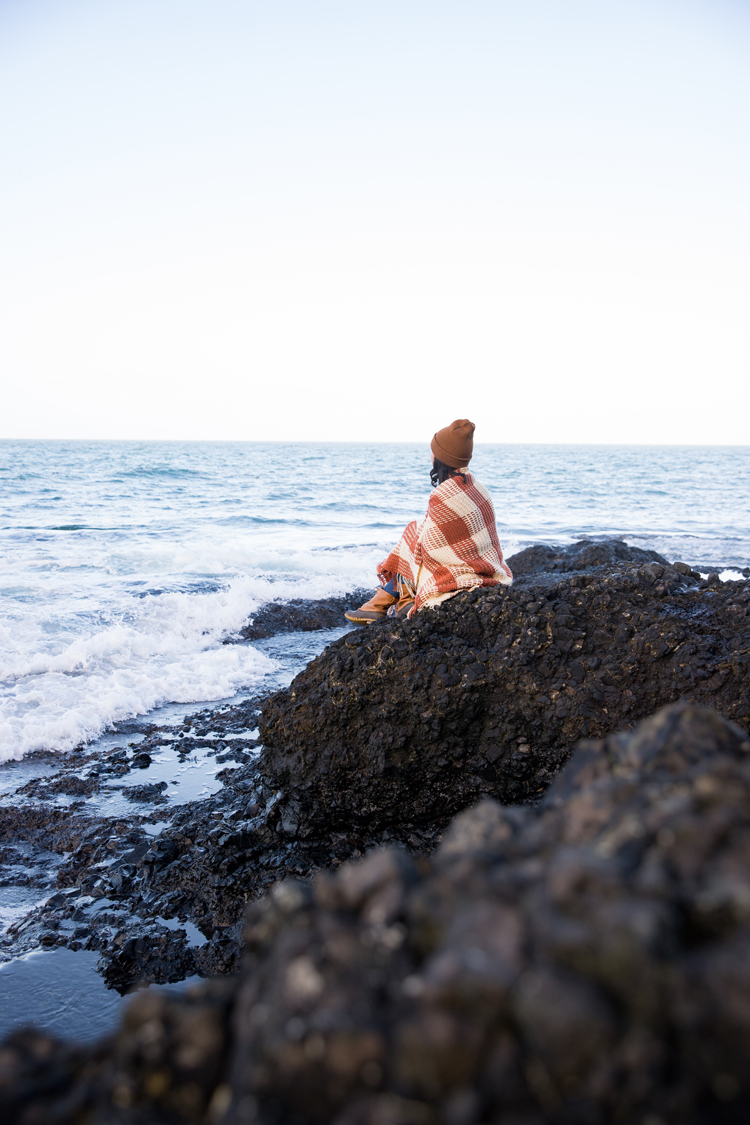
For now, I’m going to wear this blanket as a coat in the forest and at the beach…
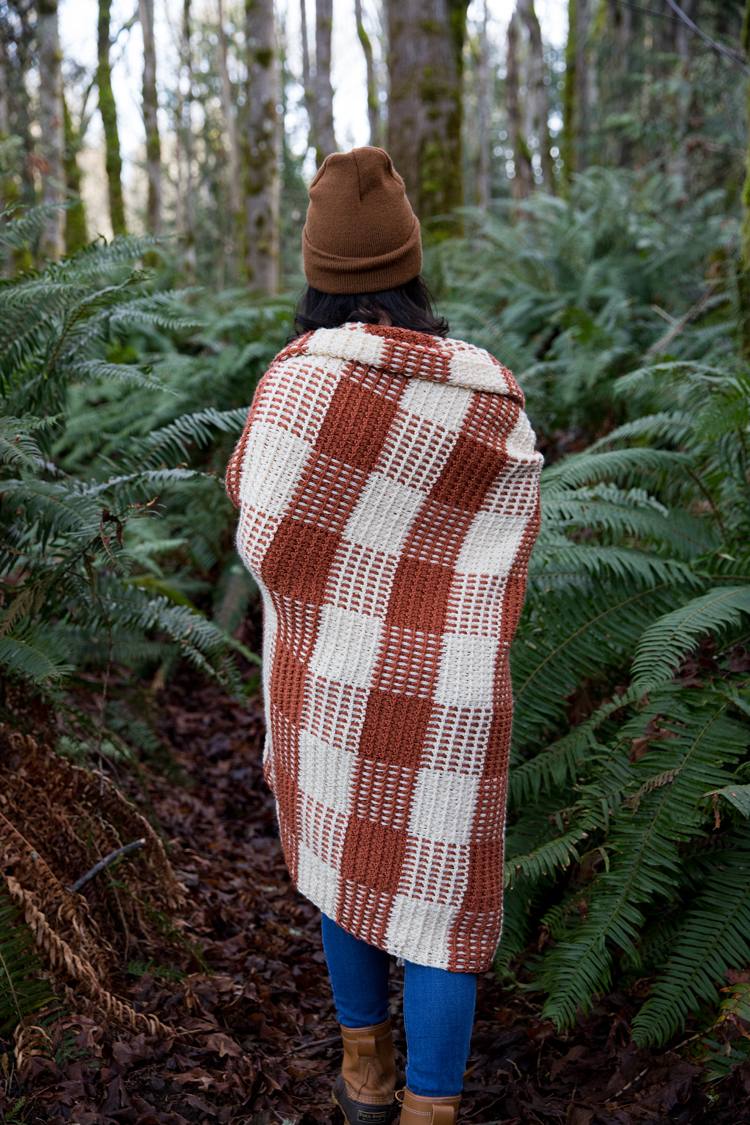
Haha! Of course I’m just doing this for pictures, but I’m laughing at how I look like the kid who forgot we live in the NW, refused to wear a jacket, and then got too cold.
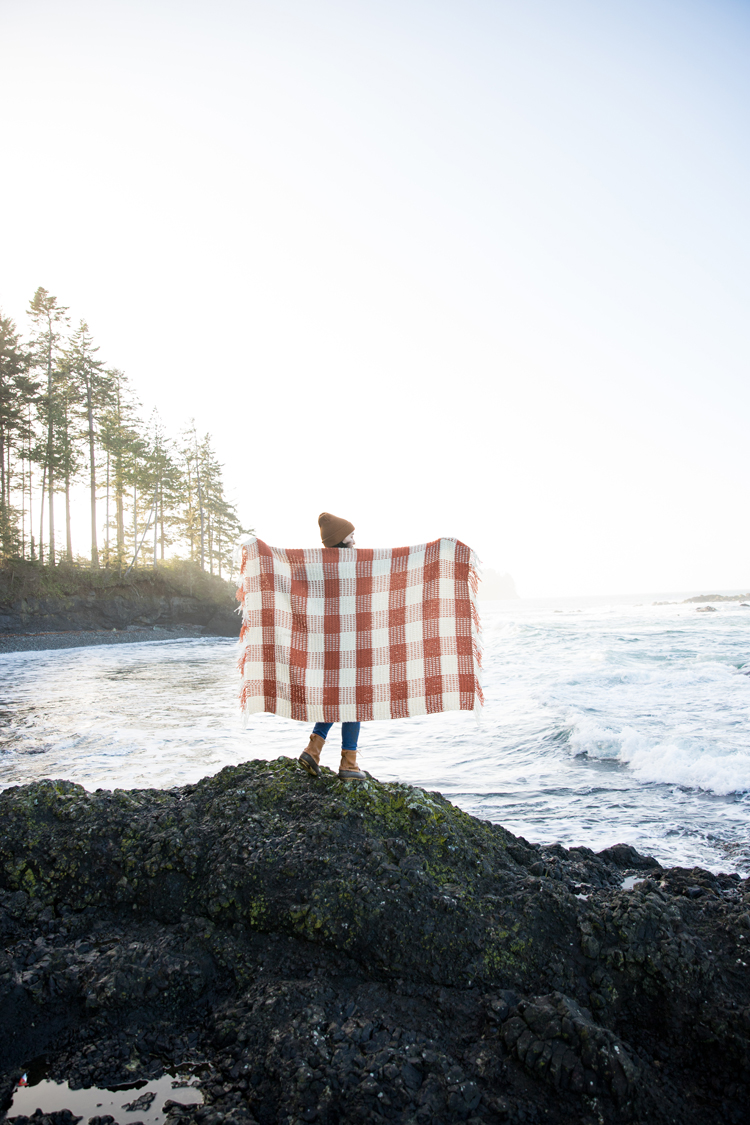

It was effective though and it also cushioned my butt from the pointy rocks. Ha!
I love this! So pretty
Thank you Kell!
I can’t wait to try this. It looks really gorgeous. Coming into Autumn here in Melbourne Australia so a good time to start.
Thank you! I hope you enjoy making it. If you are on instagram, I’d love to see it when you’re done! I’m @deliacreates.
Thank you , thank you .. can’t wait to make this 👏🏼
Ok, this is super cute. And I would totally want to make pillow covers for my couch with this idea. Thanks for sharing. Might have to grab some yarn now. 🙂
I love this pattern and am in the process of making one, using the suggested Brava yarn. Can you please provide washing instructions? The yarn says it is machine washable and tumble dry, but I’m wondering if you recommend hand washing for the blanket and if the dryer is ok? Thank you.
Good question. I run the blanket through the washer, preferably on delicate with my other sweaters, and then I like to air dry it. Even though the yarn can handle going through the washer and dryer, I like to think it lasts longer and protects the woven nature of the blanket if I baby a little.
Hi there, can you provide inst for a smaller version? I would like to use the pattern as a baby blanket.
Sure. The blanket is worked in groups of ten. Ten dc with 9 chains in between equals *approximately* 4 inches and 10 rows equals *approximately* 4 inches (if you are matching the gauge I provided). This blanket is about 53 x 46 inches minus the fringe. Decide how large you want the finished blanket and then subtract stitches and rows accordingly. If you want a blanket about 41″ x 34″ then remove 30 stitches and 30 rows.
Terrific way to combine my passions for weaving and crochet.
Ms. Delia- I Loved this pattern the 1st time I saw it. It really does require a lot of patience- I’m the most impatient person I know but I made it thru! It is my best work yet! Thanks so much for sharing this method! I love to try new things & ways to get things done. I’m actually making two at the same time! They’re gifts for a brother/sister set. Wish I could upload a photo- you’d be so proud- I am! Thanks again- cg
That makes me SO happy to hear! I wish I could see them. The brother and sister getting those blankets are so lucky!
Merci beaucoup pour le partage de votre patron.
Cette couverture a un effet extraordinaire.
Bonne continuation.
I am so inspired! Just received my Malabrigo Rios yarn order from Fabulous Yarn right before the announcement that Malabrigo prices will go up! Now I am patiently waiting for my new Lykke hook to come in so I can get started on making this for my baby due in August. Thank you so much for this pattern and tutorial!
Congrats on the new baby! If you’re on instagram, I would love to see the finished blanket. Your yarns sound lovely! I’m @deliacreates.
This is gorgeous!
Thank you Angela!
I love this pattern and would like to make a queen size one for my bed. Could you tell me the multiple you used to start the foundation row?
Does the length of the first 224 chains represent the width of the final piece? Is this a good estimate to where I should add more rows of 10. I am a large male who loves camping and so think this will be great but would be upset to put so much effort in and get a smaller blanket. Saying that though I’m so excited and this is beautiful thank you for sharing
Great question (also…sorry for my delayed response, I’m more accessible via email: [email protected])…
The starting chain length can be helpful but you will need to stretch it just a little bit to get an idea of how big it will be in the end. The chain will stretch a bit as future rows are worked. It’s hard to know how much to stretch it, so I usually work a few rows and use that measurement. That way, if I want to change the size, then I am only ripping out a few rows.
I hope this helps. Email me if you have any more questions.
I’m not sure if my first comment was posted. I would like to make a queen size blanket of this pattern. Can you help me with the multiple of stitches that I would have to crochet to create this? Thank you for sharing this pattern!
Hi Dee! Sorry about that. I didn’t get notification of a bunch of comments and I had to manually approve them. Good question. So, I worked this blanket in a multiple of 10 chain spaces by 10 rows. Ten chain spaces get woven into, which requires 12 dc stitches with chains in between. Because each group of 10 shares a “side,” you really only need 11 dc stitches with chains in between, except for the last row, which needs 12. That’s why there are 111 dc stitches with chains in between. 10 x 11 = 110 plus one more on the end = 111.
Each woven square is roughly 4×4 inches (10 dc with chains by 10 rows). Once you decide how big you want your blanket you can figure out the math from there. A queen size blanket is about 90 inches by 100 inches. I’d size up when determining the number of stitches. The closest would be 92 inches by 100 inches. So 23 groups of 10 chain woven squares (11 dc) = 253 dc plus one on the end = 254 dc with chains in between.
Your starting number of chains would be 510 (two for starting chains that count as one dc). Dc in fifth chain from the hook, ch, skip a ch, dc in the next. Repeat to the end. You should have 254 dc stitches at the end. Change colors every ten rows. Work 25 rows (100″/4″ = 25).
I think it will end up a bit bigger than 90 x 100 inches of course, but not by much. Plus, bigger is better than too small.
I hope this helps. Let me know if you have any more questions.
do you think it would be possible to follow the pattern but use four colors?
Sure! There are some interesting tartan patterns I have seen on Pinterest that use four colors. I would search there for ideas on how to configure them.
I’m making a variation with 4 colors. I used plaidmaker.com to design my color scheme.
Ooh! Sounds lovely! Thank you for the link.
Does the woven section tend to pull out easily? I’m only 3 rows in but I’m concerned that I’m either not pulling it tight enough or too tight. Ha!
Good question. It doesn’t really. I wouldn’t pull it too tightly or too loosely. Just enough to knot it at the end when it’s perfectly flat. If it’s too tight, it won’t lay flat or it might come out. If too loosely, I could see the woven bits snagging. I hope that helps!
I’m making this gorgeous blanket as a baby gift … and then realized the fringes are not a great idea for baby. 😜 Thinking about doing an edge around the perimeter but any idea about the extra yarn? When I try to weave them back they come out again. Or have I just made a massive mistake? (But it’s soooo cute!!!)
Good thinking. Tassels would not be good for baby. The two strands of yarn are supposed to straddle the edges of the blanket and be tied around them so they won’t come out. I wonder if you could weave in a whole colored stripe section at a time and then weave the ends into the stitches next to it (which should match the color) to disguise it. Then add a border at the very end.
Very pretty pattern! Can I make a dress out of this stitch?
Sure! You would probably need to line it, or wear a slip underneath, but I don’t see why not.
Hi Delia
Thank you for this tutorial & the free pattern <3 It will be a perfect autumn project for me 🙂
– my only question is: I don't see any video on here? Were can I find it? Is it supposed to pop up by itself?
Thank you in advance 🙂
Hi Frida,
The video tutorial should pop up under the “Video Tutorial” heading. If you cannot see it, you might be using an ad blocker. If an ad blocker is in place or if you are using an internet browser that blocks ads, then it will not show up. If this is not the case and you still cannot see it, will you email me? [email protected] …I will try to trouble shoot the problem with you.
Delia
Oh, another thing! Do you yarn over or yarn under?
https://www.crochetaustralia.com.au/pdf/ht/yarn-under.pdf
I have just realized, that I’ve been making all of my yarn overs wrong – I actually yarn under like shown in the link above – but I’m not sure how it will matter in this pattern, hence why I ask how you do it 🙂
Good question! I yarn over. I’ve learned the when you yarn under it can create a tighter, closer gauge in amigurumi. I don’t know how it would fare in a project like this though.
I just love this blanket, I want to make one for my son, he is leaving for college in a couple of weeks. He wants Navy blue and gray? I love your colors could you recommend yarn for his colors? Thank if you if you can.
Hi Krissi,
I am so sorry that I am just now seeing your comment. If you still want some yarn advice, I really like the Brava yarn colors from WeCrochet. The Solstice heather (blue) and Dove heather (light gray) would be lovely. They also have a Cobblestone heather that is darker, but I think the contrast of light gray with the navy blue would be bolder. Here’s a link: https://www.crochet.com/yarn/brava-worsted/c/5420219
Such a pretty blanket! I know, though, not crochet. Is there a knitting pattern out there for this?
Thanks
Thank you! I’m sorry but I don’t know of a knitted version.
Hi, what would the chain be if you wanted to do 8×8 squares or 6×6 squares?
I’m not sure. That would be a very different pattern. What I would do is work up swatches to figure out the size needed. Starting chains are usually not a great reflection of how big a finished square will be, so I would work up at least a few rows to see how much I would need to adjust sizing. Pull it out and keep trying until you get the size squares you are looking for. Good luck!
Where did you get that yarn needle with the ball at the end? And, what is it called?
I inherited it from my grandma. I thought it would be easy to find one like it now, but I can see why you asked because I cannot find one with a ball tip. I have found other large eye, plastic, yarn needles though. They should work just as well. You can find them at any craft store and even at big box stores.
Where is the video tutorial? I don’t see a link.
It is under the “Video” heading but it should pop to the top or side of your screen as you scroll through the post.
Finally finished this blanket! Loved putting it together and learning a new technique to create a different look.
Aw yay! So glad you enjoyed the project.
Hi! I’m currently working on this blanket myself, and I’m wanting to know how long your strings are that you wove through. You hold them double, and in the pictures you have two skeins to pull from. I’m using large balls of yarn and I’ll have to cut the length before weaving, and I don’t want to mess up
Good question. The blanket is 53 inches wide minus the fringe. Decide how long you want your fringe, add a couple of inches to that (so that you can trim it later and make it even), double it (for both sides), and then add it to 53. That should give you a good idea how long the strings need to be.
I would also double check that our gauges match and that your blanket is 53 inches wide. This may vary a little depending on tension and yarn type.
I hope that helps!
I am in the process of making this navy blue and cream coloured. I’ve done the base and am about to start the fringe. How do I know how much to cut for the weaving? Is it just a guess?
Thanks
I pulled the yarn out the length of the blanket, added a bit for fringe on each end (About 5-6 inches so that you can trim it at the end) and then doubled back to double up the yarn. Then I threaded it onto a yarn needle. You can use this as your guide and precut a few pieces at a time if you like. I preferred not to precut too many at once, because it would get tangled. I hope that helps.
Hey! Do you think it would be too wonky, if I used a do weight for one stripe and a worsted weight for the other? Just really like the blue color in their dk weight and their cream in the worsted😂
It’s hard to say because I feel like there can be some differences in sizing even within DK and worsted weight. If your worsted weight seems a little on the thin side or your DK is on the thick side, it may work fine. You might need to adjust your gauge (maybe go up or down a hook size when switching between yarns) to make it work. If you try it, I would love to know how it goes.
is het geen Tartan vanwege het haken en weven / Zeer mooie deken ‘ en ik doe ook niet graag ! een Jas aan nog Veel haakplezier
Hello, is there a particular reason you went down so far from the hook size recommended by the yarn manufacturer?
The recommended hook size on yarn labels is pretty general information that doesn’t account for the gauge of any specific project. I sometimes use the recommended hook size as a starting point for figuring out what hook I want to use for my project. Ultimately, to get the sizing and look right, hook size can work with your natural tendencies to crochet too tightly or loosely compared to the pattern designer. The hook size I list is also a suggestion. It is important to work a test swatch, see if it matches the gauge I list, then go up (for looser) or down (for tighter) a hook size to help you get the same gauge if it doesn’t match mine. If I want tighter stitches I use a smaller hook. A larger hook for looser stitches. I hope that helps.
I did it! It’s beautiful 🙂
This is my first blanket, and first so huge project. Till now I have fun with creating amigurumi, but when I saw that blanket I thought: “I have to do that!” – for sure it is more usefull for me then the toys 😉 From now I will enjoy crocheting another projects sitting under that lovely blanket.
It would be great if it is possible to attached photos. It would be nice to see how the ready blanket looks in other hands, and maybe there would by different colours inspirations…
Might be helpful:
– I use Himalaya Everyday (100% akryl antypiling, 100g and 250 m in ball, suggested needle: 5)
– To crochet I used hook 3.00 mm
– My blanket has size: 148 cm x 98 cm
– I used 4 balls each colour (overall 8 balls)
Cheers from Poland
Hey, hope you’re doing well, am contemplating whether i should take up this or the ‘Button up Cardigan sweater’ to go with my current project (the basic SC stich beanie). Anyways, i have a 3.5mm hook and 4mm hook but not a 3.75 which do you recommend I use for this project with a size 4 yarn??
Hi Siri! Great question. I would make this throw blanket and use a 4 mm hook. The blanket may end up slightly bigger and maybe have a more open stitch look, but it should work just fine. The Button Up Cardigan Sweater uses two different hook sizes, both of which are much larger than what you mentioned, so I would skip that one until you can get those hooks.
I hope that helps. I would love to see your finished blanket if you share on social media. It makes me so happy that you’ve already enjoyed the SC Beanie and are coming back for another pattern!
hello, I did 223 chains followed directions but ended up with 107 DC instead of 110? when you start you DC into the 5th chain do you count the loop on your crochet hook
Hi Kathy. I don’t count the loop on my hook. I doubled checked my math and it should be 110. I’m not sure why you ended up with 107. I wish I had a better answer for you or that I could physically look at your blanket to help you troubleshoot. You can always direct message me on instagram (@deliacreates) and I can try to help that way.