Hi Elegance & Elephants readers!
I am so happy to be here! It was such a pleasure competing in Project Run & Play with Heidi. She is classy and oh so incredibly talented.
When she asked me to participate in this series, at first I was excited. Then…I couldn’t think of anything I wanted to knock off! For various reasons, either the limits of my sewing ability, or just because I am stubborn and like to do things my way, I had the hardest time coming up with something.
I finally decided on some suits for my boys. I have been dissatisfied with their church clothes for a long time, so I figured now was a good time to get going on making them something I like….just in time for the holidays too!
I found this cool suit from Indochino.
Indochino also happens to be running ads on Google right now, so it might look familiar. 🙂
I didn’t match it perfectly, but I got it as close as I could manage.
I used two Melly Sews patterns:
The Basic Blazer
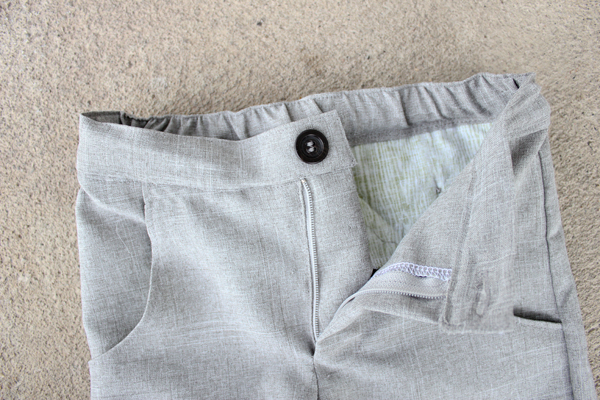
The Clean Slate Pants
Melissa shows you how to create working welt pockets and working zip flies. But don’t worry, it’s easy to follow along. She explains things clearly and uses lots of pictures. I highly recommend her patterns.
I added a welt pocket to the inside of the blazer, which not surprisingly, is a big hit with the boys. I added a homemade tag as well using some duck cloth and a fabric sharpie.
I decided to use three buttons for the front of the blazer because I like that look better.
I also sewed three non working buttons on the sleeves to mimic the sleeves in the inspiration.
Now I know my welt pockets are a bit sloppy. Please be kind. : / I keep telling myself I’ll look back at this post in a year secure in the knowledge that my welts have improved. Right? Hopefully. Suiting material is very slippery. If you a beginner at creating welts, I highly suggest using cotton!
Anyway…I added a flap like so.
I liked the two pocket look on the right side of the blazer but didn’t want to make both of them working welts. So I added a flap and sewed it down to look like the pocket below it.
For the pants, I slimmed the fit a bit more so they are skinny dress pants.
And…I have to say, each time I install a zip fly I feel like a super star. Melissa’s patterns rock!
Then, I added some working buttons to the back pockets like the inspiration.
After you create your welt opening, but before you attach the lining.
*Mark where you want your button hole to go.
*Make your button hole.
*Mark where the button needs to go on the pocket lining.
*Sew a button on that spot.
*Attach your lining as normal.
There you go!
To make the hem look more formal I used a machine blind stitch.
As for their shirts…store bought.
And for their ties:
The authentic bow tie is from my tutorial found here.
My tutorial also shows you how to tie a bow tie if you need instruction on that.
For Owen’s tie, I used this free skinny tie pattern from See Kate Sew:
I simply pieced some cotton solids together to get a striped pattern I liked and then shortened and slimmed the tie down a little to fit my child.
I found that in between the copyright text on the “back” part of the tie was the perfect spot to cut the length down.
One thing I didn’t anticipate is how thick it would get because I pieced the outer fabric together. If you want to attempt this, you’ll like want to omit the interfacing.
I don’t have a good way to compare the prices of the original and mine, since I knocked off a men’s suit; but to make two boy suits and ties it only cost about $35! The suiting material cost $18 at Joann (!!) and I still have a ton left over…I have plans for a skirt for me. Plus, I had all the buttons in my stash which helped reduce the cost even more. Sometimes sewing seems to cost more than store bought, and sometimes the savings are oh so sweet…
My lining fabrics are both from the Ribbon Retreat! They are well known for their ribbon but they have a great fabric selection. The thin black chevron is found here and the green wood grain is found here.
Well that’s a wrap. Thanks for having us over Heidi!


.jpg)


.jpg)
.jpg)


.jpg)


I hardly sew at all but I always enjoy your posts where you describe how you made clothes. You did a really great job on these suits. So many excellent details! And your models are cuties indeed. They look like a very fun handful.
oh my goodness!!!!! those are just adorable!!! i love love the green woodgrain on the inside! i think u did great, esp for $35!
These suits are amazing! I cannot believe you made them yourself. They look awfully cute running around in them. Can't wait for some little boys of my own. 🙂
These suits are so darling! I am so impressed! And now I'm inspired to make one for my little boy someday 🙂