Beanies are almost year round attire here in the PNW, so I try to create a new pattern each year to add to my collection.

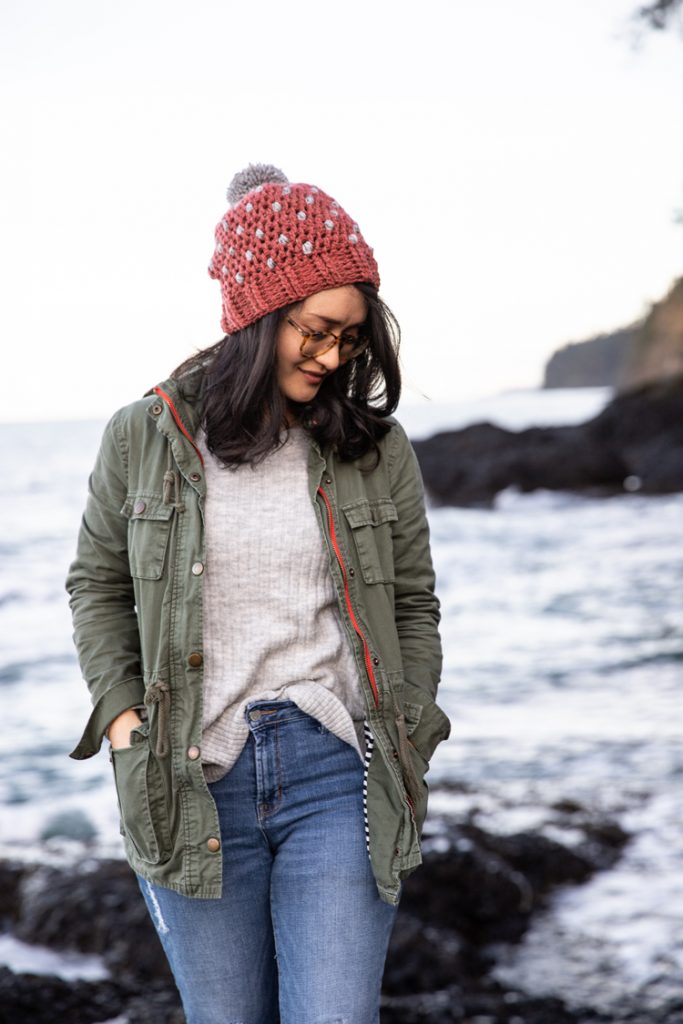
I call this one the puff dot crochet beanie, because it uses the puff or bobble stitch in a staggered dot pattern. I’ve set them in between taller double crochet stitches rather than tighter sc or hdc so that they are less pronounced and the end result is smoother.

I also worked out the kinks of the color change between the dots to get as clean as finish as possible, which I will explain in the tutorial before the pattern.
The hat is a little bit oversized so that it will fit a head as large as 23-24 inches. I have a 22 inch head and it fits me with some slouch. If you know me, you know I love me a slouchy beanie.
Okay, enough chit chat. Let’s make one! After I share the materials list, gauge, and abbreviations, I share a tutorial version of the pattern with detailed steps and photos. Just the pattern will be shared at the end.

MATERIALS
- About 250 yards of worsted weight or category 4 yarn*
- I/9.00 mm crochet hook
- Yarn needle
*If changing colors, you will need about 50 yards of a different color. I am being generous with yardage requirements. You will likely have some left over.
*I used Premier Everyday yarn in Terracotta Heather and Lion Brand Vanna’s Choice in Grey Marble for the dots.
GAUGE
4 x 4 inches = 10 dc stitches x 8 rows
ABBREVIATIONS
ch = chain
sl st = slip stitch
yo = yarn over
dc = double crochet
fpdc = front post double crochet
bpdc = back post double crochet
TUTORIAL + PATTERN
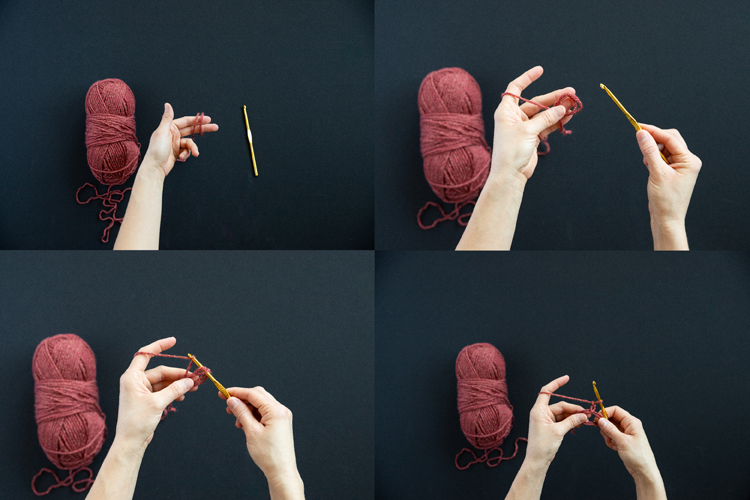
Foundation Round: Create a magic ring.
Wrap the end of your yarn loosely around two fingers, twice. Flip the circles of yarn to the side, insert your hook through the circles, hook the working yarn attached to the skein, and pull it through, chaining 3.
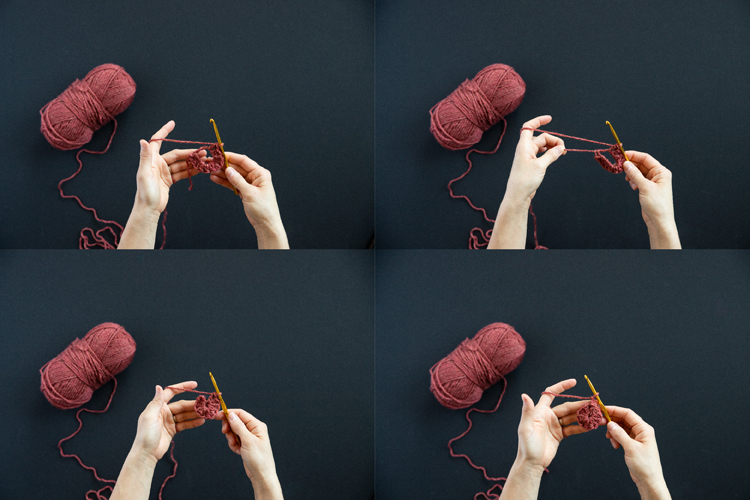
Dc twelve times around the stacked circles of yarn. Pull on the tail to cinch the stitches into a disk shape. Sl st to the top of the ch 3. You have your foundation round or round 1! Stitch count: 12, including ch 3.
Note: Any time you want to cinch this foundation circle tighter, simply pull on the tail and it will pull it closed…like “magic!” 😉
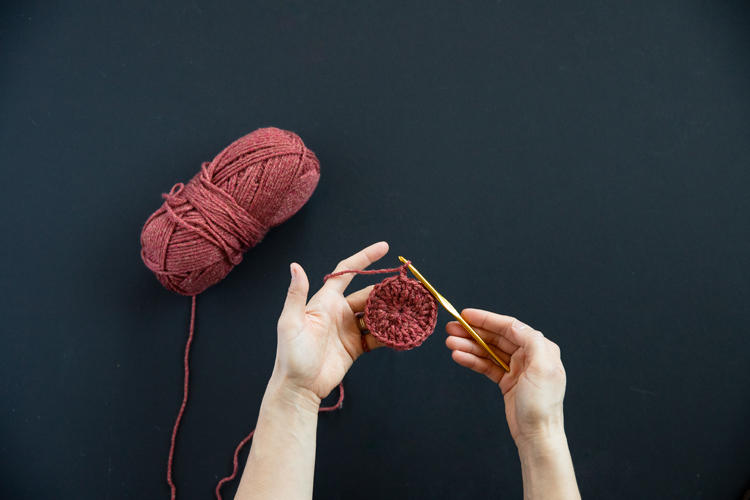
Round 2: Ch 3. Increase in this next round by working two dc stitches in each stitch. Sl st to the top of the ch 3. Stitch count: 24, including ch 3.
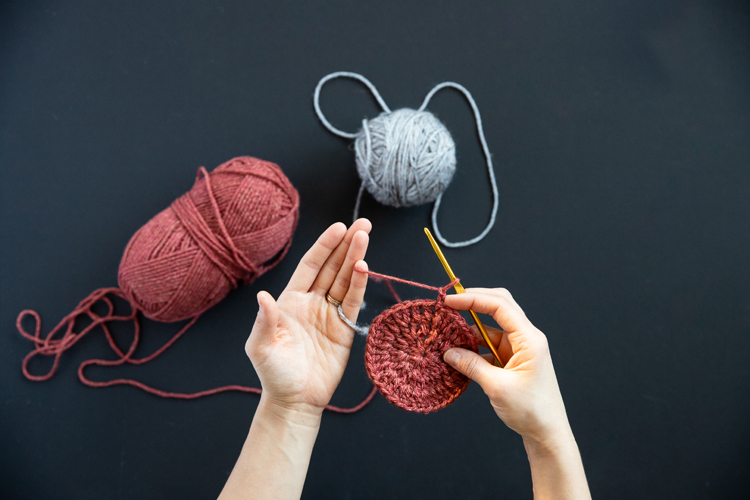
Round 3: Ch 3, 2 dc in same stitch, *dc, 2 dc in same stitch.* Repeat from * to * 22 times. Sl St into top of ch 3. Stitch count: 36, including ch 3.
Round 4: For this row we will still be increasing the size of the hat, while introducing the first row of puff stitches and color changing. Ch 3. Drop the red yarn and pick up the grey yarn.
Yarn over, insert hook into the next stitch, yo, insert in same stitch, yo, insert in same stitch. You should now have 6 gray loops and 1 red loop or a total of 7 loops on your hook.
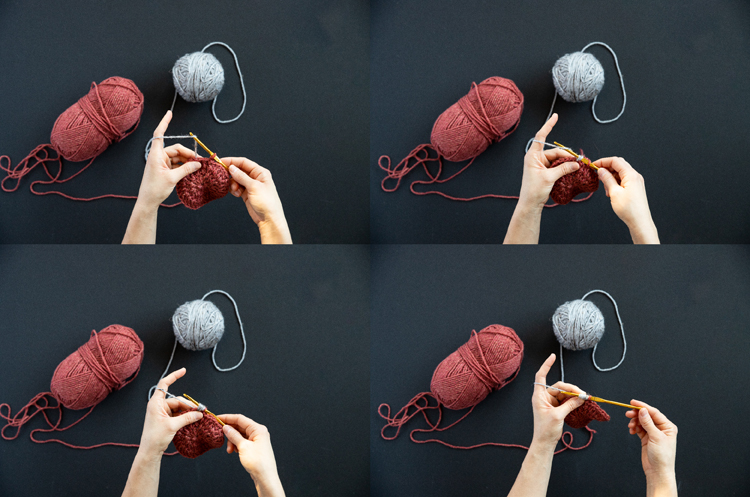
Drop the grey yarn and pick up the red. Yarn over and pull through all 7 loops. Work 2dc in the same stitch. Take care to slide the grey yarn along the curve of the circle as you work, so that you are crocheting over it and “carrying” it with you until you need it again.
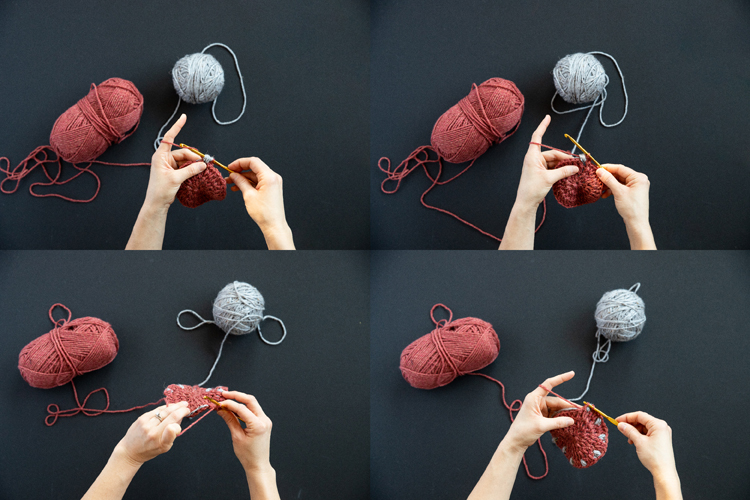
*Dc, puff stitch, 2 dc in same stitch.* Repeat from * to * ten more times. Sl st to the top of ch 3. Stitch count: 48, including ch 3.
Note: After the first puff stitch, each time you work a new puff stitch and switch to the grey yarn, drop the red yarn to the FRONT of your circle and crochet over it so that it is enclosed in the puff stitch.
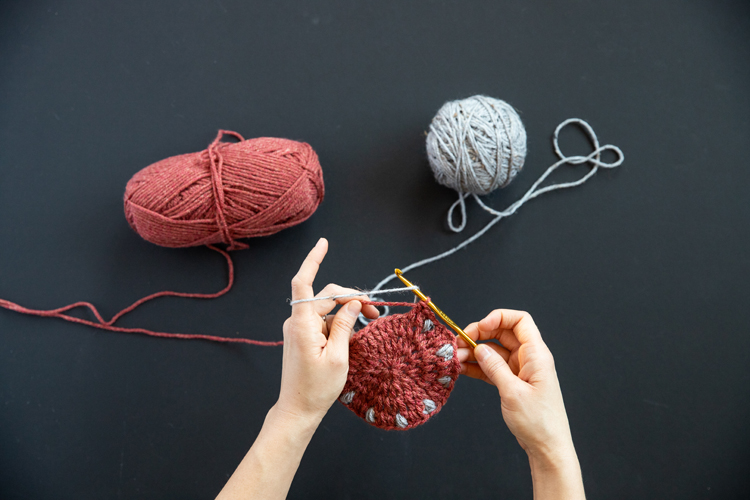
This helps prevent the two colors from getting tangled and it creates a cleaner finish.
Also note, that it is important to finish the puff stitch with the red yarn and not the grey yarn because this affects the final look of the beanie. The sides of your circle should always be the red or the main color of your beanie.
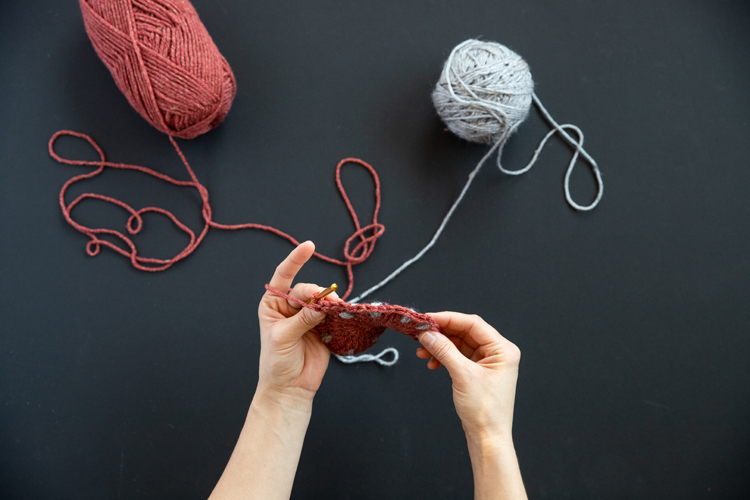
Round 5: Ch 3, dc ten times, 2 dc in same stitch, dc 11 times, 2 dc in same stitch, dc 11 times, 2 dc in same stitch, dc 11 times, 2 dc in same stitch, sl st to top of ch 3. Stitch count: 52, including ch 3. This round is worked in all red with no color change.
Sizing Tip: This increasing round is optional. If you want a smaller hat, do not include the 2 dc in the same stitches worked every 12th stitch. Going forward, you will also only work three dc in between each puff stitch. Either way, you need a final stitch count that is divisible by four.
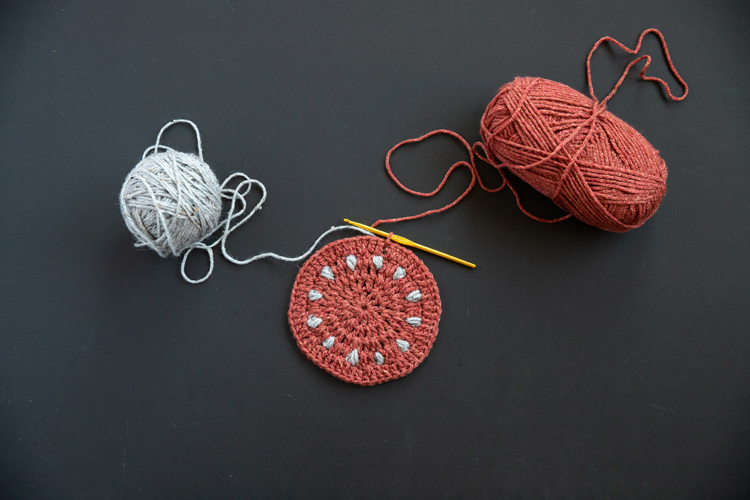
Round 6: Ch 3, dc 2 times, puff stitch, dc 3x, puff stitch, dc 3x, puff, dc 4x, puff, dc 3x, puff, dc 3x, puff, dc 4x, puff.* Repeat * to * one more time. Dc 3x, puff, dc 3x, puff, dc, sl st to top of ch 3. Stitch count: 52
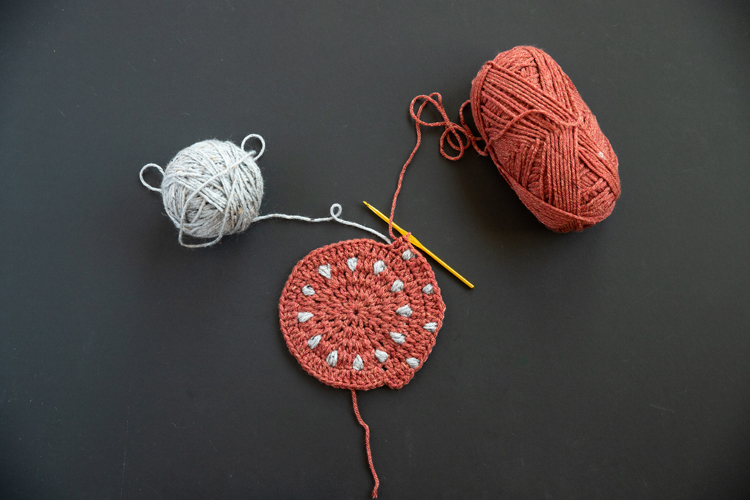
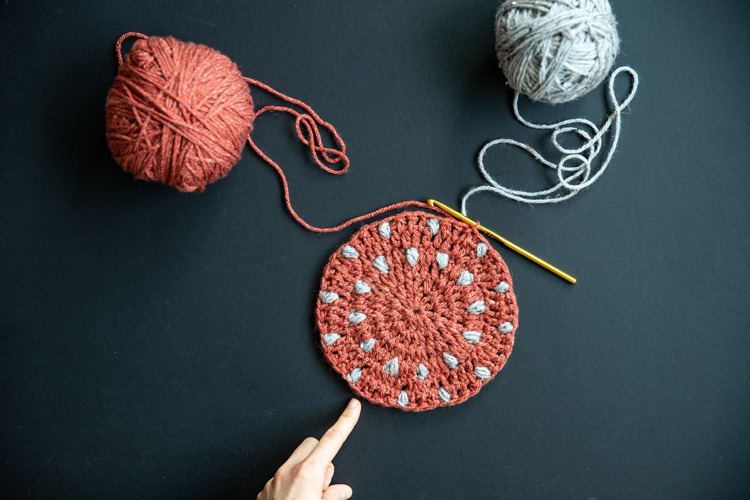
As you can see, there is a pattern of two sets of 3 dc and a puff stitch, and then 4 dc and a puff stitch. There is a round of dots, a round without dots, and then another round of dots that staggers between the previous round of dots.
As you move onto the next round without dots, you will leave the grey yarn behind. As you finish the round, pick the grey yarn back up with the last stitch in the round and with the sl st to the top of ch 3. That will prevent there from being big loops of grey yarn hanging from the wrong side of your hat.
Rounds 7-17: Please to the full pattern shared at the end of this post. There is no more increasing. You will work alternating rounds of puff stitches and just dc stitches.
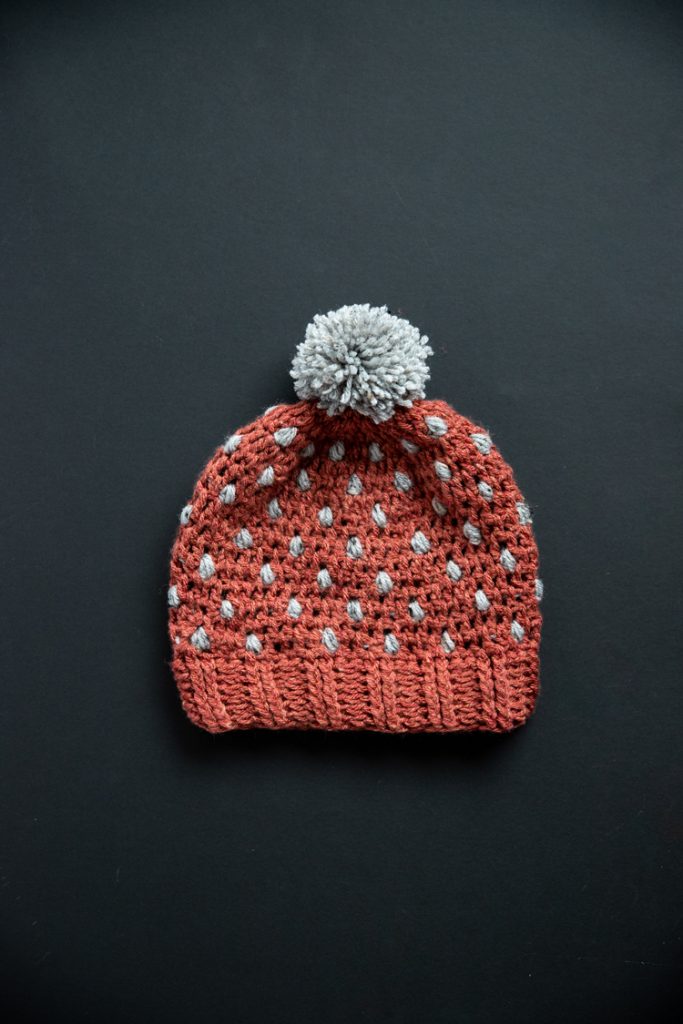
Rounds 18-23: These will create your brim. Again, refer to the pattern. For a tutorial on how to work front post and back post double crochet stitches to create the brim, refer to the video tutorial for my skip twist cabled crochet beanie. If you start it at about the 7 1/2 minute mark, it covers the brim. This brim works an alternating pattern of 2 fpdc to 2 bpdc, but the method is very similar.
Add a pom if desired. Believe me…I was sooo tempted to add leaves to the top of this when I realized I had unwittingly crocheted a strawberry hat. Ha!
Puff Dot Crochet Beanie PATTERN
Round 1: Create magic ring, ch 3 in ring, work 11 dc into ring, sl st to top of ch 3. Pull tail tight to close up circle. (12, including ch 3)
Round 2: Ch 3, 2 dc in each stitch. Sl St to top of ch 3. (24)
Round 3: Ch 3, 2 dc in same stitch, *dc, 2 dc in same stitch.* Repeat from * to * 22 times. Sl st into top of ch 3. (36)
Round 4: Ch 3, puff stitch, 2 dc in same stitch, *dc, puff, 2 dc in same stitch.* Repeat from * to * ten times. (48)
Round 5: Ch 3, dc ten times, 2 dc in same stitch, *dc 11 times, 2 dc in same stitch.* Repeat from * to * two more times. Sl st into top of ch 3. (52)
Round 6: Ch 3, dc 2 times, puff stitch, dc 3x, puff stitch, dc 3x, puff, dc 4x, puff, dc 3x, puff, dc 3x, puff, dc 4x, puff.* Repeat * to * one more time. Dc 3x, puff, dc 3x, puff, dc, sl st to top of ch 3. (52)
Round 7: Ch 3, dc in each stitch, sl st to top of ch 3. (52)
Round 8: Ch 3, dc, puff, *dc 3x, puff, dc 3x, puff, dc 4x, puff.* Repeat from * to * two times. Dc 3x, puff, dc 3x, puff, dc 2x, sl st to top of ch 3. (52)
Round 9: Repeat Round 7.
Round 10: Ch 3, puff, *dc 3x, puff, dc 3x, puff, dc 4x, puff.* Repeat from * to * two times. Dc 3x, dc 3x, sl st to top of ch 3. (52)
Round 11: Repeat Round 7.
Round 12: Ch 3, dc 3x, puff, *dc 3x, puff, dc 3x, puff, dc 4x, puff.* Repeat from * to * two times. Dc 3x, puff, dc 3 x, puff, sl st to top of ch 3. (52)
Round 13: Repeat Round 7.
Round 14: Ch 3, dc puff, dc 4x, puff, *dc 3x, puff, dc 3x puff, dc 4x, puff.* Repeat from * to * two times. Dc 3x, puff, dc, sl st to top of ch 3. (52)
Round 15: Repeat Round 7.
Round 16: Ch 3, puff, dc 3x, puff, dc 4x, puff, *dc 3x, puff, dc 3x puff, dc 4x, puff.* Repeat from * to * two times. Dc 2x, sl st to top of ch 3. (52)
Round 17: Repeat Round 7.
Round 18: Ch 3, *2 fpdc, 2 bpdc.* Repeat from * to * 11 times. 2 fpdc, 1 bpdc, sl st to top of ch 3. (52)
Rounds 19-23: Repeat Round 18.
Tie off and weave in ends. Add pom if desired.



Love this, I’ve made four in varoius colors already! Thank you!
That makes me SO happy to hear! I am stoked that you like the pattern!
Ooh I think hot pink with black dots and a lime green band or poof will make this a fun watermelon knit for my daughter! Thank you so much for sharing
Cute idea! So glad you like the pattern!
I cant wait to make this hat and then make one for my baby too! Thank you so much for sharing the pattern.
So happy you like the pattern! Enjoy!